Setting Up a Quiz
Step 1: Create a New Quiz
To start creating a new quiz, navigate to the Quizzes tool in Brightspace.
- Go to your course site and click Assessment in the course navbar.
- Select Quizzes from the dropdown menu.
- On the next page, click ‘New Quiz’.
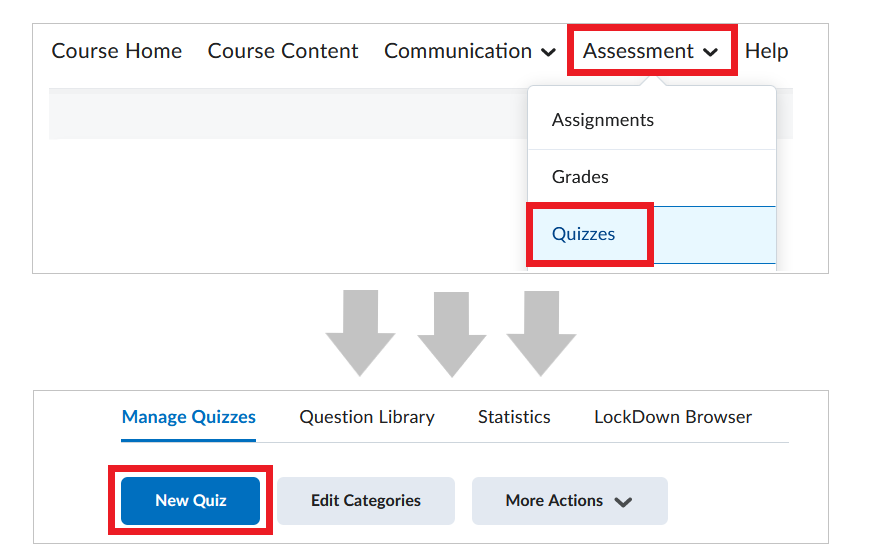
- The quiz creation window will open.
Step 2: Configure Quiz Settings
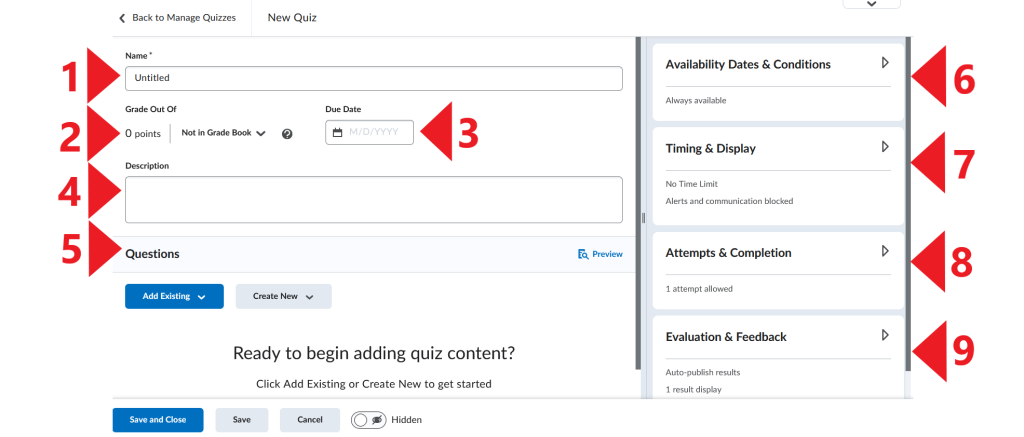
In this section, you can find details on each setting numbered in the image above. Click each box to expand.
> 1. Quiz Name
Give your quiz a title.
If you want to create a corresponding grade item in the Brightspace grade book, clicking Save at the bottom of the window will automatically create a grade item with the same name as the quiz.
> 2. Grade Out Of & Link to the Grade Book
The default setting for new quizzes is ‘Not in Grade Book’.

Consider the two scenarios below and proceed accordingly:
- If the quiz is not a part of your course evaluation, and you do not want to link it to the grade book (e.g., it is only a practice quiz), leave the ‘Not in Grade Book’ setting in place.
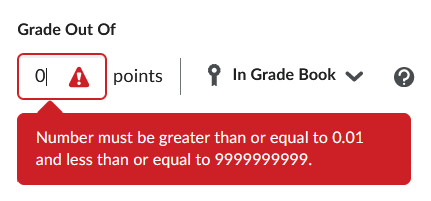
NOTE: If you leave ‘Not in Grade Book’ selected, the ‘Grade Out Of‘ box will stay ‘locked’, i.e. you will not be able to enter the point value for the quiz manually. The number will change automatically once you start adding questions to the quiz, and it will reflect the total number of points available to score.
- If the quiz is part of your course evaluation, and you do want to link it to the grade book for automatic grade transfer, click the downward arrow next to ‘Not in Grade Book’. Two options will appear.
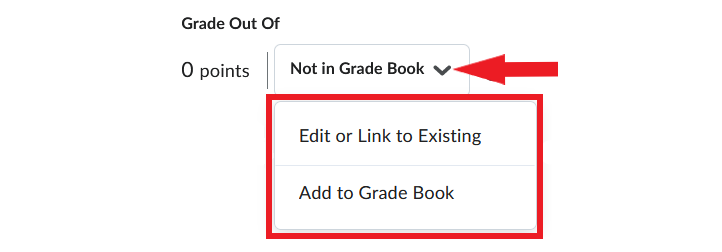
OPTION 1: ‘Edit or Link to Existing‘ – Select this option if your Brightspace grade book is already populated with grade items. In the window that pops up, select ‘Link to an existing grade item‘ and choose the grade item to which you want to link the quiz from the dropdown menu. Then click OK.
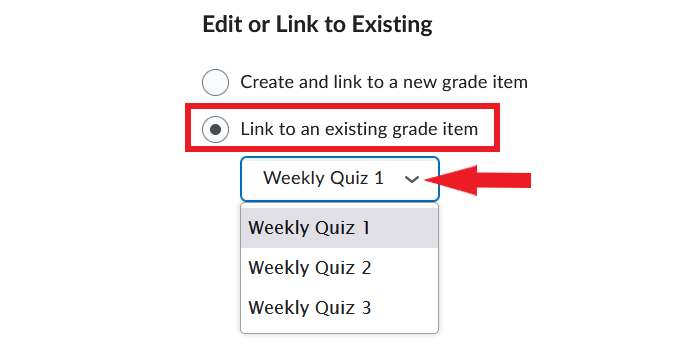
NOTE: The ‘Grade Out Of‘ field will now display the same point value as the grade book item to which it has been linked.
OPTION 2: ‘Add to Grade Book‘ – Select this option if your Brightspace grade book does not yet contain a corresponding grade item. Selecting this option will prompt you to enter the point value for the quiz in the ‘Grade Out Of‘ field. This value will apply both to the quiz and to the grade book item.
Once you click Save or Save & Close at the bottom of the quiz creation windown, a grade item with the same name as your quiz will be created in the grade book.
> 3. Due date
You can set a Due Date for your quiz, i.e. the date and time when you expect students to complete the quiz. The Due Date will be visible in the course calendar in Brightspace. After that date, students will still be able to access and complete the quiz, but their submissions will be flagged as late.
NOTE: Due Date is for information purposes only. To restrict access to a quiz before and/or after a certain date, set a Start and End Date under ‘Availability Dates & Conditions‘ on the quiz creation page.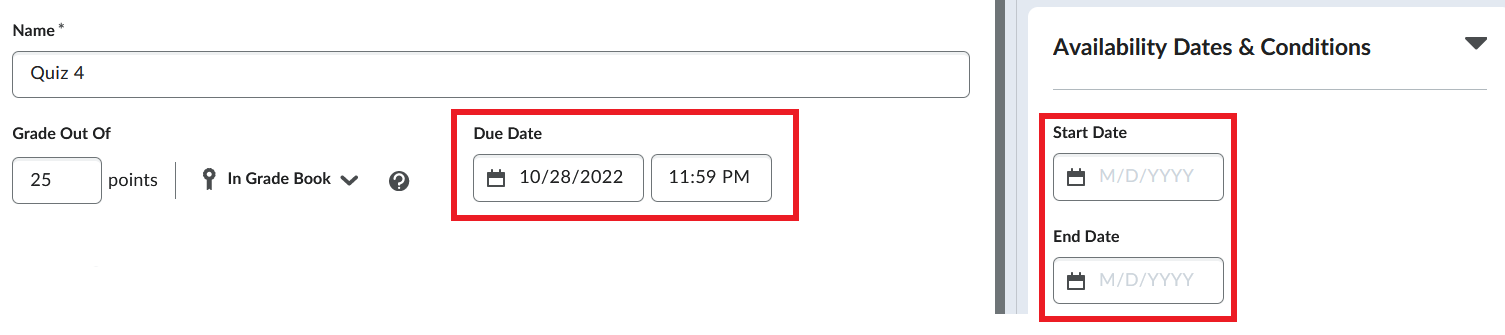
> 4. Description
Clicking the Description field opens a text box where you can enter instructions for the quiz.
For more information on using the Brightspace HTML editor, please visit our resource on this topic.
> 5. Questions
For information on available questions types and how to create them, please refer to other pages in this resource available in the sidebar menu.
> 6. Availability Dates and Conditions
‘Availability Dates and Conditions‘ are located in the top right corner of the quiz creation window. Click to expand the box and view all available settings.
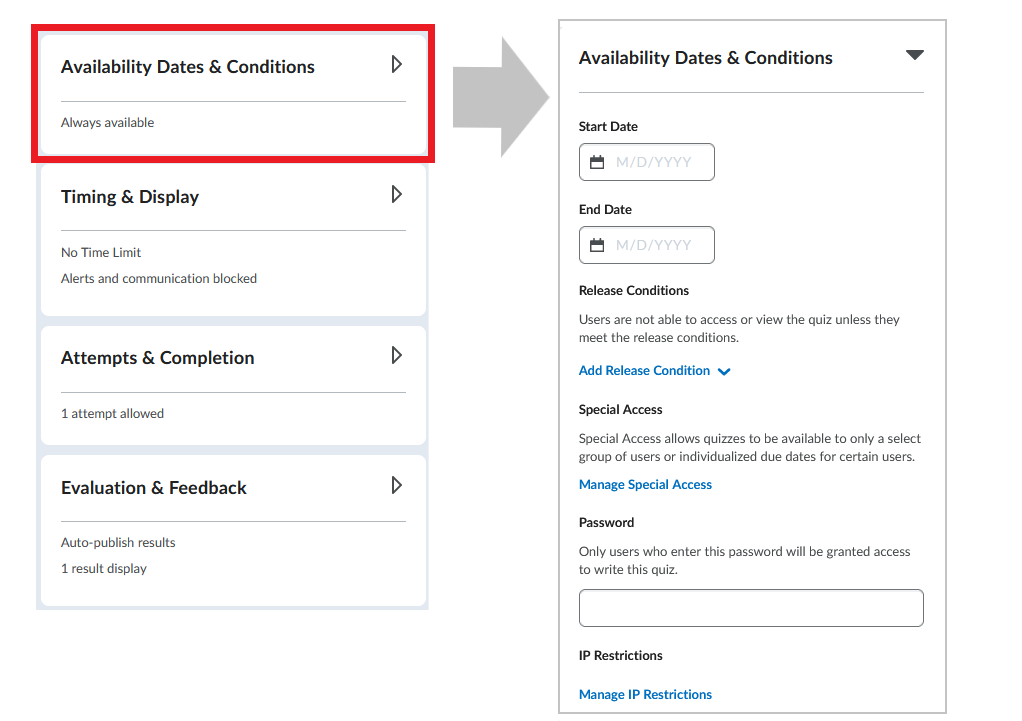
In this section, you can set the following quiz parameters:
- Start Date (and Time) – This setting controls when the ‘Start Quiz!’ button should become available to students. Until then, students can see the Start Date in the course calendar, but cannot begin the quiz.
- End Date (and Time) – This setting controls when the ‘Start Quiz!’ button should become unavailable to students.
NOTE: The Start and End Dates set for a quiz are unrelated to the amount of time students have to complete the quiz. These dates only control the time interval in which students can begin the quiz. If a student starts the quiz one minute before the End Date/Time, they will still have the entire time allotted for the quiz in the Timing & Display section.
Consider Due Date, Start and End Dates, and Timing carefully. For example, if you want to set up a quiz for a typical 50-minute lecture period, you could choose:
Due Date: 2:50 PM (quizzes submitted after 2:50 PM will be submitted but flagged as late)
Start Date: 2:00 PM (students can start the quiz any time between 2:00 PM and 2:50 PM)
End Date: 2:10 PM (after 2:10 PM students will not be able to start the quiz)
Enforced time limit: 50 minutes (each student will have 50 minutes to complete the quiz, regardless of then they started)
- Release Conditions – For information on release conditions, please visit this Brightspace resource.
- Special Access – You can adjust quiz configurations for students with accommodation requests or those who require an alternate submission date/time.
- Password – You can set a password for the quiz as an additional security measure. Most often, the instructor would display this password in the room where the quiz is taking place.
- IP Restrictions – You can add multiple IP address ranges to ensure that users can only access a quiz from IP addresses in the specified IP address ranges.
> 7. Timing & Display
Click the ‘Timing & Display‘ box on the right to expand and view all settings available here.
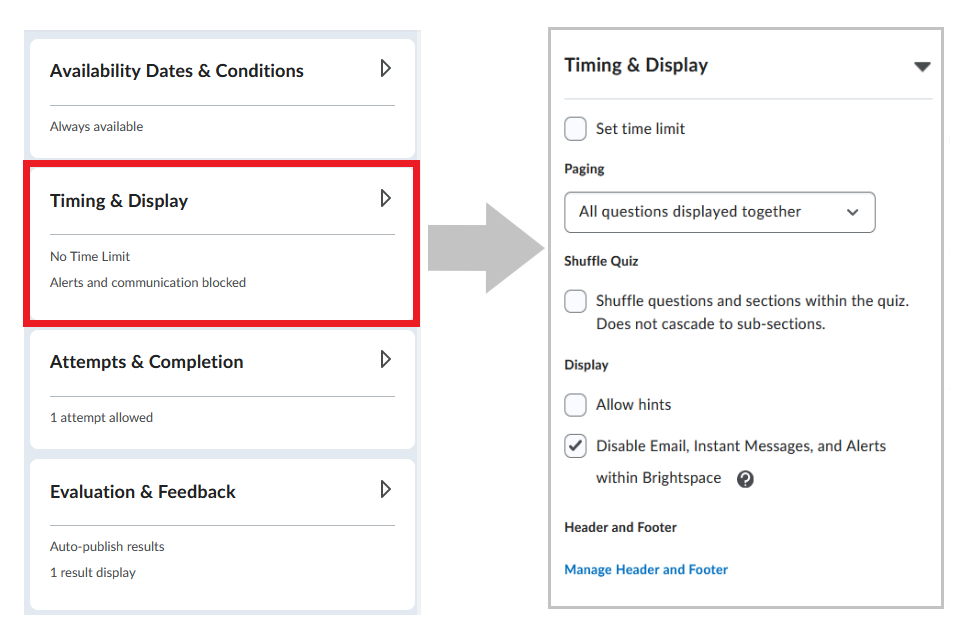
In this section, you can set the following quiz parameters:
- Set Time Limit – By default, this option is unselected. If this is a practice quiz, you may wish give students unlimited time to complete it. Otherwise, select ‘Set Time Limit‘, and you will be prompted to enter the Time Limit for the quiz and, if applicable, adjust Timer Settings.
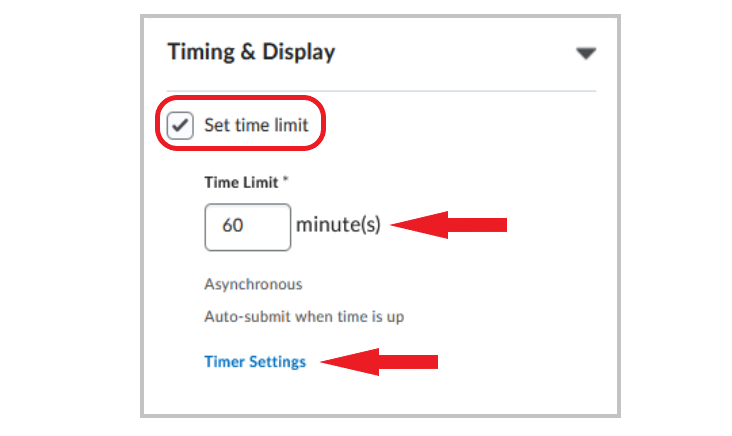
Clicking Timer Settings will cause a ‘Timing’ window to appear. Here, you can choose:
- whether the quiz should be synchronous or asynchronous, and
- what should happen to the quiz when a student reaches the set time limit. The options are:
- Automatically submit the quiz attempt (selected by default) – When a student reaches the time limit, the quiz will be submitted automatically.
- Flag as “exceeded time limit” and allow the learner to continue working – Students can continue working on the quiz after reaching the time limit, but their submissions will be marked as late.
- Do nothing: the time limit is not enforced – Students have unlimited time to complete the quiz.

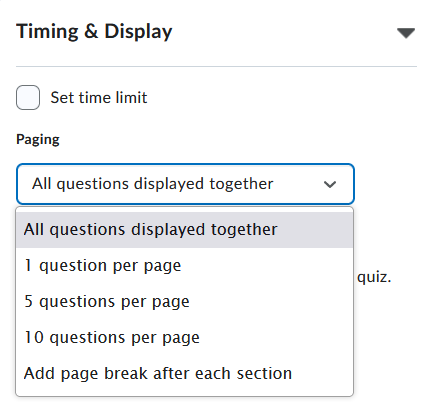
- Paging – you can decide how many questions per page you want students to view when taking the quiz:
- All questions displayed together (default)
- 1 questions per page
- 5 questions per page
- 10 questions per page
- a separate page for each quiz section (if your quiz is divided into sections)
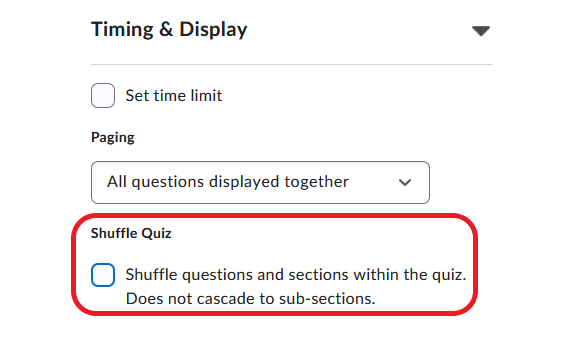
- Shuffle Quiz – this setting randomizes the order of questions in the quiz, so each student will have a different version of the quiz.
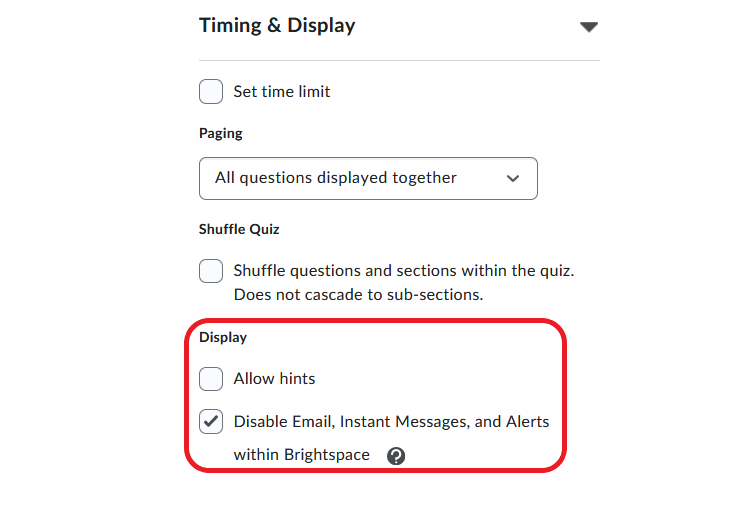
- Display – this setting allows you to control if students can:
- view hints, if you have previously created them for your quiz
- access Brightspace email, Instant Messages, and alert functions while they are completing the quiz (not recommended for practice quizzes).
- Header and Footer – You can opt to enter messages that will be displayed at the top and bottom of every page in the quiz.
> 8. Attempts & Completion
Click the ‘Attempts & Completion‘ box on the right to expand and view all settings available here.
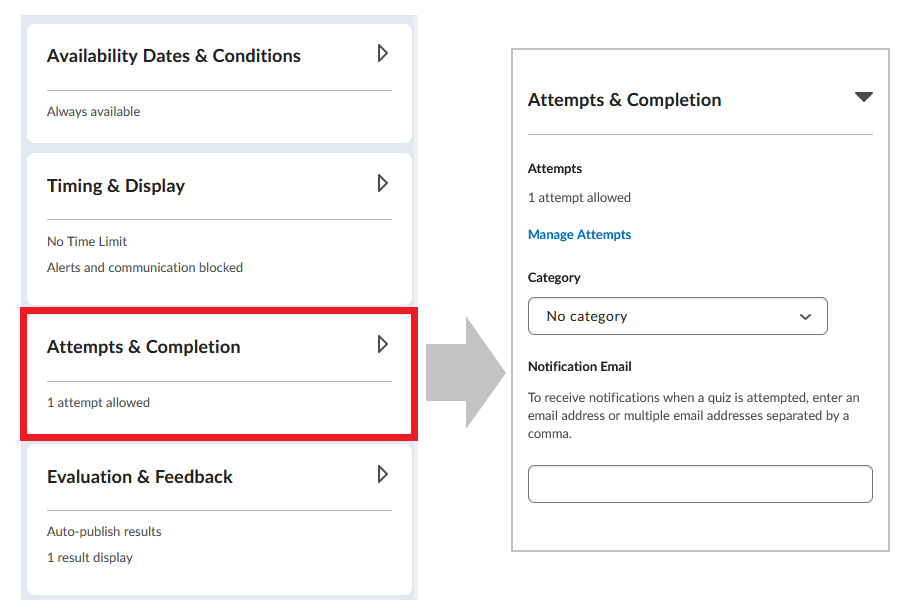
The options you can set in this section are:
- Attempts – The number of times students can take the quiz. If you allow more than one attempt, options for calculating the overall score will appear (highest/lowest score? average of all scores? etc.)
- Category – If your course involves multiple quizzes, you may consider organizing them into categories.
- Notification Email – You can opt to receive an email each time a student completes a quiz (not recommended).
> 9. Evaluation & Feedback
Click the ‘Evaluation & Feedback‘ box on the right to expand and view all settings available here.

In this section, you can specify whether to: when the quiz scores should be sent to the grade book, whether or not to display questions and answers to students etc.
- Auto-publish attempt results immediately upon completion – If the quiz is linked to a grade book item, selecting this box will allow students to see their quiz score immediately after they complete it. NOTE: This applies only to the auto-graded portion of the quiz, not to questions that need to be graded manually such as ‘Written Response’.
- Synchronize to grade book on publish – With this option selected, any changes or updates to the quiz score will be automatically updated in the grade book.
- When published, display to learners – you can customize what the students will be able to see once the quiz results are published (if they can view scores per attempt, correct/incorrect questions, correct/incorrect answers etc.)
You can also link the quiz to your Learning Objectives. For information on creating learning objectives, please visit this Brightspace resource.
NOTE: Once you configure and save your quiz, you can return to it and modify the settings at any time.