Creating Questions Directly in a Quiz
This page provides step-by-step instructions for creating every question type available in Brightspace quizzes.
NOTE: Once you save your quiz, you can return to it and add, delete or edit the questions at any time.
Getting Started
Creating any question type in a quiz always begins the same way:
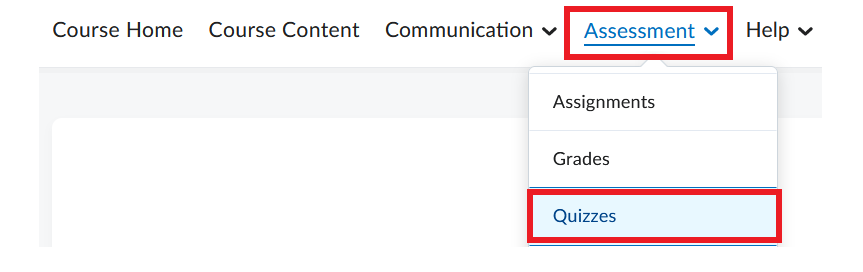
- In your Brightspace course site, click Assessment in the course navbar and select Quizzes from the menu.
- Create a new quiz by clicking ‘New Quiz‘ or open an existing quiz.
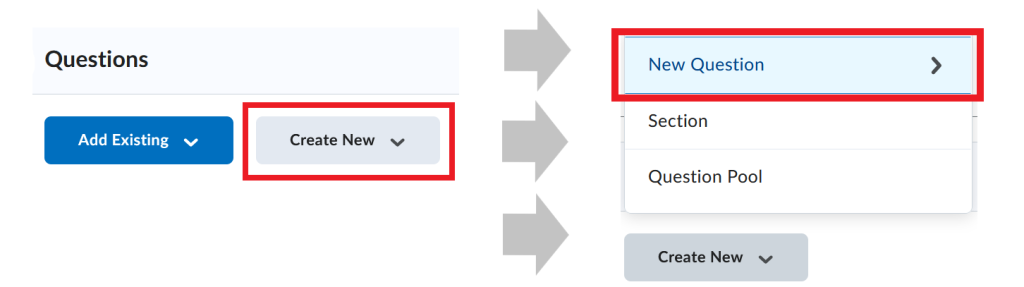
- At the bottom of the quiz window, click ‘Create New‘ and select ‘New Question’ from the menu. A list of available question types will open. Select the type you want to create and proceed with instructions for that question type located below.
Creating Different Question Types
Click the items below for detailed instructions on creating each question type.
> Create a Multiple Choice question (M/C)
Multiple choice questions present a statement or question with a list of possible answers. Learners must choose the best possible answer – only one answer for each multiple choice question.
If you create a multiple choice question that has more than one possible answer, you can assign different weights depending on the level of correctness of each possible answer.
For example, if two answer choices out of five options are accepted as correct, both can be weighted 100% and the other three options can be weighted at 0%. If all five answer choices are accepted as correct but some are more correct than others, each can be weighted differently with the most correct answers weighted more than the others (see Custom Weights* below).
To create a multiple choice question:
- Enter the question in the Question Text field.
- Enter all possible answers.
- Select the correct answer.
- Optional: Click Add Answer to add more possible answers.
- If applicable, modify the point value for the M/C question in the Points field (the default is 1 point).
- Optional: Click Options to add: Feedback, a Hint, a Short Description (not visible to students), Custom Weights*, Enumeration.
- Optional: Select Randomize answer order if you want the answer choices to appear in a different order for each student.
- Click Save, Save and New, or Save and Copy at the bottom of the page.
> Create a True or False question (T/F)
True-or-false questions present a statement, and learners must determine if that statement is correct or incorrect.
- Enter the question in the Question Text field.
- Select the correct answer (either True or False).
- If applicable, modify the point value for the T/F question in the Points field (the default is 1 point).
- Optional: Click Options to add: Feedback, a Hint, a Short Description (not visible to students), and Enumeration.
- Click Save, Save and New, or Save and Copy at the bottom of the page.
Video Instructions
The video below illustrates how to create a true-or-false question.
> Create a Fill-in-the-Blanks question (FIB)
Fill-in-the-blanks questions present an incomplete sentence, statement, phrase, list, or key terminology. Students are required to fill in one or more missing words in the blank space(s) in the statement, phrase etc.
NOTE: As a best practice, D2L recommends that answers in blank fields be no more than one or two words to ensure auto-grading accuracy.
- Optional: Give the question a title in the Title field.
- If applicable, modify the point value for the question in the Points field (the default is 1 point).
- Select the difficulty level of the question in the Difficulty dropdown menu (on a scale from 1 to 5).
- Optional: Click Insert an Image if you want to add an image to the question. You can enter Alternative Text for the image.
- In the Question Text section enter the following:
- In Text #1, enter the first part of the sentence/statement students will be asked to complete.
- In Blank #1, enter the answer (1 or 2 words) you want students to provide. If more than one answer is possible, click ‘Add Answer‘. Add all possible correct answers.
- Optional: In Text #2, enter the second part of the sentence/statement.
NOTES:
1. You can have as many/few text fields and blanks as needed. Use ‘+Add Blank/Text‘ to add, and trash can icons to delete them.
2. The sequence of your text fields and blanks is the same sequence that will be displayed to students.
- Enter the weight for each possible Answer in the Weight (%) box.
NOTES:
1. The total weight of your answers in each Fill-in-the-Blanks question should equal 100% (e.g., you can have one answer worth 100%, two answers worth 50% each, three answers worth 50%, 25%, and 25% etc.).
2. Some answers may be more correct than others. In that case, you can set different weights for the answers, as long as the total weight of most correct answers is still 100%.
- Optional: Add a Hint and Question Feedback.
- Click Save, Save and New, or Save and Copy at the bottom of the page.
Video Instructions
The video below illustrates how to create a fill-in-the-blanks question.
> Create a Multi-Select question (M-S)
Multi-select questions require learners to identify one or more correct answers in a list of possible answers. Unlike multiple choice (MC) questions, multi-select questions allow students to select more than one answer.
- Enter the question in the Question Text field.
- Under Answers, enter all possible answers. (You can add more answer choices by clicking Add Answer. You can delete answer choices by clicking X next to each answer box.)
- Select the correct answers.
- Optional: Select Randomize answer order if you want the answer choices to appear in a different sequence for each student.
- If applicable, modify the point value for the question in the Points field (the default is 1 point).
- Determine how you want to assign points to answers by opening the ‘How are points assigned to blanks?‘ menu and choosing the most suitable option. (For more information on each option, click ‘Which grading method should I choose?‘ on the screen).
- Optional: Click Options to add: Feedback, a Hint, a Short Description (not visible to the student), and Enumeration.
- Click Save, Save and New, or Save and Copy at the bottom of the page.
Video Instructions
The video below illustrates how to create a multi-select question.
> Create a Matching question (MAT)
Matching questions require students to choose from a set of possible match choices from dropdown lists and correctly pair them with related items. This question type enables you to assess users’ recognition of information and demonstrate comprehension of specific relationships.
NOTE: ‘Matches’ are the statements you create, and ‘choices’ are the options that students choose from to match each statement. Matches are randomized for quiz-takers.
- Optional: Give the question a title in the Title field.
- If applicable, modify the point value for the MAT question in the Points field (the default is 1 point).
- Select the difficulty level of the question in the Difficulty dropdown menu (on a scale from 1 to 5).
- Enter the question in the Question Text field.
- Optional: Click Insert an Image if you want to add an image to the question. You can enter Alternative Text for the image.
- Choose what grading option you want to apply:
- Equally weighted: Students earn points for each correct answer they select, up to the total point value of the question.
- All or nothing: Students will only get full points if they select all correct answers and no incorrect answers. Missing any correct answers or selecting any incorrect answers will result in a score of zero.
- Right minus wrong: A student’s score is calculated by adding the number of correct answers and then subtracting the number of incorrect answers they choose. A negative score is not possible.
- Enter the Choices.
- Enter a Match for each of the Choices — pay attention to the numbering to be sure that they are matched correctly.
- Optional: Add a Hint and Question Feedback.
- Click Save, Save and New, or Save and Copy at the bottom of the page.
Video Instructions
The video below illustrates how to create a matching question.
> Create an Ordering question (ORD)
Ordering questions require learners to arrange a series of items into a correct sequence or order.
- Optional: Give the question a title in the Title field.
- If applicable, modify the point value for the question in the Points field (the default is 1 point).
- Select the difficulty level of the question in the Difficulty dropdown menu (on a scale from 1 to 5).
- Enter the question in the Question Text field.
- Optional: Click Insert an Image if you want to add an image to the question. You can enter Alternative Text for the image.
- Choose what grading option you want to apply:
- Equally weighted: Students earn points for each correct answer they select, up to the total point value of the question.
- All or nothing: Students will only get full points if they select all correct answers and no incorrect answers. Missing any correct answers or selecting any incorrect answers will result in a score of zero.
- Right minus wrong: A student’s score is calculated by adding the number of correct answers and then subtracting the number of incorrect answers they choose. A negative score is not possible.
- Add items for students to order in the Value fields. (To add more items, click + Add Item. To delete items, click the trash icons.)
- If necessary, adjust the order of the values by using the Correct Order dropdown menu. Note that the first value in the correct order should be “1”.
- Optional: Add a Hint and Question Feedback.
- Click Save, Save and New, or Save and Copy at the bottom of the page.
Video Instructions
The video below illustrates how to create an ordering question.
> Create an Written Response question (WR)
Written response questions require learners to write detailed answers in response to open-ended questions. You can enable users to respond in multiple sentences, paragraphs, or mathematical explanations and calculations. Users can also respond in HTML code.
NOTE: HTML code is sometimes stripped from saved written responses if a learner refreshes the page while taking the quiz. As a best practice, encourage users to save a version of their HTML response locally in case they need to refresh the page.
Written response questions cannot be auto-graded. When students complete a written response question, they automatically receive a score of ‘0’, and it displays as incorrect in the ‘Submission View’. You have to manually grade each answer and enter a score to the answer.
- Enter the question in the Question Text field.
- Optional: Enable HTML editor for student responses.
- If applicable, modify the point value for the question in the Points field (the default is 1 point).
- Optional: Add Feedback a Hint, a Short Description, an Answer Key, a Custom Response Box Size, or Initial Text. If you need students to submit a filled-in table, make sure you provide the table for them to fill in as the ‘Initial Text’.
- Click Save, Save and New, or Save and Copy at the bottom of the page.
Video Instructions
The video below illustrates how to create a written response question.
> Create an Short Answer question (SA)
Short-answer questions require learners to create one word or brief sentence answers in response to open-ended questions.
- Enter the question in the Question Text field.
- Enter the Answers for Blank #1.
- From the abc dropdown menu, select the auto-grading option for the answer:
- Text – the answers will be scored as correct regardless of whether upper and lower case letters are use correctly
- Case-Sensitive Text – upper and lower case letters have to be used correctly for the answer to be auto-graded as correct, or
- Regular Expression (click here for more information).
- If you want to add more blanks, click Add Blank and enter your answer(s) and the auto-grading option.
- If applicable, modify the point value for the question in the Points field (the default is 1 point).
- If you have more than one blank, choose one of these options from the drop down list: How are points assigned to blanks?
- If you have more than one blank, choose one of these options from the drop down list:
- Click Save, Save and New, or Save and Copy at the bottom of the page.
> Create an Arithmetic question (2+2)
Arithmetic questions enable you to assess students’ knowledge and comprehension of mathematics and number theory. You can ensure each student receives a unique question by including variables enclosed with curly braces that randomly generate numbers within the problem. For example, if you set variables x, y, and z with a Min 1 to Max 5 number range in 1-step increments, the question “You have {x} green marbles, {y} red marbles, and {z} blue marbles. How many marbles do you have in total?” will randomly generate a rational number (1, 2, 3, 4, 5) for {x}, {y}, and {z}.
In arithmetic questions, use answer precision to limit the number of acceptable decimal places allowed in a response. You can require that correct answers contain a specific number of decimal places.
- Optional: Give the question a title in the Title field.
- If applicable, modify the point value for the question in the Points field (the default is 1 point).
- Select the difficulty level of the question in the Difficulty dropdown menu (on a scale from 1 to 5).
- Enter the question in the Question Text field. Enclose variables in curly braces { }.
- Optional: Click Insert an Image if you want to add an image to the question. You can enter Alternative Text for the image.
- Enter the formula that is required to generate a solution — use the variables enclosed in { } per the problem text.
- Refine the answer criteria.
- Answer precision — set the acceptable number of decimal places for the answer
- Tolerance — indicate whether you will accept near accurate, estimated, or rounded answers
- Enter the variables for the question — give each variable a Name, a Min value, a Max value, the number of Decimal Places for the variable, and the Step value (increment amount for the variable).
- Optional: Add a Hint and Question Feedback.
- Click Save, Save and New, or Save and Copy at the bottom of the page.
Video Instructions
The video below illustrates how to create an arithmetic question.
> Create a Significant Figures question (x10)
Significant-figures questions require students to answer in scientific notation and provide solutions that contain a specified number of significant figures. Math and science courses commonly use this question type. You can ensure each respondent receives a unique question by including variables enclosed with curly braces that randomly generate scientific notations within the problem.
- Optional: Give the question a title in the Title field.
- If applicable, modify the point value for the question in the Points field (the default is 1 point).
- Select the difficulty level of the question in the Difficulty dropdown menu (on a scale from 1 to 5).
- Enter the question in the Question Text field. Enclose variables in curly braces { }.
- Optional: Click Insert an Image if you want to add an image to the question. You can enter Alternative Text for the image.
- Enter the formula that is required to generate a solution — use the variables enclosed in { } per the problem text.
- Enter the variables for the question — give each variable a Name, a Min value, a Max value, the number of Decimal Places for the variable, and the Step value (increment amount for the variable).
- Optional: Add a Hint and Question Feedback.
- Click Save, Save and New, or Save and Copy at the bottom of the page.
Video Instructions
The video below illustrates how to create a significant-figures question.
> Create a Multi-Short Answer question (MSA)
Multi-short-answer questions require students to answer a multi-solution question and input their answers into individual input boxes. Students’ answers are checked against each possible answer stored in the answer fields. D2L recommends that the required number of answers corresponds with the number of input boxes provided.
An MSA question’s maximum point value is reflected by a 100% weight. As a best practice, D2L recommends that each possible answer’s weight calculation equals 100% divided by the number of answers required by the question.
Multi-short-answer questions differ from short-answer (SA) questions in that the multi-short-answer question enables you to create multiple answer boxes which all relate to one answer set. For example, the question “Name 3 state capitals” displays three input boxes to users. Each answer users submit is checked against 51 possible correct answers stored in the answer fields and each answer field has a weight of 33.3%.
- Optional: Give the question a title in the Title field.
- If applicable, modify the point value for the question in the Points field (the default is 1 point).
- Select the difficulty level of the question in the Difficulty dropdown menu (on a scale from 1 to 5).
- Optional: Click Insert an Image if you want to add an image to the question. You can enter Alternative Text for the image.
- Enter the number of input boxes for the answers — set the box size using the Rows and Columns dropdown menus.
- Add all possible answers, their corresponding weight, and the evaluation method. Note that the number of answers does not have to match the number of input boxes.
- Optional: Add a Hint and Question Feedback.
- Click Save, Save and New, or Save and Copy at the bottom of the page.
When finished, click Save and Close at the bottom of the page.
For additional information about question types in Brightspace quizzes, please refer to this Brightspace resource.