Scheduling in Webex
NOTE: Before you can start using Webex in Brightspace, you must first request a Webex account from Memorial’s Information Technology Services and complete the Webex-Brightspace integration process.
Scheduling Class Sessions
You can schedule virtual meetings in Webex either through your Webex dashboard or through Brightspace (after you complete the Brightspace-Webex integration process). For virtual classroom, using Webex integrated with Brightspace is recommended as it provides a few advantages for scheduling:
- Students are automatically added and removed from the invitee list based on their course registration status;
- The Join link for students is always available within Brightspace in the same location – no need to share links and passwords;
- You can easily set up recurring sessions;
- Your recordings automatically appear in Brightspace for your students to access.
For information about how to schedule Webex meetings, click on the items below to expand.
> Scheduling from within Brightspace
Before you can use the Brightspace integration, you must enable it within your course. Visit our integration page for more information.
On the Virtual Meetings tab in the Webex integration, select New Meeting. You will be brought to the New Meeting setup page. From here you can enter the details of your meeting.

Meeting details
- Name. Enter a descriptive name of the meeting.
- Meeting date. Select the date and time of your meeting.
- Duration. Select the duration of your meeting. Note: Webex will not necessarily shutdown your meeting if you exceed the duration. This is mostly for scheduling purposes.
- Choose a Host Center. Choose the host that best fits your needs for your meeting. The main difference between Meeting and Event is the number of potential participants. Events can support up to 3000 participants. Events is also geared toward broadcasting sessions whereas Meetings is geared toward being more interactive. Training has some learning tools(Breakout rooms) that are missing from the others.
- Recurrence. You can set your meeting to reoccur Daily, Weekly and Monthly at the meeting date or time. This feature is useful for frequent meetings. If you set recurrence, the meeting space will persist for you and your participants.
- Ending. If you set your meeting to reoccur, you will need to specify a end date.
Once you have the details entered, select Create Meeting. Your new meeting will appear in the Upcoming meetings section of the Virtual Meetings tab.
> Scheduling from the Webex portal
Your Dashboard is located at https://mun.webex.com. From your Dashboard, select the Schedule button.
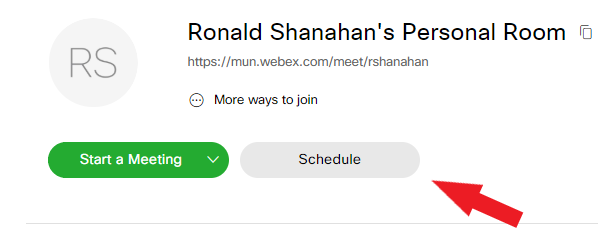
You will be directed to a page where you can fill out the details of your meeting(s). Please review the options on this page carefully. Below is a description of some of the choices you can make:
Meeting Type: There are two choices. They are:
- WebEx Meetings Pro Meeting – You can send invitations, set room passwords and upload agendas. People can only join at the scheduled time.
- WebEx Personal Conference – Intended for ad-hoc meetings. There are no invitations or passwords. You share the unique url and people can come and go. This option also requires a personal conferencing account.
Meeting Topic: This is the name of the meeting.
Password: This password is required to join your meeting. It is sent with invitations. It is optional, you do not have to configure a password.
Date /Time/Duration: Choose the date and time. The duration can be from 1-24 hours.
Recurrence: Select this option if you want to host the meeting at the same time on a regular basis. This will eliminate the need to creating a new meeting each time.
Attendees: This is for the email addresses of the people you want to invite. Note: you can leave this blank. On the next page there will be a summary of the meeting you can share with your class.
Advanced options: Here you can include an agenda, specify audio connection requirements and some other scheduling details.
Once you have filled out the pertinent information, press Schedule. You will be presented with a summary of your meeting and your meeting will appear in the upcoming meetings section of your Dashboard. Press the copy button to the right of your meeting name to copy your meeting information. You can send your meeting details to whomever you want to join session.
Note: Do not send the Host Key. Make sure it is removed from the information you send. Using the copy button does not include the Host key.
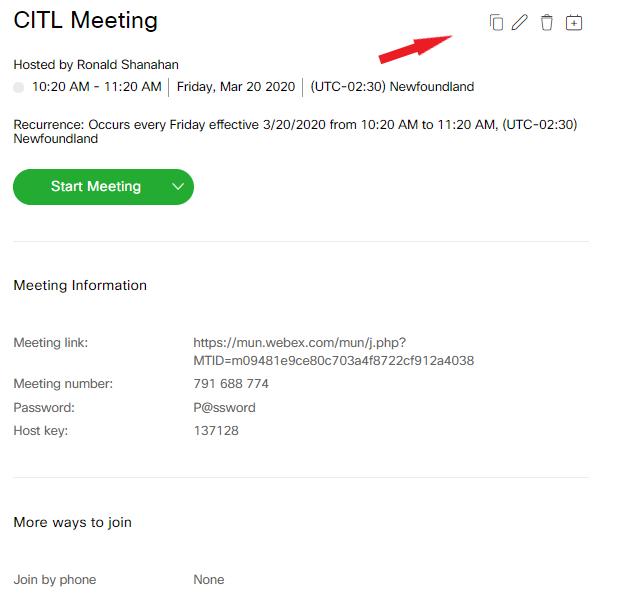
As the host, you will be emailed the meeting information automatically.
> Scheduling classes in a course with multiple instructors
If you are co-teaching a course in Brightspace with other instructors, each instructor may wish to host different Webex sessions in that course. However, because only one instructor can integrate their Webex account with the Brightspace course site (click here for details), only that instructor is able to schedule Webex class meetings through Brightspace and later launch them as the host. The other instructors can only join the session once it has been launched by the host.
In order to allow the other instructors to launch and host the Webex sessions in the course, you can use the alternate host (co-host) feature in Webex. Using this feature will ensure that students can still access the Webex session from Brightspace, and that any recordings will automatically appear in the course site.
In order to assign alternate host(s) to your Webex sessions, follow the steps below.
- Schedule your class meetings in Brightspace following the usual procedure (click here for details).
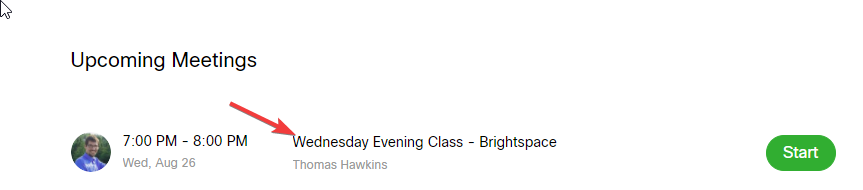
- Log in to the Webex portal at https://mun.webex.com. You should see a list of the sessions you have just scheduled under Upcoming Meetings.
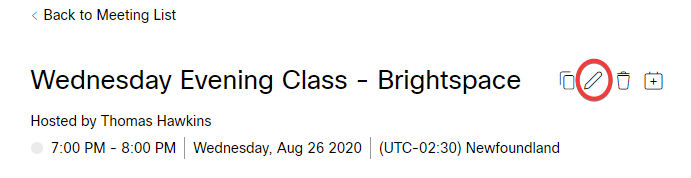
- Find the session to which you want to assign another host. Click on the title of the event to access meeting details.
- Click the Edit icon for the event.
- In the Attendees box, type in the name of the individual who will be the alternate host. As you are typing, a directory will appear with autocomplete suggestions. You can search by name, MUN Login ID/email address. Click on the name of the correct individual.
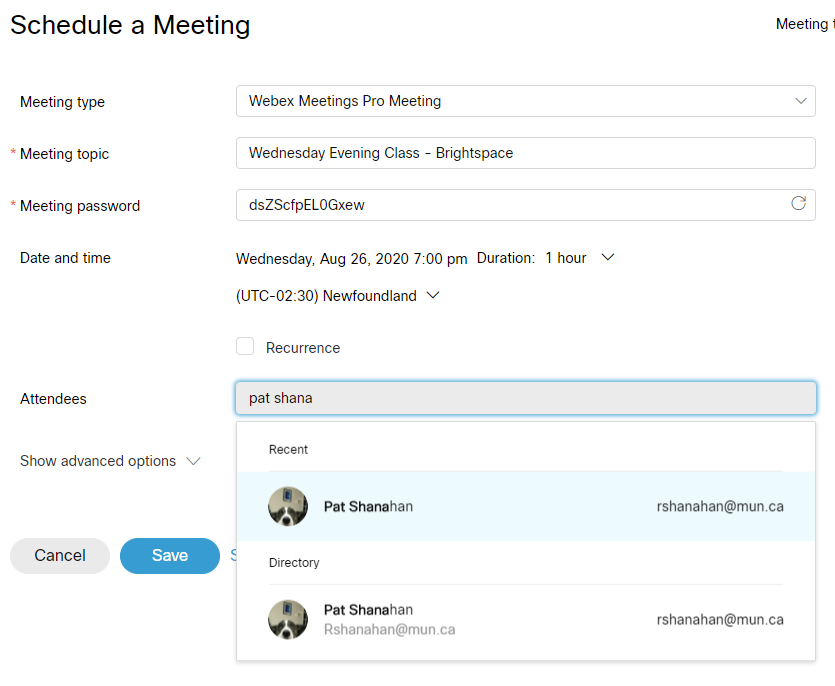
- Next to the individual you have just invited, you will see an outline of a person icon. Clicking this icon will make this individual an alternate host (co-host) for the event. (Note that you can select multiple alternate co-hosts for an event.)

Note: Only users with Webex accounts can be made co-hosts. If the person you are inviting does not have a Webex account, the alternate host icon will not appear.
- Once you add all your alternate hosts, click the Save button. Your alternate hosts will receive an email invitation. They will be able to launch the session as host from that email invitation without you needing to be present.
NOTE: Alternate hosts must use the email invite link to launch the session. They cannot launch from within Brightspace as they are not the session creator.
Scheduling Office Hours
Integrating Webex with Brightspace provides instructors with an Office Hours feature, which enables facilitating one-on-one meetings with students. Instructors can choose their office hour availability, and set the meeting duration as well as the time between scheduled appointments. Students can then sign up for specific time slots during available hours.
> Enabling Office Hours
Before you can set your office hour availability, you must first ensure you have the Office Hours tool enabled. For details, visit our resource on the Webex-Brightspace integration.
> Setting Office Hour Availability
- In your Brightspace course site, locate the Webex link (depending on how you integrated Webex into your course, the link may be directly in the navbar, under the Communications menu, or in a content module).
- Click the Webex link and select the Office Hours tab. NOTE: If you do not see the Office Hours tab, click on the Setup tab, locate the Choose your features section, and check the box next to Office Hours. Click Apply.
- A scheduling tool like the one in the image below will open.

- To set up your office hours, make the following selections:
- Meeting duration: Under Availability, click the down arrow to open a menu. Select your desired meeting duration for each student. You can choose 15-, 30-, 45-, or 60-minute increments.
- Appointment buffer: Under Block Off Extra Time, click the down arrow to open a menu. Select the amount of time you want to block off between the end of one office-hour appointment and the beginning of the next one. This buffer may be helpful to allow extra time should meetings run over or to provide a break. You can choose 15-, 30-, or 45-minute increments or No buffer if you wish to schedule back-to-back meetings.
- Your availability: In the calendar (main part of the screen), select the time slots you would like to make available for students to book appointments by clicking on them.
- Click Save in the bottom right corner of the screen.
> After an Appointment Is Booked
Students
Once you have saved your office hour availability, students can go to the Webex link in the Brightspace course site and select the time slot for their office-hour appointment. When a student schedules an appointment, that time slot is no longer available to other students.
When a student schedules an office-hour appointment, they will receive an email notification (to their @mun.ca email) with the meeting details and a link to join. They need to refer to this email to join the Office Hours meeting (the meeting link will not appear in Brightspace).
Instructors
When a student schedules an office-hour appointment, the instructor receives an email notification with the meeting link. You can view your scheduled office hours in two places:
- In the course site in Brightspace by going to the Webex link >> Office Hours tab >> View My Meetings in Webex, or
- In the Webex portal under Upcoming Meetings.
You can launch the office-hour appointment in one of two ways:
- From the Upcoming Meetings in the Webex portal
- From the email invitation you received when a student booked the appointment.