Frequently Asked Questions
Can I mute all participants?
Yes. As the host, you can mute all microphones at any point during the meeting in one of two way:
- In the meeting window, select Participant in the menu on top, then click Mute All.
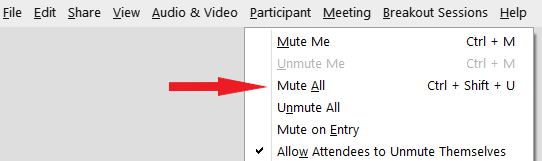
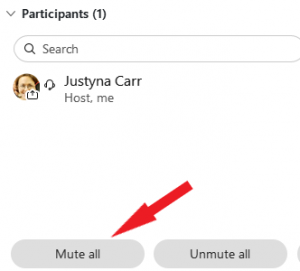
- Click Mute All at the bottom of the participant list.
My alternate host (cohost) cannot start the meeting through Brightspace. Why?
Brightspace only allows the event creator to start the meeting from within Brightspace. If you have alternate hosts (cohosts) assigned to your session, they will only be able to join it after you have launched the session from within Brightspace. However, they can launch the session they are co-hosting in other ways:
- From their Webex portal (https://mun.webex.com)
- From the Webex desktop application (if they have it installed)
- From the email invite they received when they were assigned as an alternate host (cohost)
Learn more about how to add alternate hosts (cohosts) to a Brightspace Webex session on our this page.
If I stop and start a recording, does it save as one recording or two?
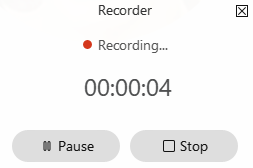
If you start a recording, stop it, and and then start again, it will save as two separate recordings.
If you want the recording pieces to remain together as a single recording, then use the Pause recording function instead of the Stop option.
How can I control what participants can do in my meeting?
When a session is in progress, you can control what permissions participants have for the meeting in a few places.
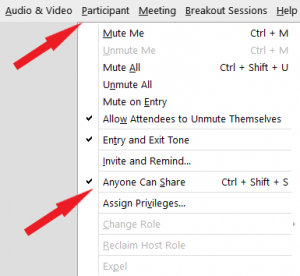
- Select Participant in the top menu bar and locate Anyone Can Share. If this setting is ON (check mark next to it), anyone in the meeting can initiate content sharing and become the presenter. If the setting is OFF (no check mark), only the meeting host can share. You can turn the setting on and off by clicking on it.
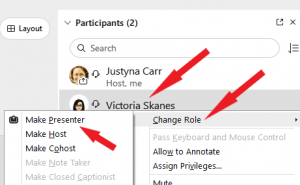
- If you want to give sharing privileges to a specific participant, you can do it through the session’s Participants list. Locate the name of the person you want to allow to share content and right-click on it. Select Change Role, then Make a Presenter from the menu.
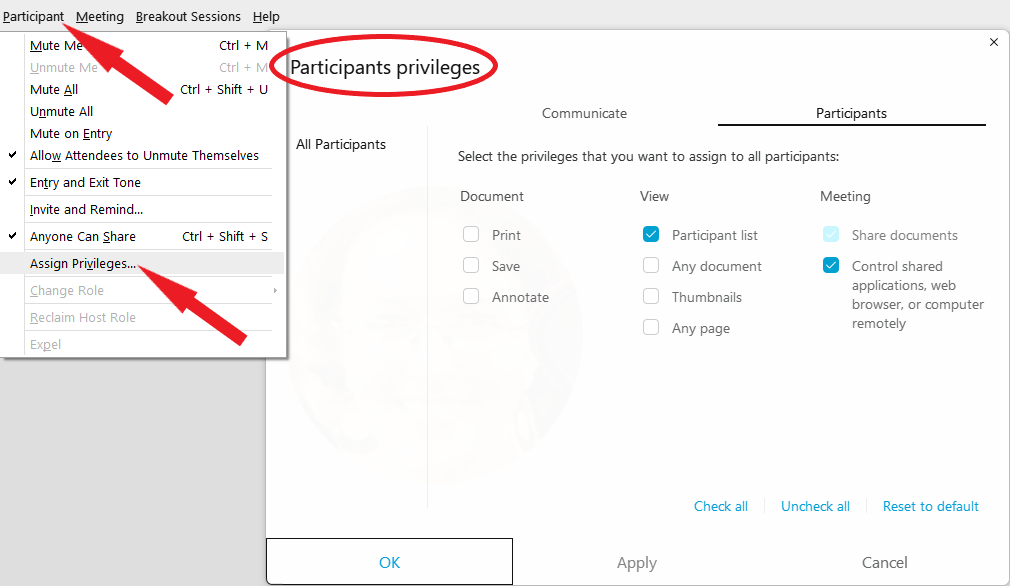
- If you want more granular control over what participants can do, go to the Participant menu in the top menu bar and select Assign Privileges. A new box will pop up that allows you to provide specific permissions to participants and what aspect of the meeting they have access to. You can control who they can communicate with under the Communicate tab, and what tools they have access to under the Participants tab.
- You can also adjust meeting-wide participant privileges by going to Meeting (top menu bar) and then Options. A new window will pop up with a list of functions that you can enable or disable as you wish.

I am no longer the Host or Presenter. How can I get that role back?
If someone else is now in the host or presenter role in a meeting you created, you can reclaim the host role by clicking Participant in the top menu bar, and then selecting Reclaim Host Role. This should automatically make you the host of the meeting again.
How can I configure my Webex Meeting to be a more controlled environment?
In general, the default privileges given to participants in Webex Meetings provide a good balance of functionality and control. However, if you want your Webex sessions to be a more controlled environment, there are a number of settings you can change to achieve that. Some options are listed below with an explanation of how they work.
- Anyone Can Share
By default, a Webex Meeting is configured to allow anyone to share content in a session. This can cause interruptions if abused by participants. To disable this feature, go the Participant menu across the top of your meeting window, then uncheck Anyone Can Share. Now, only the presenter will be able to share content in the session. You can make someone else the presenter by right-clicking their name in the Participant list, clicking Change Role -> Make Presenter.
- Mute on Entry
One way to prevent audio disruptions in your session is to enable the Mute on Entry option. This setting will automatically mute the microphones of all participants entering your session. This helps reduce unwanted background noise as participants join the meeting with an open microphone. To enable mute on entry, go to the Participant menu at the top of your meeting window and check Mute on Entry.
- Mute All
If at any point you notice unmuted microphones from your participants, you can use the Mute all button at the bottom of the Participants list in the meeting window. This will mute the microphones of all participants except for the host and presenter.
- Lock the Room
If you wish to limit who can enter after the session has begun, locking the room can prevent new participants from entering. Go to the Meeting menu at the top of the meeting window, and click Lock Meeting. New participants will receive a message when they try to enter notifying them that the session is locked.
- Disable Entry/Exit Tone
If you have a large number of participants in your session, the entry and exit tone can be distracting. At any time, you can disable the tone by going to the Participant menu at the top of the meeting window and unchecking Entry and Exit Tone.
- Assign Privileges
The Assign Privileges option in Webex allows you to determine how participants can interact with each other and the session. You can access this screen by going to the Participant menu at the top of the meeting window and clicking Assign Privileges…. A new window will pop up.
On the Communicate tab you will see options that controls who participants can chat with. You could choose to disable private chats between participants, or to disable public chatting, depending on the format of your session.
On the Participants tab, you can control what participants can see and interact with in the session. By default, participants can see the participant list and control shared applications remotely (if you provide access). You can turn these features off, or optionally allow participants to have more permission in your sessions if that is desirable.
- Meeting Options
The Meeting Options function allows you to control what features of Webex Meetings are available for all participants. You can access these options by going to the Meeting menu at the top of the meeting window and clicking Options….
The General tab is the section that allows you to customize your meeting. Here you can optionally disable everyone’s video in the session (including presenters and hosts), disable chat, disable notes, disable file transfer, disable rich media, or enable closed captioning.
Of these options, disabling video or chat could provide greater meeting control depending on the nature of your session.
- Stop Individual’s Video
If a particular participant is sharing disruptive video, you can disable their ability to share video completely. To do this, go to the meeting’s Participants list, right-click on the participant’s name and select Stop Video. NOTE: You cannot re-enable a users video in the same manner. They will need to leave the meeting and rejoin in order to enable their video again.
When sharing content, should I share a screen or an application?
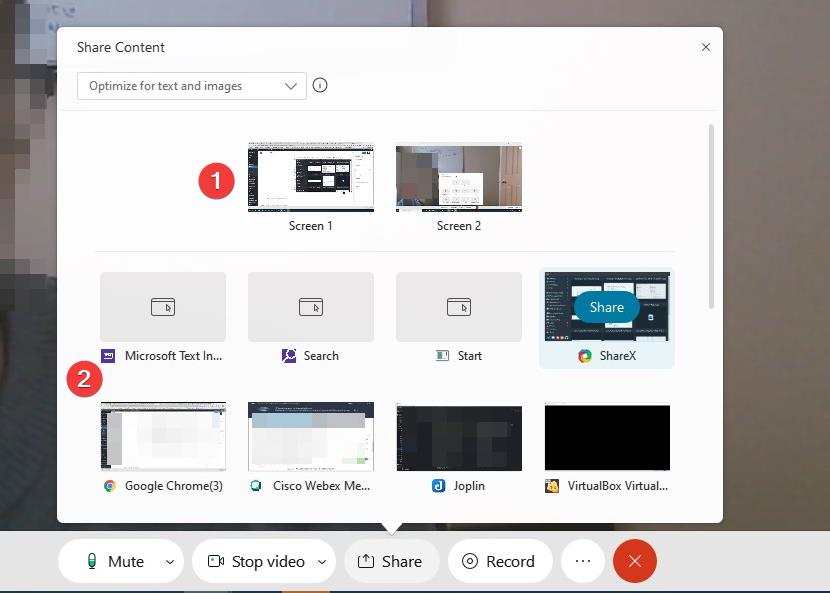
Webex allows you to share contents from your computer with everyone in your Webex session. When you click the Share button, you are presented with a number of options. Depending on the situation, one option may be preferable.
OPTION 1: Share Screen 1 (or Screen 2) [#1 in image below]
Sharing a screen does just that – shares the entire contents of whatever is displayed on that screen at the time of sharing, and for the duration of the screen share. This is the easiest option for sharing content as you can simply select a screen, and move applications that you want to display to that screen.
Pros: Easy to do. Can quickly change between applications that are shared during the session.
Cons: Shows everything that appears on the screen. You may end up sharing information you do not intend, like other open windows, or email notifications.
OPTION 2: Share Application [#2 in image below]
Underneath the screen options, you will have a list of applications open on your computer at the time you initiate sharing. You can select a specific application to share, regardless of what screen it is open on on your own computer.
Pros: Shares just this application. Any other content or notifications are hidden from your participants.
Cons: If you want to share two different applications during a session, you need to Stop Sharing when you are finished with one, and then begin sharing again with the other application selected for sharing.
The ‘Record in Cloud’ option is not available in my Webex meeting. How do I get it?
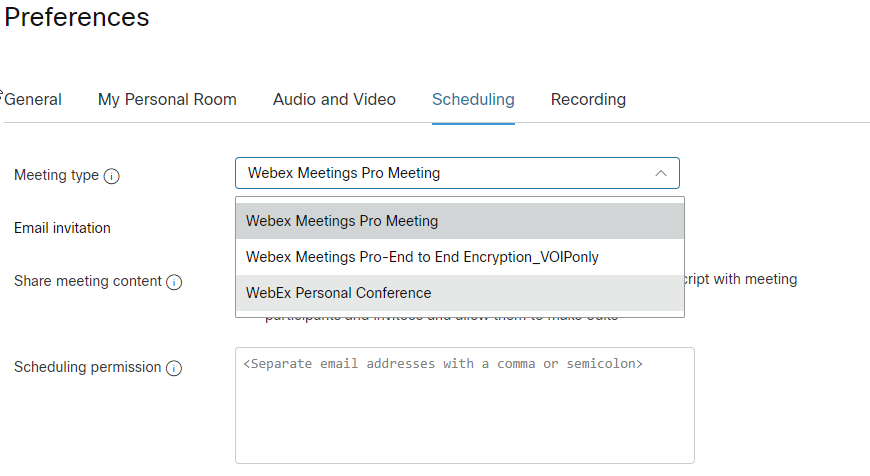
If you do not have the option to Record in Cloud (seen in the image below), it may be because of the Meeting Type you have selected when scheduling your session.
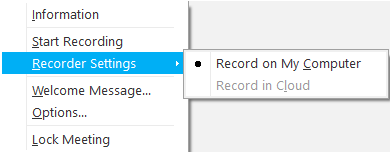
Webex has several meeting types, and some of them limit what you can do during your session. One meeting type, called Webex Meetings Pro-End to End Encryption_VOIPonly, will disable your ability to record to the cloud. To check if you are using the Webex Meetings Pro-End to End Encryption_VOIPonly meeting type, follow these steps:
- Log into your Webex dashboard.
- In the menu on the left, click Preferences.
- Select the Scheduling tab.
- Look at the Meeting type. If you have Webex Meetings Pro-End to End Encryption_VOIPonly selected as your meeting type, then this is your issue.
- Select Webex Meetings Pro Meeting from the dropdown menu and click Save. You can now launch a new Webex session and will have access to the Record in Cloud option.
NOTE: If you created a reoccurring meeting through Outlook, the Webex portal, or Brightspace, or if you scheduled future sessions, you will need to delete those sessions and recreate them in order have the new Meeting Type apply correctly.
If your issue still persists, contact the CITL Support Centre.