Creating Quizzes
Using Quizzes in Brightspace allows instructors to ask learners a variety of questions to help evaluate learning outcomes and users’ learning progress. You can configure each quiz based on your needs, and you can facilitate the grading process by using features such as auto-grading and automatic transfer of grades to the Brightspace grade book.
There are 11 question types available in Brightspace quizzes (see chart below). Some questions are close-ended and others open-ended; there are also questions that use formulas and significant figures. For information on benefits and challenges of different types of questions, please visit this resource.
| 1. | Multiple Choice (MC) | 7. | Written Response (WR) |
| 2. | True or False (T/F) | 8. | Short Answer (SA) |
| 3. | Fill-in-the-Blanks (FIB) | 9. | Arithmetic (2+2) |
| 4. | Multi-Select (M-S) | 10. | Significant Figures (x10) |
| 5. | Matching (MAT) | 11. | Multi-Short Answer (MSA) |
| 6. | Ordering (ORD) |
CITL has created a sample quiz that instructors can add to their course(s). The purpose of this quiz is to make sure that students can access and submit a quiz successfully PRIOR to doing an actual assessment in the Quizzes tool. To download the quiz, follow the steps below.
- Right click this link: Download the CITL Sample Quiz and select “save link as”. The .zip quiz package will be downloaded to your computer (mark the location).
- Go to your course in Brightspace and select Course Admin on the navigation bar.
- Next, choose Import/Export/Copy Components.
- Select Import Components.
- Press Start.
- Select the “Sample Quiz.zip” file that you downloaded previously.
- Choose Upload.
- Choose Import All Components and wait until it is imported.
- Once the package has been successfully imported, go to the Assessments tab in the course navigation bar and choose Quizzes.
- Your “Sample Quiz” is ready.
If students have difficulty using the quiz tool, they should be directed to contact the CITL Support Centre so any issues can be resolved.
Creating a Quiz in Brightspace
Quizzes can be created in two places in Brightspace:
- Directly in a quiz (see below)
- In the ‘Question Library’ for your course. (see below)
Note
Using the ‘Question Library’ to create quizzes is the recommended option as it allows for a better organization of questions.
Step 1: Create a Quiz
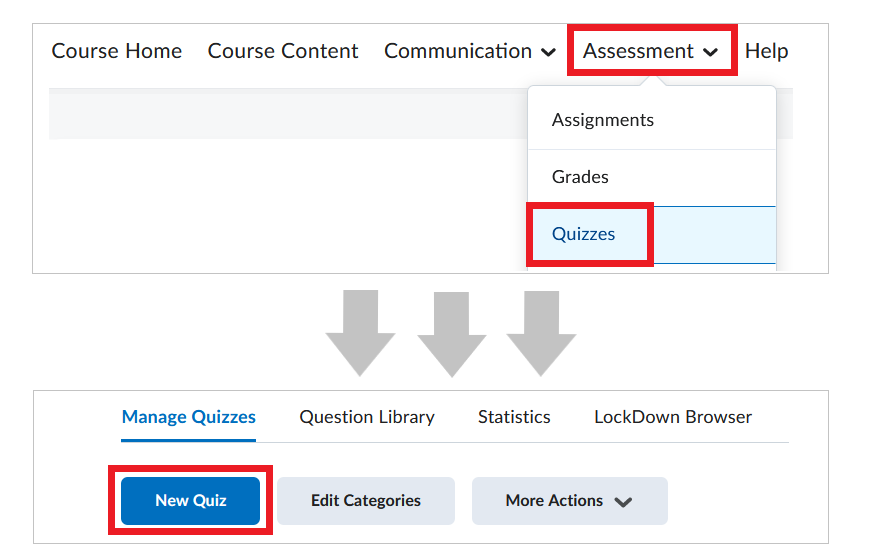
To start creating a new quiz, navigate to the Quizzes tool in Brightspace.
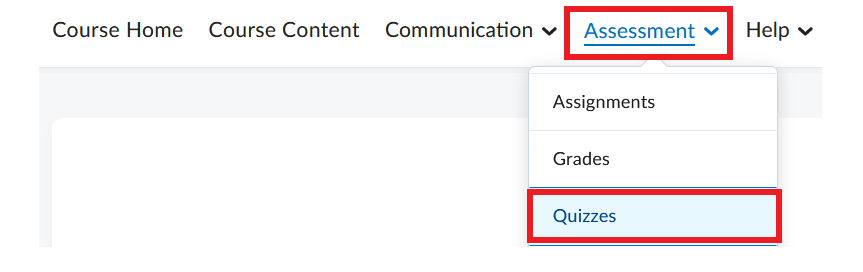
- Go to your course site and click Assessment in the course navbar.
- Select Quizzes from the dropdown menu.
- On the next page, click ‘New Quiz’.
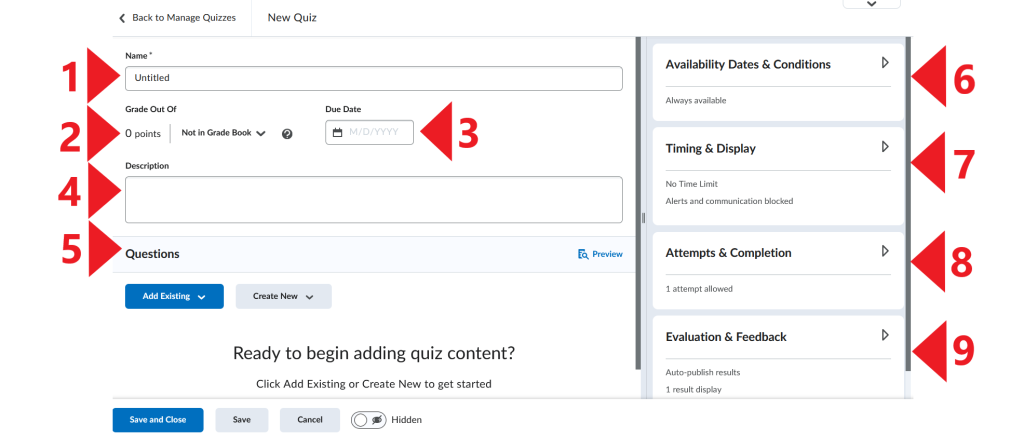
- The quiz creation window will open.
Step 2: Configure Quiz Settings
In this section, you can find details on each setting numbered in the image above. Click each box to expand.
1. Quiz Name
Give your quiz a title.
If you want to create a corresponding grade item in the Brightspace grade book, clicking Save at the bottom of the window will automatically create a grade item with the same name as the quiz.
2. ‘Grade Out Of’ and ‘Link to the Grade Book‘
The default setting for new quizzes is ‘Not in Grade Book’.

Consider the two scenarios below and proceed accordingly:
- If the quiz is not a part of your course evaluation, and you do not want to link it to the grade book (e.g., it is only a practice quiz), leave the ‘Not in Grade Book’ setting in place.
Note
If you leave ‘Not in Grade Book’ selected, the ‘Grade Out Of‘ box will stay ‘locked’, i.e. you will not be able to enter the point value for the quiz manually. The number will change automatically once you start adding questions to the quiz, and it will reflect the total number of points available to score.
- If the quiz is part of your course evaluation, and you do want to link it to the grade book for automatic grade transfer, click the downward arrow next to ‘Not in Grade Book’. Two options will appear.
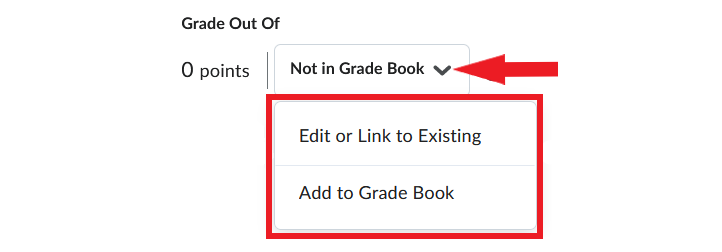
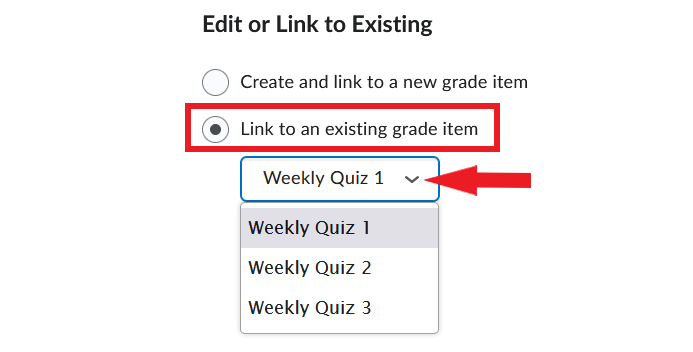
OPTION 1: ‘Edit or Link to Existing‘ – Select this option if your Brightspace grade book is already populated with grade items. In the window that pops up, select ‘Link to an existing grade item‘ and choose the grade item to which you want to link the quiz from the dropdown menu. Then click OK.
Note
The ‘Grade Out Of‘ field will now display the same point value as the grade book item to which it has been linked.
OPTION 2: ‘Add to Grade Book‘ – Select this option if your Brightspace grade book does not yet contain a corresponding grade item. Selecting this option will prompt you to enter the point value for the quiz in the ‘Grade Out Of‘ field. This value will apply both to the quiz and to the grade book item.
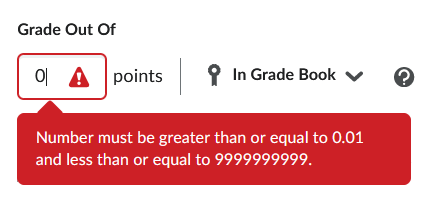
Once you click Save or Save & Close at the bottom of the quiz creation window, a grade item with the same name as your quiz will be created in the grade book.
3. Due date
You can set a Due Date for your quiz, i.e. the date and time when you expect students to complete the quiz. The Due Date will be visible in the course calendar in Brightspace. After that date, students will still be able to access and complete the quiz, but their submissions will be flagged as late.
NOTE: Due Date is for information purposes only. To restrict access to a quiz before and/or after a certain date, set a Start and End Date under ‘Availability Dates & Conditions‘ on the quiz creation page.
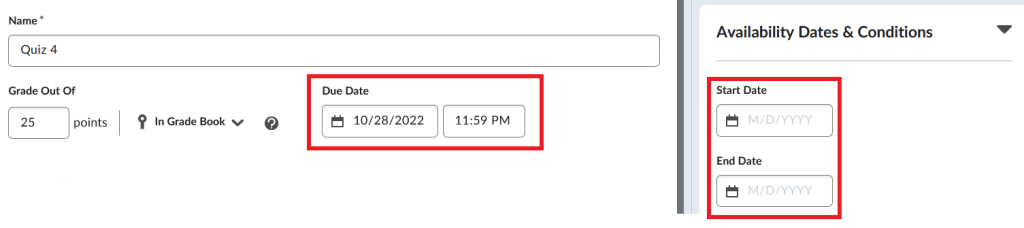
4. Description
Clicking the Description field opens a text box where you can enter instructions for the quiz. For more information on using the Brightspace HTML editor, please visit our resource on this topic.
5. Questions
For information on available questions types and how to create them, please refer to our other resources in the Quizzes category.
6. Availability Dates and Conditions
‘Availability Dates and Conditions‘ are located in the top right corner of the quiz creation window. Click to expand the box and view all available settings.
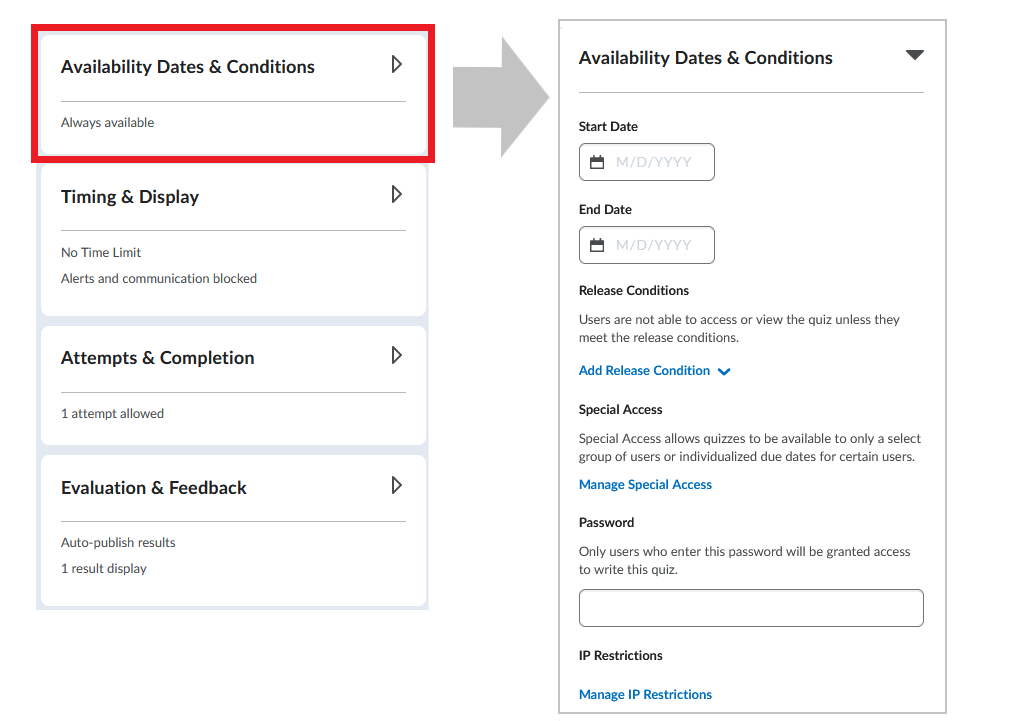
In this section, you can set the following quiz parameters:
- Start Date (and Time) – This setting controls when the ‘Start Quiz!’ button should become available to students. Until then, students can see the Start Date in the course calendar, but cannot begin the quiz.
- End Date (and Time) – This setting controls when the ‘Start Quiz!’ button should become unavailable to students.
Note
The Start and End Dates set for a quiz are unrelated to the amount of time students have to complete the quiz. These dates only control the time interval in which students can begin the quiz. If a student starts the quiz one minute before the End Date/Time, they will still have the entire time allotted for the quiz in the Timing & Display section.
Tip
Consider Due Date, Start and End Dates, and Timing carefully. For example, if you want to set up a quiz for a typical 50-minute lecture period, you could choose:
Due Date: 2:50 PM (quizzes submitted after 2:50 PM will be submitted but flagged as late)
Start Date: 2:00 PM (students can start the quiz any time between 2:00 PM and 2:50 PM)
End Date: 2:10 PM (after 2:10 PM students will not be able to start the quiz)
Enforced time limit: 50 minutes (each student will have 50 minutes to complete the quiz, regardless of then they started)
- Release Conditions – For information on release conditions, please visit this Brightspace resource.
- Special Access – You can adjust quiz configurations for students with accommodation requests or those who require an alternate submission date/time.
- Password – You can set a password for the quiz as an additional security measure. Most often, the instructor would display this password in the room where the quiz is taking place.
- IP Restrictions – You can add multiple IP address ranges to ensure that users can only access a quiz from IP addresses in the specified IP address ranges.
7. Timing & Display
Click the ‘Timing & Display‘ box on the right to expand and view all settings available here.
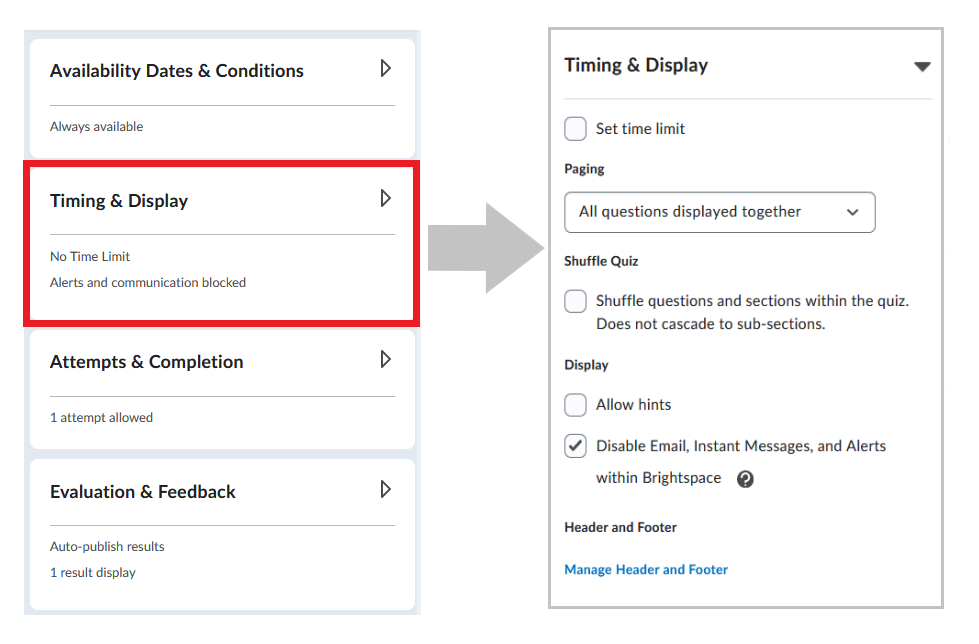
In this section, you can set the following quiz parameters:
- Set Time Limit – By default, this option is unselected. If this is a practice quiz, you may wish give students unlimited time to complete it. Otherwise, select ‘Set Time Limit‘, and you will be prompted to enter the Time Limit for the quiz and, if applicable, adjust Timer Settings.
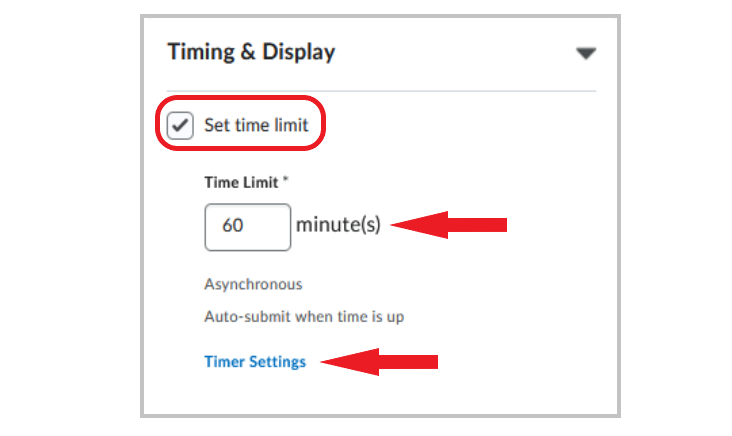
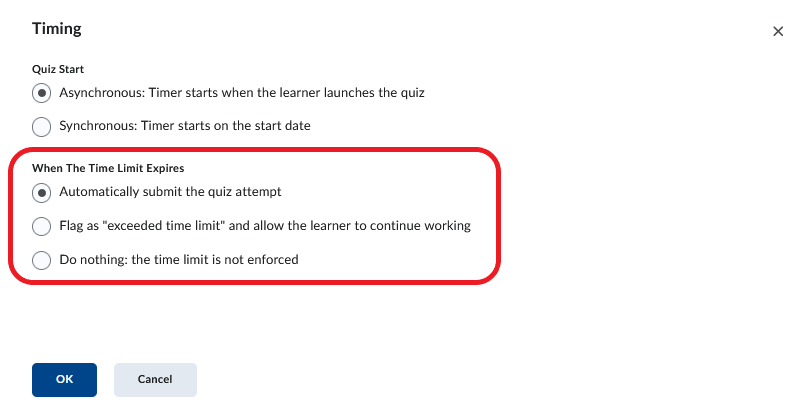
Clicking Timer Settings will cause a ‘Timing’ window to appear. Here, you can choose:
- whether the quiz should be synchronous or asynchronous, and
- what should happen to the quiz when a student reaches the set time limit. The options are:
- Automatically submit the quiz attempt (selected by default) – When a student reaches the time limit, the quiz will be submitted automatically.
- Flag as “exceeded time limit” and allow the learner to continue working – Students can continue working on the quiz after reaching the time limit, but their submissions will be marked as late.
- Do nothing: the time limit is not enforced – Students have unlimited time to complete the quiz.
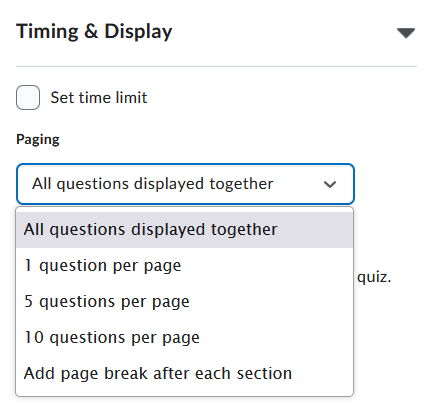
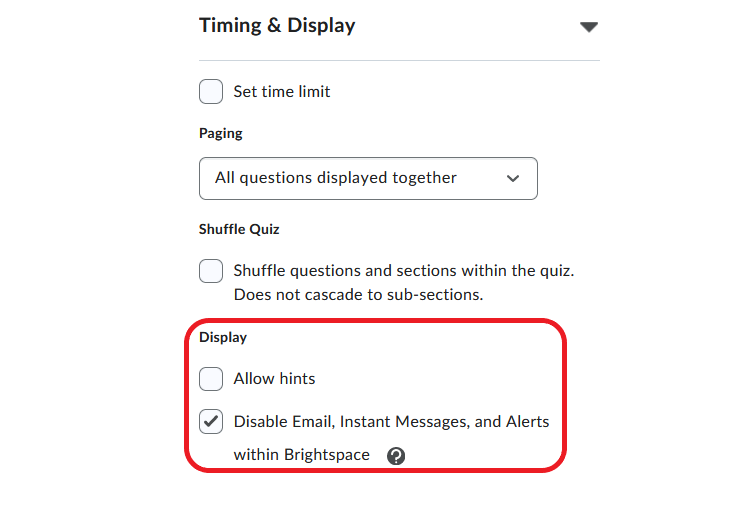
- Paging – you can decide how many questions per page you want students to view when taking the quiz:
- All questions displayed together (default)
- 1 questions per page
- 5 questions per page
- 10 questions per page
- a separate page for each quiz section (if your quiz is divided into sections)
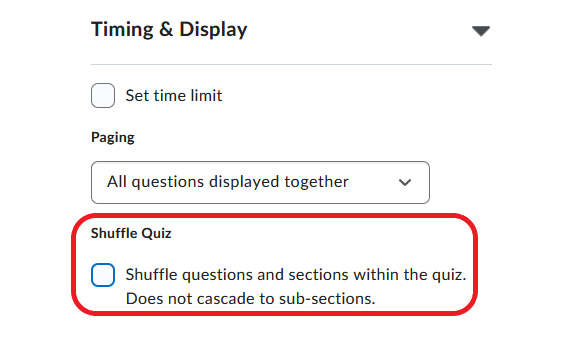
- Shuffle Quiz – this setting randomizes the order of questions in the quiz, so each student will have a different version of the quiz.
- Display – this setting allows you to control if students can:
- view hints, if you have previously created them for your quiz
- access Brightspace email, Instant Messages, and alert functions while they are completing the quiz (not recommended for practice quizzes).
- Header and Footer – You can opt to enter messages that will be displayed at the top and bottom of every page in the quiz.
8. Attempts & Completion
Click the ‘Attempts & Completion‘ box on the right to expand and view all settings available here.
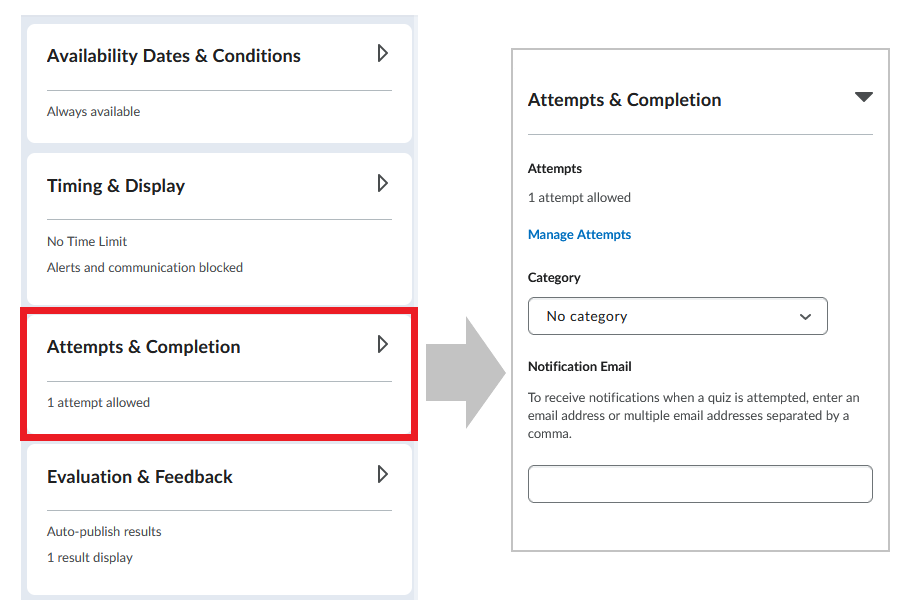
The options you can set in this section are:
- Notification Email – You can opt to receive an email each time a student completes a quiz (not recommended).
- Attempts – The number of times students can take the quiz. If you allow more than one attempt, options for calculating the overall score will appear (highest/lowest score? average of all scores? etc.)
- Category – If your course involves multiple quizzes, you may consider organizing them into categories.
9. Evaluation & Feedback
Click the ‘Evaluation & Feedback‘ box on the right to expand and view all settings available here.
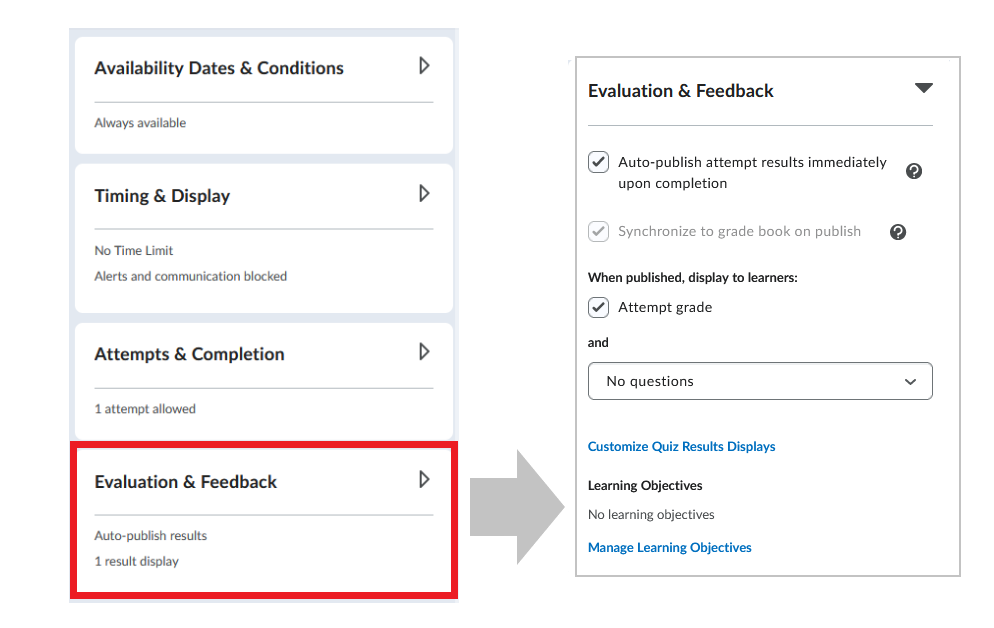
In this section, you can specify whether to: when the quiz scores should be sent to the grade book, whether or not to display questions and answers to students etc.
- Auto-publish attempt results immediately upon completion – If the quiz is linked to a grade book item, selecting this box will allow students to see their quiz score immediately after they complete it. NOTE: This applies only to the auto-graded portion of the quiz, not to questions that need to be graded manually such as ‘Written Response’.
- Synchronize to grade book on publish – With this option selected, any changes or updates to the quiz score will be automatically updated in the grade book.
- When published, display to learners – you can customize what the students will be able to see once the quiz results are published (if they can view scores per attempt, correct/incorrect questions, correct/incorrect answers etc.)
You can also link the quiz to your Learning Objectives.
Note
Once you configure and save your quiz, you can return to it and modify the settings at any time.
Video Instructions
Brightspace Quizzes
Creating Questions Directly in Quizzes
This page provides step-by-step instructions for creating every question type available in Brightspace quizzes.
Note
Once you save your quiz, you can return to it and add, delete or edit the questions at any time.
Getting Started
Creating any question type in a quiz always begins the same way:
- In your Brightspace course site, click Assessment in the course navbar and select Quizzes from the menu.
- Create a new quiz by clicking ‘New Quiz‘ or open an existing quiz.
- At the bottom of the quiz window, click ‘Create New‘ and select ‘New Question’ from the menu. A list of available question types will open. Select the type you want to create and proceed with instructions for that question type located below.
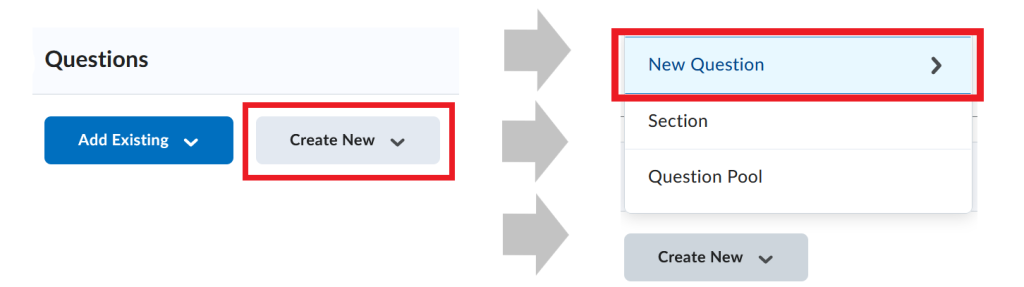
Creating Different Question Types
Click the items below for detailed instructions on creating each question type.
Create a Multiple Choice question (M/C)
Multiple choice questions present a statement or question with a list of possible answers. Learners must choose the best possible answer – only one answer for each multiple choice question.
If you create a multiple choice question that has more than one possible answer, you can assign different weights depending on the level of correctness of each possible answer.
For example, if two answer choices out of five options are accepted as correct, both can be weighted 100% and the other three options can be weighted at 0%. If all five answer choices are accepted as correct but some are more correct than others, each can be weighted differently with the most correct answers weighted more than the others (see Custom Weights* below).
To create a multiple choice question:
- Enter the question in the Question Text field.
- Enter all possible answers.
- Select the correct answer.
- Optional: Click Add Answer to add more possible answers.
- If applicable, modify the point value for the M/C question in the Points field (the default is 1 point).
- Optional: Click Options to add: Feedback, a Hint, a Short Description (not visible to students), Custom Weights*, Enumeration.
- Optional: Select Randomize answer order if you want the answer choices to appear in a different order for each student.
- Click Save, Save and New, or Save and Copy at the bottom of the page.
Create a True or False question (T/F)
True-or-false questions present a statement, and learners must determine if that statement is correct or incorrect.
- Enter the question in the Question Text field.
- Select the correct answer (either True or False).
- If applicable, modify the point value for the T/F question in the Points field (the default is 1 point).
- Optional: Click Options to add: Feedback, a Hint, a Short Description (not visible to students), and Enumeration.
- Click Save, Save and New, or Save and Copy at the bottom of the page.
Video Instructions
The video below illustrates how to create a true-or-false question.
Question Library – Create a New Question
Create a Fill-in-the-Blanks question (FIB)
Fill-in-the-blanks questions present an incomplete sentence, statement, phrase, list, or key terminology. Students are required to fill in one or more missing words in the blank space(s) in the statement, phrase etc.
Note
As a best practice, D2L recommends that answers in blank fields be no more than one or two words to ensure auto-grading accuracy.
- Optional: Give the question a title in the Title field.
- If applicable, modify the point value for the question in the Points field (the default is 1 point).
- Select the difficulty level of the question in the Difficulty dropdown menu (on a scale from 1 to 5).
- Optional: Click Insert an Image if you want to add an image to the question. You can enter Alternative Text for the image.
- In the Question Text section enter the following:
- In Text #1, enter the first part of the sentence/statement students will be asked to complete.
- In Blank #1, enter the answer (1 or 2 words) you want students to provide. If more than one answer is possible, click ‘Add Answer‘. Add all possible correct answers.
- Optional: In Text #2, enter the second part of the sentence/statement.
Note
- You can have as many/few text fields and blanks as needed. Use ‘+Add Blank/Text‘ to add, and trash can icons to delete them.
- The sequence of your text fields and blanks is the same sequence that will be displayed to students.
- Enter the weight for each possible Answer in the Weight (%) box.
Note
- The total weight of your answers in each Fill-in-the-Blanks question should equal 100% (e.g., you can have one answer worth 100%, two answers worth 50% each, three answers worth 50%, 25%, and 25% etc.).
- Some answers may be more correct than others. In that case, you can set different weights for the answers, as long as the total weight of most correct answers is still 100%.
- Optional: Add a Hint and Question Feedback.
- Click Save, Save and New, or Save and Copy at the bottom of the page.
Video Instructions
The video below illustrates how to create a fill-in-the-blanks question.
Question Library – Creating Fill in the Blanks Questions
Create a Multi-Select question (M-S)
Multi-select questions require learners to identify one or more correct answers in a list of possible answers. Unlike multiple choice (MC) questions, multi-select questions allow students to select more than one answer.
- Enter the question in the Question Text field.
- Under Answers, enter all possible answers. (You can add more answer choices by clicking Add Answer. You can delete answer choices by clicking X next to each answer box.)
- Select the correct answers.
- Optional: Select Randomize answer order if you want the answer choices to appear in a different sequence for each student.
- If applicable, modify the point value for the question in the Points field (the default is 1 point).
- Determine how you want to assign points to answers by opening the ‘How are points assigned to blanks?‘ menu and choosing the most suitable option. (For more information on each option, click ‘Which grading method should I choose?‘ on the screen).
- Optional: Click Options to add: Feedback, a Hint, a Short Description (not visible to the student), and Enumeration.
- Click Save, Save and New, or Save and Copy at the bottom of the page.
Video Instructions
The video below illustrates how to create a multi-select question.
Question Library – Create a Multi-Select Question
Create a Matching question (MAT)
Matching questions require students to choose from a set of possible match choices from dropdown lists and correctly pair them with related items. This question type enables you to assess users’ recognition of information and demonstrate comprehension of specific relationships.
Note
‘Matches’ are the statements you create, and ‘choices’ are the options that students choose from to match each statement. Matches are randomized for quiz-takers.
- Optional: Give the question a title in the Title field.
- If applicable, modify the point value for the MAT question in the Points field (the default is 1 point).
- Select the difficulty level of the question in the Difficulty dropdown menu (on a scale from 1 to 5).
- Enter the question in the Question Text field.
- Optional: Click Insert an Image if you want to add an image to the question. You can enter Alternative Text for the image.
- Choose what grading option you want to apply:
- Equally weighted: Students earn points for each correct answer they select, up to the total point value of the question.
- All or nothing: Students will only get full points if they select all correct answers and no incorrect answers. Missing any correct answers or selecting any incorrect answers will result in a score of zero.
- Right minus wrong: A student’s score is calculated by adding the number of correct answers and then subtracting the number of incorrect answers they choose. A negative score is not possible.
- Enter the Choices.
- Enter a Match for each of the Choices — pay attention to the numbering to be sure that they are matched correctly.
- Optional: Add a Hint and Question Feedback.
- Click Save, Save and New, or Save and Copy at the bottom of the page.
Video Instructions
The video below illustrates how to create a matching question.
Question Library – Create a Matching Question
Create an Ordering question (ORD)
Ordering questions require learners to arrange a series of items into a correct sequence or order.
- Optional: Give the question a title in the Title field.
- If applicable, modify the point value for the question in the Points field (the default is 1 point).
- Select the difficulty level of the question in the Difficulty dropdown menu (on a scale from 1 to 5).
- Enter the question in the Question Text field.
- Optional: Click Insert an Image if you want to add an image to the question. You can enter Alternative Text for the image.
- Choose what grading option you want to apply:
- Equally weighted: Students earn points for each correct answer they select, up to the total point value of the question.
- All or nothing: Students will only get full points if they select all correct answers and no incorrect answers. Missing any correct answers or selecting any incorrect answers will result in a score of zero.
- Right minus wrong: A student’s score is calculated by adding the number of correct answers and then subtracting the number of incorrect answers they choose. A negative score is not possible.
- Add items for students to order in the Value fields. (To add more items, click + Add Item. To delete items, click the trash icons.)
- If necessary, adjust the order of the values by using the Correct Order dropdown menu. Note that the first value in the correct order should be “1”.
- Optional: Add a Hint and Question Feedback.
- Click Save, Save and New, or Save and Copy at the bottom of the page.
Video Instructions
The video below illustrates how to create an ordering question.
Question Library – Creating Ordering Questions”
Create an Written Response question (WR)
Written response questions require learners to write detailed answers in response to open-ended questions. You can enable users to respond in multiple sentences, paragraphs, or mathematical explanations and calculations. Users can also respond in HTML code.
Note
HTML code is sometimes stripped from saved written responses if a learner refreshes the page while taking the quiz. As a best practice, encourage users to save a version of their HTML response locally in case they need to refresh the page.
Written response questions cannot be auto-graded. When students complete a written response question, they automatically receive a score of ‘0’, and it displays as incorrect in the ‘Submission View’. You have to manually grade each answer and enter a score to the answer.
- Enter the question in the Question Text field.
- Optional: Enable HTML editor for student responses.
- If applicable, modify the point value for the question in the Points field (the default is 1 point).
- Optional: Add Feedback a Hint, a Short Description, an Answer Key, a Custom Response Box Size, or Initial Text. If you need students to submit a filled-in table, make sure you provide the table for them to fill in as the ‘Initial Text’.
- Click Save, Save and New, or Save and Copy at the bottom of the page.
Video Instructions
The video below illustrates how to create a written response question.
Question Library – Add an Answer Key
Create an Short Answer question (SA)
Short-answer questions require learners to create one word or brief sentence answers in response to open-ended questions.
- Enter the question in the Question Text field.
- Enter the Answers for Blank #1.
- From the abc dropdown menu, select the auto-grading option for the answer:
- Text – the answers will be scored as correct regardless of whether upper and lower case letters are use correctly
- Case-Sensitive Text – upper and lower case letters have to be used correctly for the answer to be auto-graded as correct, or
- Regular Expression (click here for more information).
- If you want to add more blanks, click Add Blank and enter your answer(s) and the auto-grading option.
- If applicable, modify the point value for the question in the Points field (the default is 1 point).
- If you have more than one blank, choose one of these options from the drop down list: How are points assigned to blanks?
- If you have more than one blank, choose one of these options from the drop down list:
- Click Save, Save and New, or Save and Copy at the bottom of the page.
Create an Arithmetic question (2+2)
Arithmetic questions enable you to assess students’ knowledge and comprehension of mathematics and number theory. You can ensure each student receives a unique question by including variables enclosed with curly braces that randomly generate numbers within the problem. For example, if you set variables x, y, and z with a Min 1 to Max 5 number range in 1-step increments, the question “You have {x} green marbles, {y} red marbles, and {z} blue marbles. How many marbles do you have in total?” will randomly generate a rational number (1, 2, 3, 4, 5) for {x}, {y}, and {z}.
In arithmetic questions, use answer precision to limit the number of acceptable decimal places allowed in a response. You can require that correct answers contain a specific number of decimal places.
- Optional: Give the question a title in the Title field.
- If applicable, modify the point value for the question in the Points field (the default is 1 point).
- Select the difficulty level of the question in the Difficulty dropdown menu (on a scale from 1 to 5).
- Enter the question in the Question Text field. Enclose variables in curly braces { }.
- Optional: Click Insert an Image if you want to add an image to the question. You can enter Alternative Text for the image.
- Enter the formula that is required to generate a solution — use the variables enclosed in { } per the problem text.
- Refine the answer criteria.
- Answer precision — set the acceptable number of decimal places for the answer
- Tolerance — indicate whether you will accept near accurate, estimated, or rounded answers
- Enter the variables for the question — give each variable a Name, a Min value, a Max value, the number of Decimal Places for the variable, and the Step value (increment amount for the variable).
- Optional: Add a Hint and Question Feedback.
- Click Save, Save and New, or Save and Copy at the bottom of the page.
Video Instructions
The video below illustrates how to create an arithmetic question.
Question Library – Create an arithmetic question
Create a Significant Figures question (x10)
Significant-figures questions require students to answer in scientific notation and provide solutions that contain a specified number of significant figures. Math and science courses commonly use this question type. You can ensure each respondent receives a unique question by including variables enclosed with curly braces that randomly generate scientific notations within the problem.
- Optional: Give the question a title in the Title field.
- If applicable, modify the point value for the question in the Points field (the default is 1 point).
- Select the difficulty level of the question in the Difficulty dropdown menu (on a scale from 1 to 5).
- Enter the question in the Question Text field. Enclose variables in curly braces { }.
- Optional: Click Insert an Image if you want to add an image to the question. You can enter Alternative Text for the image.
- Enter the formula that is required to generate a solution — use the variables enclosed in { } per the problem text.
- Enter the variables for the question — give each variable a Name, a Min value, a Max value, the number of Decimal Places for the variable, and the Step value (increment amount for the variable).
- Optional: Add a Hint and Question Feedback.
- Click Save, Save and New, or Save and Copy at the bottom of the page.
Video Instructions
The video below illustrates how to create a significant-figures question.
Question Library – Create Significant Figures Questions
Create a Multi-Short Answer question (MSA)
Multi-short-answer questions require students to answer a multi-solution question and input their answers into individual input boxes. Students’ answers are checked against each possible answer stored in the answer fields. D2L recommends that the required number of answers corresponds with the number of input boxes provided.
An MSA question’s maximum point value is reflected by a 100% weight. As a best practice, D2L recommends that each possible answer’s weight calculation equals 100% divided by the number of answers required by the question.
Multi-short-answer questions differ from short-answer (SA) questions in that the multi-short-answer question enables you to create multiple answer boxes which all relate to one answer set. For example, the question “Name 3 state capitals” displays three input boxes to users. Each answer users submit is checked against 51 possible correct answers stored in the answer fields and each answer field has a weight of 33.3%.
- Optional: Give the question a title in the Title field.
- If applicable, modify the point value for the question in the Points field (the default is 1 point).
- Select the difficulty level of the question in the Difficulty dropdown menu (on a scale from 1 to 5).
- Optional: Click Insert an Image if you want to add an image to the question. You can enter Alternative Text for the image.
- Enter the number of input boxes for the answers — set the box size using the Rows and Columns dropdown menus.
- Add all possible answers, their corresponding weight, and the evaluation method. Note that the number of answers does not have to match the number of input boxes.
- Optional: Add a Hint and Question Feedback.
- Click Save, Save and New, or Save and Copy at the bottom of the page.
When finished, click Save and Close at the bottom of the page.
Importing Quiz Questions from a File
It is not necessary to create quiz questions manually in the Brightspace Quiz tool. If your publisher has provided you with a test bank, or if you have created a collection of questions yourself, you can import them from a file into Brightspace in two different ways.
Option 1: Import questions into Brightspace using Respondus
Respondus is a quiz-building application that allows you to import questions and assessments that you have already created in Word, or other text formats, into the Brightspace Quizzes tool. For details on using the Respondus Quiz Builder, please visit this resource.
Option 2: Import a file directly into the Quiz Tool
- On the Manage Quizzes page, click Add Existing.
- Click Browse Files.
- Drag the file you want to add to the Upload a File window.
- Click Save.
Using the Question Library to Create Quizzes
Every Brightspace course site has a ‘Question Library’ – a central repository where you can store questions you want to use in quizzes, surveys, and self-assessments for the course. The ‘Question Library’ allows you to organize those questions into Sections (folders), according to topic/module, question type, level of difficulty etc., making it easier for you to find questions for your assessments.
Note
Using the ‘Question Library’ is recommended over creating questions directly in a quiz as it allows you to organize questions into categories and then easily import them into your quiz.
You can start compiling and organizing questions in the ‘Question Library’ at any time, even before you create a quiz. You can then import selected questions or entire sections of questions into your quiz. For details on how to do it, please click the menu items below.
STEP 1: Create a New Section in the ‘Question Library’
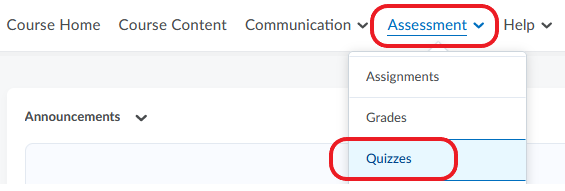
In your course navbar, click Assessment and select Quizzes from the dropdown menu.
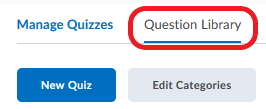
- Go to the ‘Question Library’ tab.
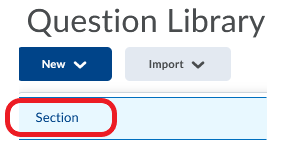
- In the ‘Question Library’, click New and select Section from the dropdown menu.
- On the ‘New Section’ page, enter the Section Title. Optionally, enter a description in the Section Text field. Then customize the following settings:
- Hide Section Title from learners: Select if you do not want students to see the section title during the quiz.
- Hide Section Text from learners: Select if you do not want students to see the section description during the quiz.
- Shuffle questions in this section: Select if you want to randomize the order of questions in the section for each student. Note that if you have created sub-sections within your section, questions in those sub-sections will not be randomized. To randomize them, you would need to select this setting for each individual sub-section.
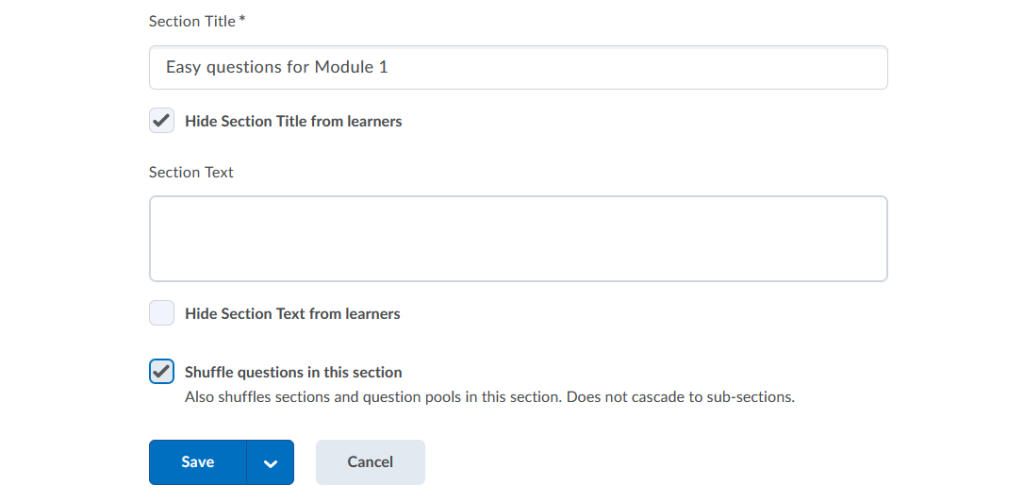
Click Save.
STEP 2: Add Questions to Your Section
Once you create a section in your ‘Question Library’, you can start populating it with questions.
- In the ‘Question Library’, click on the section you want to populate with questions.
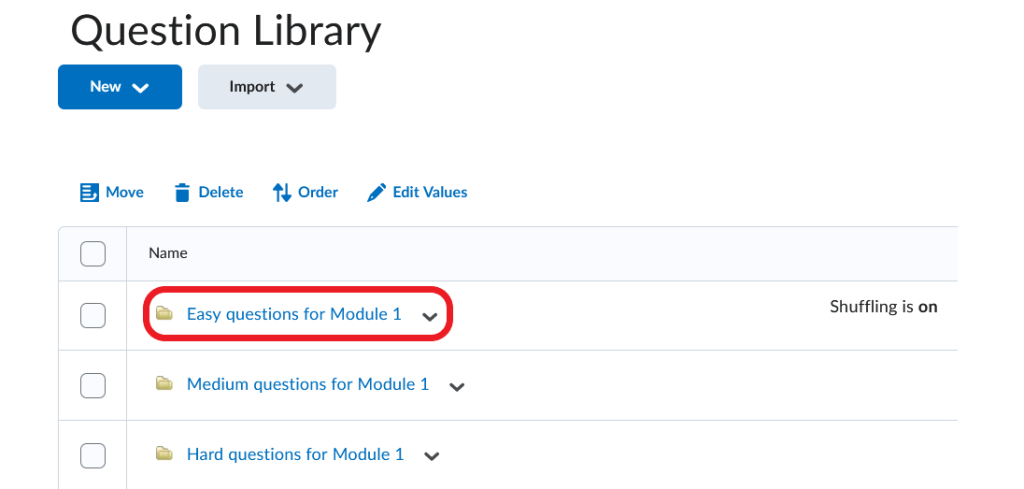
- In that section, click New and select the question type you want to create.

- To create questions in the ‘Question Library, follow the same steps as those for creating questions directly in a quiz ( above )
- When finished adding questions to the section, click ‘Done Editing Questions‘ in the top right corner of the screen in the ‘Question Library’.
Video Instructions
The video below illustrates the process of creating sections and questions in the ‘Question Library’.
Question Library – Create a New Section
STEP 3: Import Sections and/or Questions into a Quiz
Once you have created sections and questions in your ‘Question Library’, you can import entire sections, selected questions, or a combination of both into a quiz.
- In your course navbar, click Assessment and select Quizzes from the dropdown menu.
- On the next page, click ‘New Quiz‘ (or select an existing quiz from the list).
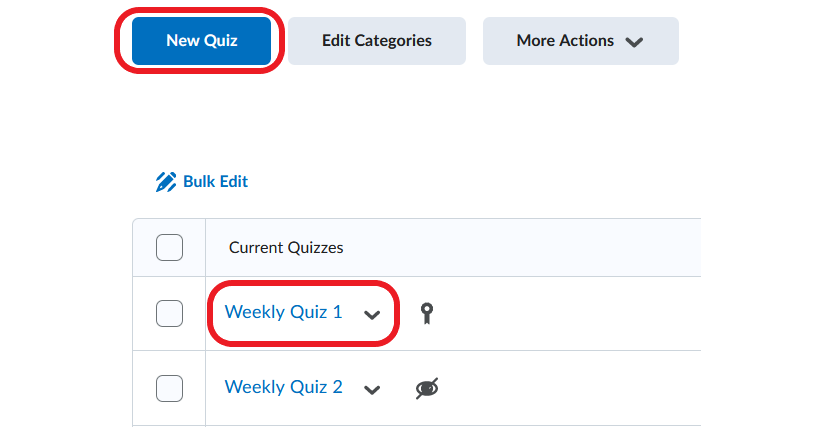
- In the quiz creation window that opens, give your quiz a title in the Name field.
- In the ‘Questions’ section at the bottom of the page, click Add Existing and select Browse Question Library.
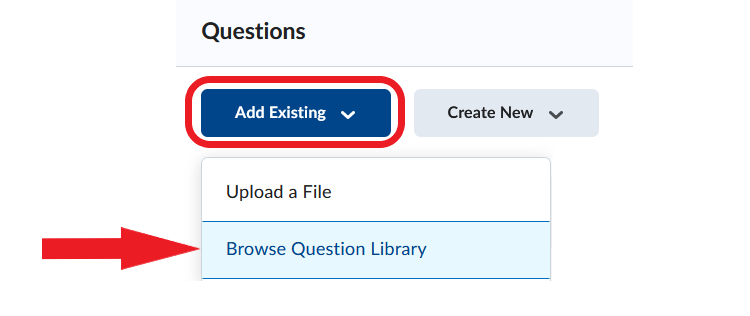
- The ‘Question Library’ will open. Select the sections or individual questions within sections that you want to add to your quiz.
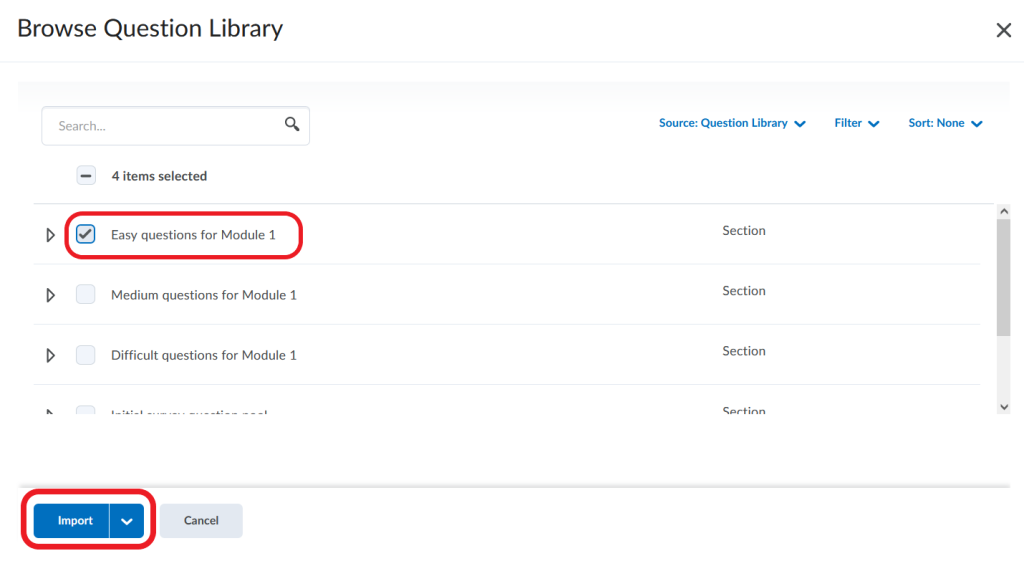
Save your quiz.
Click Import. The questions/sections along with all their properties (shuffling, randomization of answer choices etc.) will now be added to your quiz.
The video below illustrates the process of importing sections and questions from the ‘Question Library’ into a quiz.
Video Instructions
Quizzes – Populate a Quiz with Questions from Question Library
Video Overview
This video explains the benefits of using the ‘Question Library’ in creating a quiz.
Question Library – Benefits of Question Library