The Grade Book
The grade book in Brightspace enables you to manage student grades throughout the course in a transparent and consistent manner. You can customize the grade book to match your course evaluation plan by creating grade items for assignments, quizzes, discussions, projects, and other assessments. Grade items can also be linked to Assignments, Quizzes, and Discussions in Brightspace, allowing grades to be automatically transferred to the grade book.
The grade book can be created at any time during the semester, but creating it early in the term is recommended. Doing it early enables you to link Brightspace assessments, such as quizzes, assignments, and discussions, to grade items for seamless grade transfer.
Setting Up the Grade Book
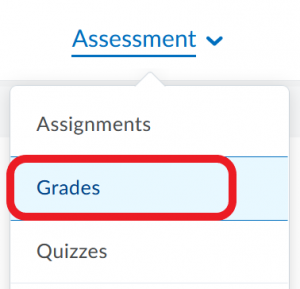
- On your course home page, go to Assessment and select Grades from the dropdown menu.

- If you are setting up a grade book for the first time, you will be automatically directed to the Setup Wizard to configure your grade book settings. The Setup Wizard is a guided, step-by-step tool that helps instructors configure the core settings for their course grade book. Scroll to the bottom of the page and click Start. (If you copied a previous course offering, the grade book may already be configured. In that case, you can either skip this step or run the Setup Wizard manually to review and adjust the grade book settings as needed.)

- You will now be taken through the grade book setup process. The default settings suggested in each step are the most commonly used options. However, if you would like to follow a unique evaluation scheme, you can make selections that reflect your plan.
Note
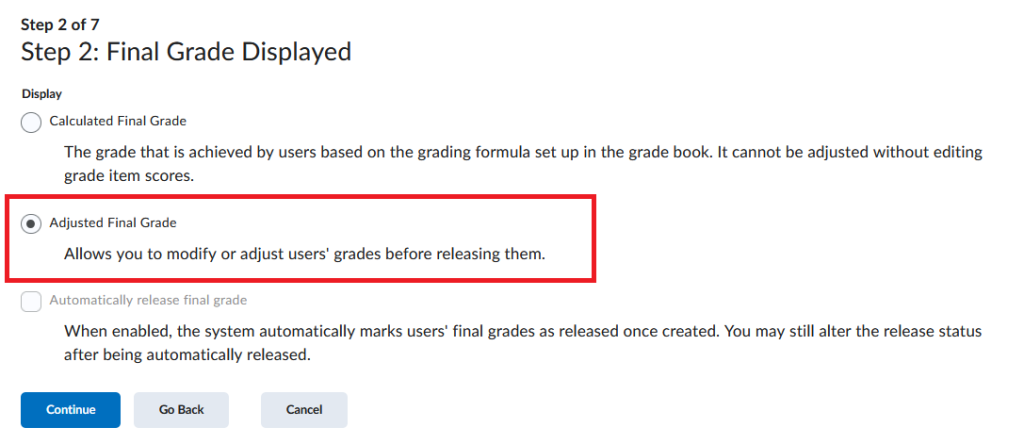
In Step 2 of the setup process, the Adjusted Final Grade is selected by default. DO NOT CHANGE THIS SETTING. At the end of the term, grades from this column (and not from the Calculated Final Grade column) will be transferred to Banner.
Creating Grade Items
Note
You have to hide the final exam or final assessment grade item in the grade book. Final grades are officially released by the Registrar’s Office through Memorial Self-Service five days after final exams end. For more information, please visit the Registrar’s Office.
- When you finish the setup process using the wizard, click on Manage Grades in the menu just below the course navbar.

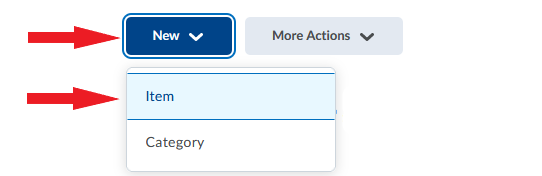
- You can now begin creating your Grade Items. Grade items represent the actual assessments students in your course will complete and to which you will assign grades. To create a grade item, click New and select Item.
- Later when you start creating assessments in your course (assignments, quizzes, discussion forums etc.), you will be able to link them to the Grade Items in your grade book.
- If your course involves multiple assessments, you may also wish to create Categories in your grade book to help you group related assessments (e.g. quizzes) into sections. A major benefit of using categories is the ability to drop the highest or lowest grade items within that category from evaluation. For instance, if your students write 10 quizzes but you want only the 8 highest grades to count towards the final grade, creating a ‘Quizzes’ category enables you to automatically drop the two lowest grades.
Note
Once you begin entering student grades, you should not make changes to the grade book settings as they can affect existing data.
Entering Grades
Grades can be entered into the Brightspace Grades tool in one of three ways:
Option 1: You can enter grades manually by following these steps:
- In your course navbar, click Assessment.

- Select Grades from the dropdown menu.
- Click Switch to Spreadsheet View.

- Enter student grades.
- Save the document – saved grades are visible to students.
Option 2: You can transfer grades directly from Brightspace assessment tools (quizzes, assignment folders, discussions). Please refer to the videos below for instructions on how to do it for each tool.
Option 3: You can import grades from a CSV, TSV or TXT file on your computer into the grade book.
Video Instructions
The videos below illustrate how to enter grades into the Brightspace grade book, and also show how to transfer grades from other Brightspace tools directly into the grade book.
Enter Grades
Grades – Enter Grades
Grade Exemptions
You can exempt a student from completing a grade item or an activity by using the exemption setting in Brightspace. A zero grade or a blank means that the student did not submit the item, that the item was not graded, or that the student failed the assessment. Having an exemption indicates that the item was not submitted due to a legitimate reason.
Note
You cannot exempt a student from a Final Calculated Grade or a Final Adjusted Grade.
Exempting from a Grade Item
To exempt one or more students from a grade item, do the following.
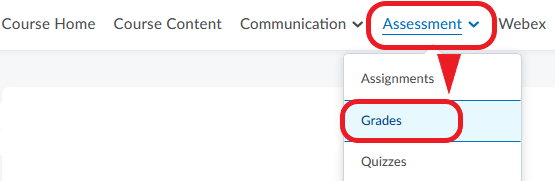
- In your course navbar, go to Assessment and select Grades from the menu.
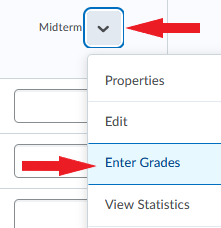
- Locate the grade item for which you want to grant an exemption. Click the down arrow next to it and select Enter Grades from the menu.
- Select the student(s) you want to exempt and click Exempt.
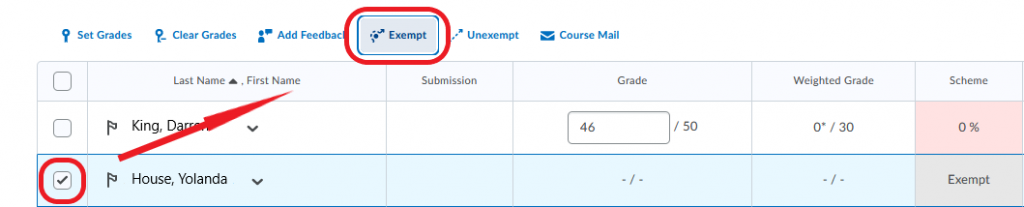
Click Save and Close.
The student(s) will now be listed as exempt from the grade item and the missing grade will not count towards their final grade.
Exempting a Student from Multiple Assessments in One Step
If you want to exempt a student from more than one grade item, you can use the ‘Bulk edit exemptions’ feature to do that.
- In your course navbar, go to Assessment and select Grades from the menu.
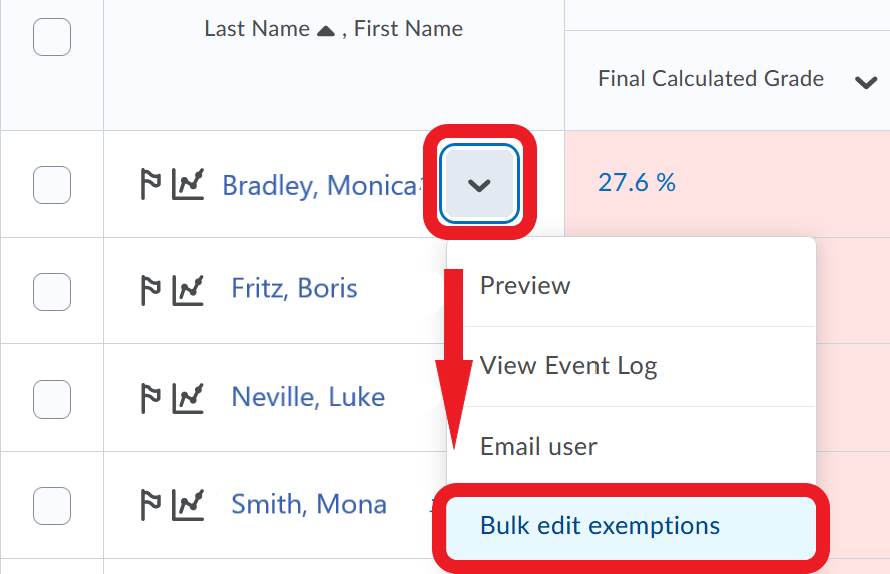
- Locate the student to whom you want exempt, and click the down arrow next to their name.
- Select ‘Bulk edit exemptions’ from the menu.
- On the page that opens, select all the course assessments from which you want to exempt the students.
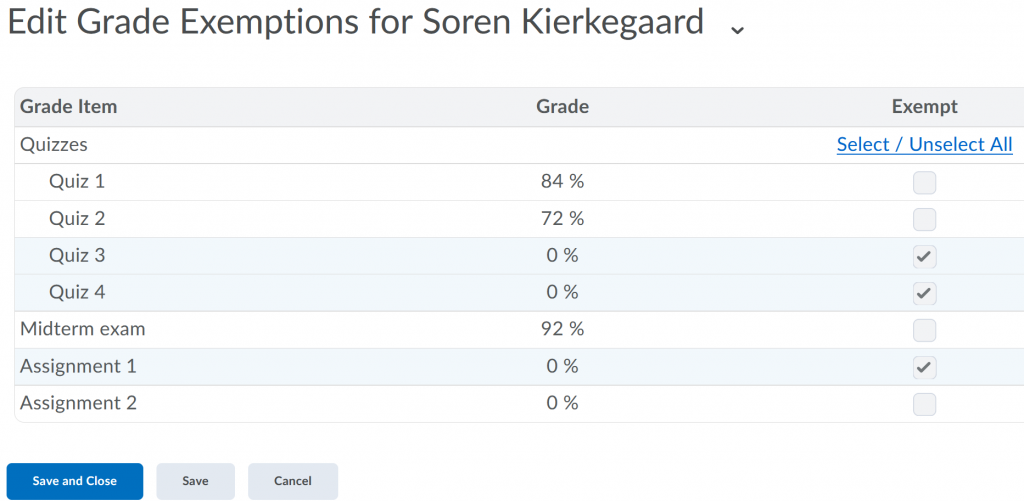
Click Save and Close.
Video Instructions
Exemptions Overview
Grades – Exemptions Overview
Create Grade Exemptions
Create Grade Exemptions
Grades FAQs
What is the difference between a ‘Grade Item’ and a ‘Grade Category’?
Grade Items represent the actual assessments students in your course complete and to which you will assign grades.
Grade Categories can optionally be used in your grade book to group related assessments (e.g. quizzes) into sections. A category must contain at least one grade item, but usually has more.
What is the difference between ‘Weight’ and ‘Maximum Points’?
The ‘weight’ assigned to a grade item or category indicates how much that item/category contributes towards the final grade of 100%.
Note
The weight of a grade item within a category is the percentage it contributes to that category, not to the final grade. Thus, the total weight of grade items within a category should add up to 100%. In the example below, there are 4 quizzes in a course, and altogether they contribute 30% towards the final grade. Each quiz, however, has a weight of 25% towards the category ‘Quizzes’.
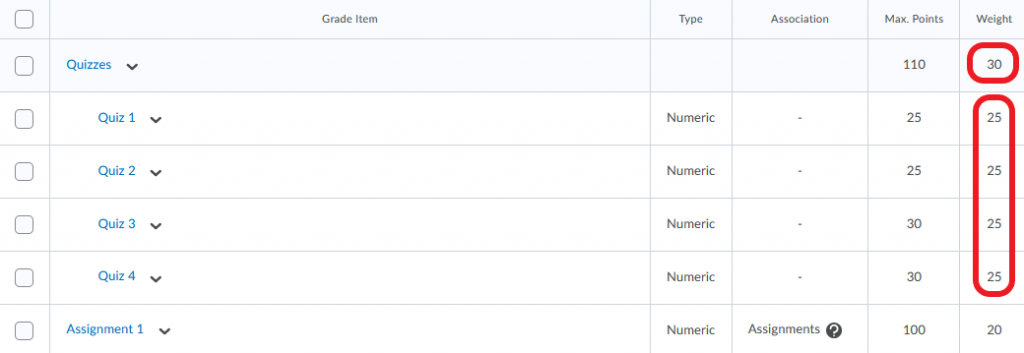
The ‘maximum points’ you assign to individual grade items (= your assessments) can be any value. For example, an assig
Why would I use a category?
Using categories in the grade book allows you to organize your grade items into sections, which can be particularly helpful in courses with multiple assessments. For example, if your course involves weekly assignments, you may wish to create a ‘Weekly Assignments’ category in the grade book to group those grade items together.
A major benefit of using categories is the ability to drop the highest or lowest grade items within that category from evaluation. For instance, if your students write 10 quizzes but you want only the 8 highest grades to count towards the final grade, creating a ‘Quizzes’ category enables you to automatically drop the two lowest grades. For information on how to do it, please refer to ‘How do I drop items automatically?’ below on this page.
How do I hide items in the grade book?
In your course navbar, go to Assessment and select Grades from the menu.
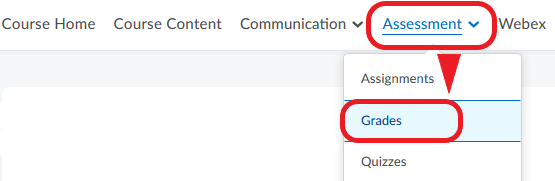
- Click the Manage Grades tab.

- Click the down arrow next to the grade item or category you want to hide. Select Hide from Users from the menu.
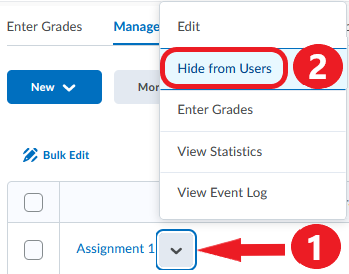
- An icon will appear next to the grade item indicating that it is not visible to students.

Click Save and Close.
How can I release grades at scheduled times?
In your course navbar, go to Assessment and select Grades from the menu.
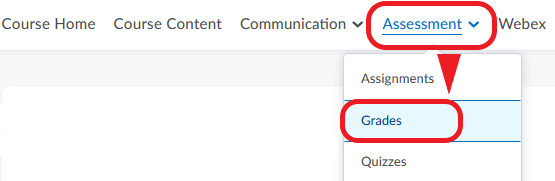
- Locate the column with the assessment for which you want to schedule grade release.
- Click the down arrow next to the grade item and select Edit from the menu.
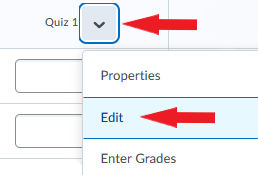
- Go to the Restrictions tab. Set the date when you want grades for this item to be released to students.
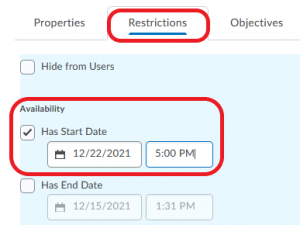
Click Save and Close.
How do I drop items automatically?
If a category in your grade book contains multiple grade items, you can choose to have one or more of those items excluded from evaluation.
- In your course navbar, go to Assessment and select Grades from the menu.
- Go to the Manage Grades tab.

- Click on the category from which you want to exclude highest or lowest grades (or create a new category by clicking New).
- Scroll down to the Distribution area of the page.
- Select ‘Distribute weight evenly across all items‘ (dropping grades is not possible for the other settings).
- Indicate how many low or high grade items will be dropped from the category.
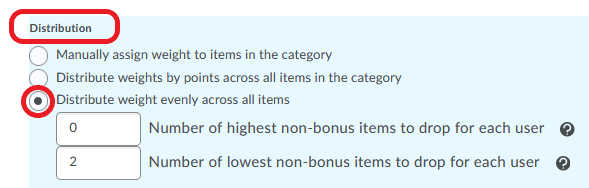
Click Save and Close.
How do I link a quiz to a grade item?
Brightspace allows you to link course assessments (quizzes, assignments, and discussion posts) directly to the grade book, which means that the grades you assign within the assessment tool will be automatically transferred to the grade book. The steps below outline how to link a Brightspace quiz to a grade item in the grade book.
- In your course navbar, go to Assessment and select Quizzes from the menu.
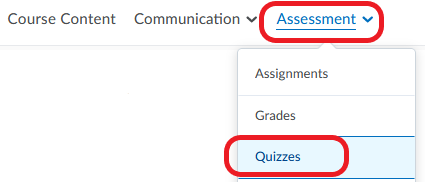
- Click on the quiz you want to link to the grade book (or create a new one by clicking New Quiz).
- On the ‘Edit Quiz’ (or ‘New Quiz’) page, go to the Assessment tab.

- Locate the Assessment section of the page.
- If you have previously created a grade item for the quiz in the grade book, click the down arrow under Grade Item and select the existing grade item to which you want to link the quiz.
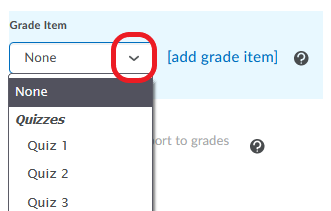
- If you have not yet created a grade item for this quiz in the grade book, click [add grade item].
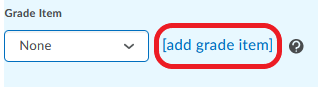
- Create the grade item by following prompts in the New Grade Item window that pops up. Click Save.
- Click Save and Close. A ribbon icon will now appear next to the quiz indicating that the quiz is linked to the grade book.

For instructions on linking an assignment to the grade book, visit this page and look under ‘Grading options‘.
For instructions on linking discussion posts evaluations to the grade book, visit this Brightspace resource.
Can I give different groups a different grading scheme?
Not easily. If you wish to explore this option, please contact CITL Client Support to discuss your specific needs.
How do I make students exempt from grade items?
In your course navbar, go to Assessment and select Grades from the menu.
- Locate the grade item for which you want to grant an exemption. Click the down arrow next to it and select Enter Grades from the menu.
- Select the student(s) you want to exempt and click Exempt.
Click Save and Close.
The student(s) will now be listed as exempt from the grade item.
How can I view statistics on grades?
In your course navbar, go to Assessment and select Grades from the menu.
- Go to Manage Grades.
- Locate the column with the grade item you wish to view and click the down arrow next to it.
- Select View Statistics from the menu.

Can TAs manage the grade book?
Yes. A teaching assistant, or a TA, is able to manage and enter grades in the Grades tools. TAs can also mark quizzes and assignments.
Video Instructions
Understanding Grades
Grades – Understanding Grades
Create a Grade Item
Grades – Create a Grade Item – Points
Create a Category
Content – Grades – Create a Category – Points
Associate an Activity with a Grade Item
Grades – Associate an Activity with a Grade Item
For videos on additional grade book settings, please visit the Grades Tool for Instructors playlist on YouTube.