Transferring Grades to Banner
Grades2Banner (G2B) is a tool used to transfer grades directly from the Brightspace grade book into Banner. This resource provides information on the location of the tool, its features, and on how to use it.
Preparing Grade Book for Banner
At the end of the term, you must transfer your final course grades from Brightspace to Banner. This resource explains how to prepare the grade book for this transfer.
Note
In order to transfer transfer final grades to Banner, you must enter them in the Final Adjusted Grade column of the Brightspace grade book and NOT in the Final Calculated Grade column.
If you have been using the grade book all semester, click here
If you have been using the Brightspace grade book to enter and store grades throughout the semester, final grades will automatically appear in the Final Calculated Grade column of the grade book. However, in order to transfer grade to Banner, you must enter them in the Final Adjusted Grade column. There are two ways to do it.
- You can enter the final grades in the Final Adjusted Grade column manually one-by-one.
- You can transfer all grades from the Final Calculated Grade to the Final Adjusted Grade column automatically:
- In your grade book, locate the Final Calculated Grade column and click the down arrow.
- Select Enter Grades from the dropdown menu.
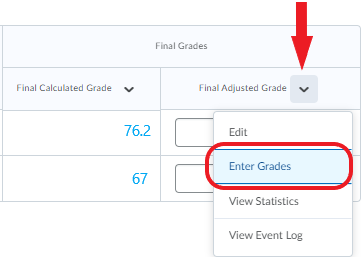
- On the new page that opens, click the down arrow next to Final Grades.
- Select Transfer All from the dropdown menu.
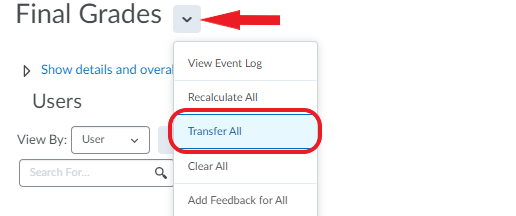
All grades from the Final Calculated Grade will be copied to the Final Adjusted Grade. If any of the grades contain decimal points, you may want to adjust them at this point.
If you have not been using the grade book during the semester, click here
If you have not been using the Brightspace grade book to store grades throughout the semester, you must enter the final grades manually. To successfully enter final grades, follow the steps below.
- In your Brightspace course, go to Assessment in the navbar and select Grades from the dropdown menu.
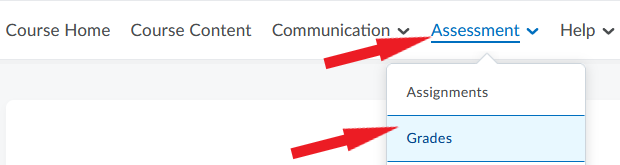
- Make sure you are on the Enter Grades tab in the menu just below the navbar.

- Locate the Final Adjusted Grade column on the page (NOT Final Calculated Grade) and click the down arrow.
- Select Enter Grades from the dropdown menu.
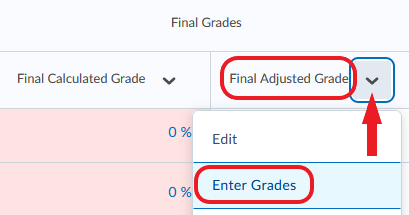
- Enter your students’ final grades.
- Click Save (if you leave this page without saving, you will lose all entered data).
Note: If you need to enter a special grading code for a student (PAS/FAL/ABS/INC), click on the Enter Special Codes tab below.
Enter Special Codes
Special grading codes (i.e., numeric values corresponding to Pass, Fail, Incomplete or Absent) can be entered in your Brightspace grade book and then transferred to Banner using the Grades2Banner tool. For any student that needs to receive a special code, you must enter negative grades in the Final Adjusted Grade column of the grade book according to the table below.
| Value To Enter | Grade Description | Grade Code In Banner |
| -1 | Fail | FAL |
| -2 | Pass | PAS |
| -3 | Absent | ABS |
| -4 | Incomplete | INC |
Your final grade book could look something like this:
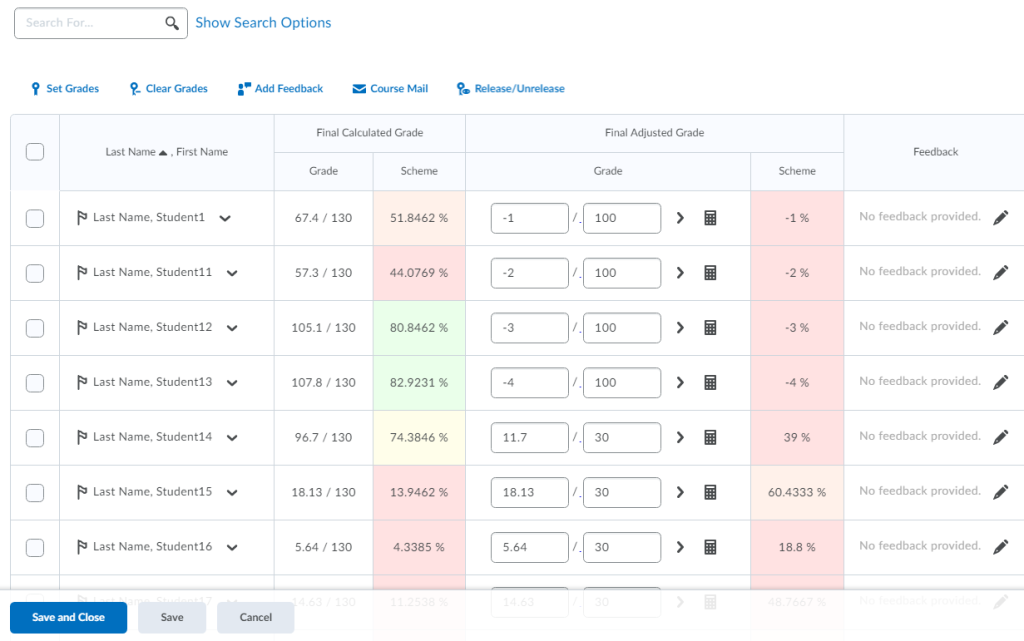
You can also enter special codes directly in Banner rather than in Brightspace. For any student that requires a special code, delete their grade from the Final Adjusted Grade column in Brightspace and leave the box blank. Otherwise, that partial grade will be transferred and must be overridden within Banner.
Below is a summary of steps to follow:
Transfer grades from Brightspace to Banner.
Enter final course grades in the Final Adjusted Grade column of the grade book in your Brightspace course.
Enter special grade codes (negative grades corresponding to PAS/FAL/ABS/INC) according to the chart above.
Transferring Grades
Accessing Grades2Banner
There are three places where you can access the Grades2Banner tool.
- The easiest way to find the tool is in the course navbar on your Brightspace home page. (If you are not signed into MUN Login, you will be prompted to log in first.)

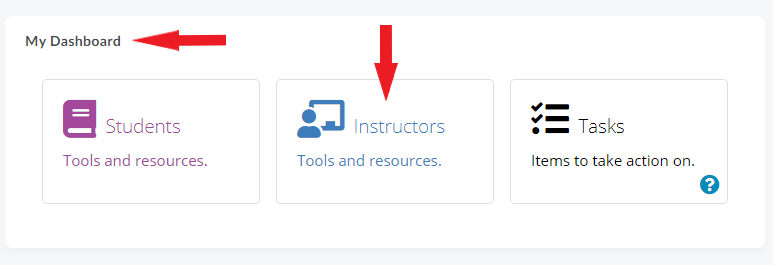
- You can also access Grades2Banner through the My Dashboard widget on your Brightspace home page.
- Log in to Brightspace
- Locate the My Dashboard widget on the home page
- Click Instructors
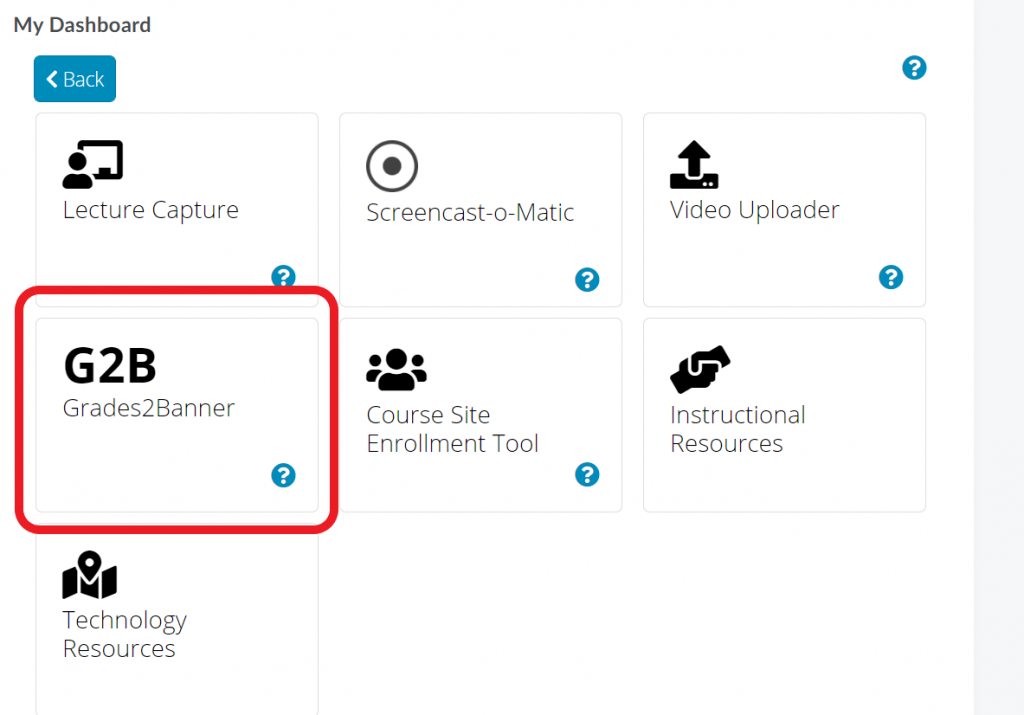
- From the new menu that opens, select Grades2Banner.
- You can also directly access the G2B tool through the Instructor Tools page.
If you have trouble accessing the G2B tool or do not see the Instructors tile, please contact the Support Centre.
Understanding the Interface
The numbers circled in blue correspond to the features listed below.
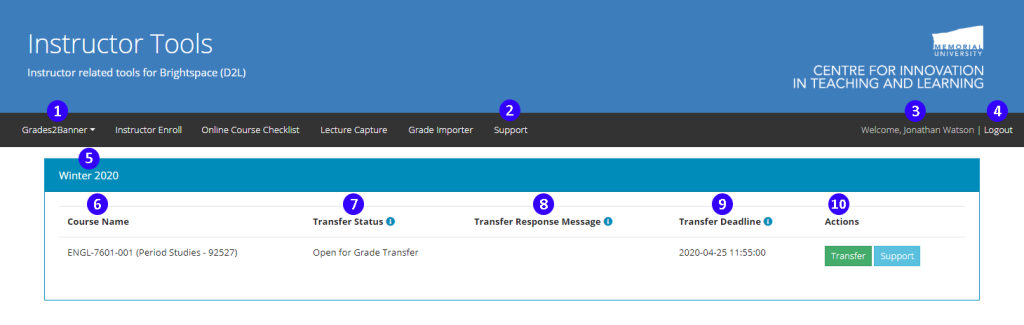
Actions – Displays the action available.
Grades2Banner – The tool itself. It is a dropdown menu displaying the current and previous semesters if you were teaching at that time.
Support – A link to the CITL Support Centre.
Welcome identifier – Identifies the user that has signed in to this tool.
Logout – This will log you out of all my.mun.ca services.
Semester – Displays the semester you are currently viewing
Course Name – Lists courses in alphabetical order by open transfer status.
Transfer Status – Indicates the grade transfer status of the course.
Transfer Message – Provides more information regarding a transfer.
Transfer Deadline – Displays the deadline to have grades transferred to banner.
Transferring Grades from Brightspace to Banner
Once you have entered your grades in the Final Adjusted Grade column, you are ready to transfer them to Banner using the Grades2Banner tool. This process is illustrated below with a course ENGL 7601 used as an example. (Note: Some of this information may vary depending on how your course is set up.)
Note
The G2B tool will only transfer grades from the Adjusted Final Grades column of the grade book in Brightspace. You can also transfer special grading codes (PAS/FAL/ABS/INC). If you need to do this, please see above on how to configure these codes.
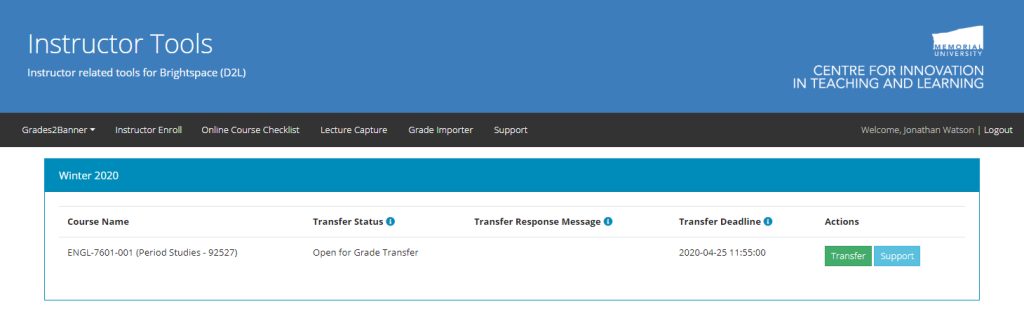
- Select the course for which you are ready to transfer final grades.
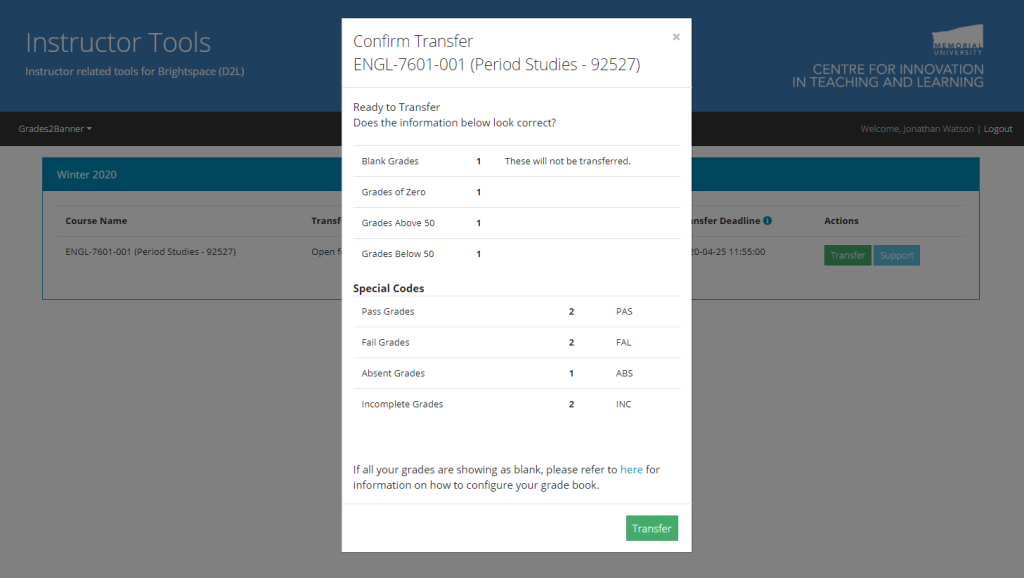
- Click on the Transfer button. This will open a confirmation window.
- Confirm the transfer of grades by following instructions on the screen. The course will then be added to a queue for the grades to be transferred to Banner.
Note
Depending on class size, it may take several minutes to compile the grade information for transfer. Please be patient.
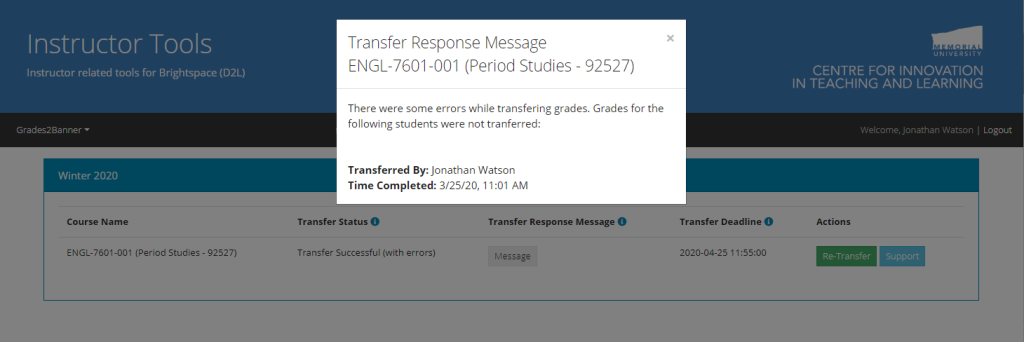
- After a few minutes, refresh the browser window and review the Transfer Status information.
If there are errors in the transfer, a Transfer Response Message will appear on your screen with the error identified. Review the message. In the example below, the majority of grades were transferred but some failed to transfer. When this happens, a list of student numbers will appear in the message (they were purposely deleted from the sample below). This could mean these students are not listed in the course in Banner or something is wrong with the grade book in Brightspace. Please reach out to the Support Centre if you have any issues resolving the errors.
Repeat steps 1 to 5 for all additional courses.
Please confirm that Transfer Successful appears next to the course. If the process was not successful and you are unable to identify the problem, please contact the Support Centre.
If you encounter any issues with transferring your grades using the Grades2Banner tool, please contact the CITL Support Centre.