Video Assignments
Communication, critical thinking, and collaboration are crucial competencies students must have in any discipline they choose to pursue. These soft skills are not just important to master in the classroom – they are indispensable for students’ future success. Being able to communicate ideas, present well, and collaborate with others are critical skills in today’s workplace. With this in mind, Brightspace has partnered with Bongo to provide an integrated video assessment tool.
The Video Assignment tool, developed by Bongo and integrated with Brightspace, allows instructors to implement structured, video-based assessments that evaluate students on speeches, presentations, and more. These authentic assessments can be used to facilitate skill development and help learners practice and develop their communication skills, presentation style, critical thinking, and other soft skills. Additionally, the video assessments can be created and then graded directly in the Brightspace course site. Instructors can also add time-stamped feedback, showing students exactly where they need to improve.
Note
Creating video assignments in Safari may not work unless the newest version of the web browser is used. Using Chrome, Firefox, or Microsoft Edge is recommended.
Sample Uses
- Oral assessments: Students can record themselves discussing a topic and/or sharing their opinion.
- Foreign language assessments: Students can demonstrate and/or practice their vocabulary.
- Mock interviews: Students can practice and prepare for real interview situations, e.g. job interviews or interviews in professional contexts (nursing, social work, education etc.)
- Case studies: Students can make a video using a “real world” example to demonstrate a concept learned in class.
- Role plays: Students can write and record poetry or short stories that illustrate literary elements learned in an English class.
- Lab work: Students can display the results of a science lab project from beginning to end, from hypothesis to conclusion.
Types of Video Assignments
The video assignment tool allows instructors to create four different types of assessments:The video assignment tool allows instructors to create four different types of assessments. Click on each type below to view details.
1. Individual Assignment
In an Individual Video Assignment, learners record or upload a video of themselves presenting on a topic or demonstrating a specific skill. With the screenshare feature, they can also enhance their project with visual aids. The individual video project can be used for the following evaluation types:
- Critiques (of an article/movie/book etc.)
- Presentations with or without visual aids (e.g. screen sharing)
- Explanations of theories/concepts/arguments
- Demonstration of skills
2. Group Assignment
In a Group Video Assignment, students work in groups toward a single presentation/video. Within their group, students can schedule and host their own Online Room meetings to collaborate on the assignment. The members’ individual contributions are then combined into a cohesive end-product, which is submitted to the instructor in Brightspace. A group video project can be used for the following evaluation types:
- Capstone projects
- Group presentations
- Role plays
- Mock interviews
- Conversation scenarios in foreign language courses
3. Question & Answer Assignment
In a Question-and-Answer Video Assignment, a student is presented with prompts (up to 20) and given a set amount of time to respond to each prompt. Recording starts once a prompt is presented, and the student only has one opportunity to answer each prompt, replicating the high-stakes environment of being asked questions in a face-to-face setting. A question & answer video assignment can be used for the following evaluation types:
- Interview preparation
- Oral quizzes
- Checking for understanding
- Skill demonstrations
- Mock interviews
- Oral assessments in foreign language courses
- Skills assessment for vocational training
4. Interactive Video Assignment
In an Interactive Video Assignment, students engage with video content in an interactive manner—students watch a video recorded or uploaded by the instructor, and they respond to prompts at specific times in the video.
The prompts (maximum of 20) appear at various points in the recording, as determined by the instructor. These prompts ask students to either answer multiple choice questions or to give video responses. When prompted for a video response, the student records a video within the platform. They continue until they have both completed the prompts and watched the whole video. Progress is saved, so learners can complete the assignment in multiple sittings. When finished, the assignment is submitted automatically. An interactive video project can be used for the following evaluation types:
- Soft skills training
- Safety/compliance training
- Checking for understanding
- Video quizzes
For more information on each type of video assignments, please refer to these Bongo resources.
Creating Video Assignments
Note
A video assignment must be created within a content module. It cannot be created in any other location in Brightspace (e.g. in Assignments).
Once you decide which type of video assignment you want to use in your course, you can create it directly in Brightspace. In the menu below, click on the type you want to create to view step-by-step instructions.
Note
To ensure a problem-free experience for you and your students, please follow Bongo’s Basic System Requirements.
1. Create an Individual Assignment
- Log in to Brightspace and go to your course site.
- Select Content in the course navbar.

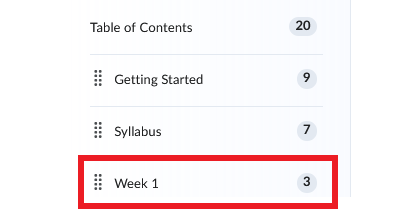
- Under the Table of Contents, select the content module where you want to place the video assignment.
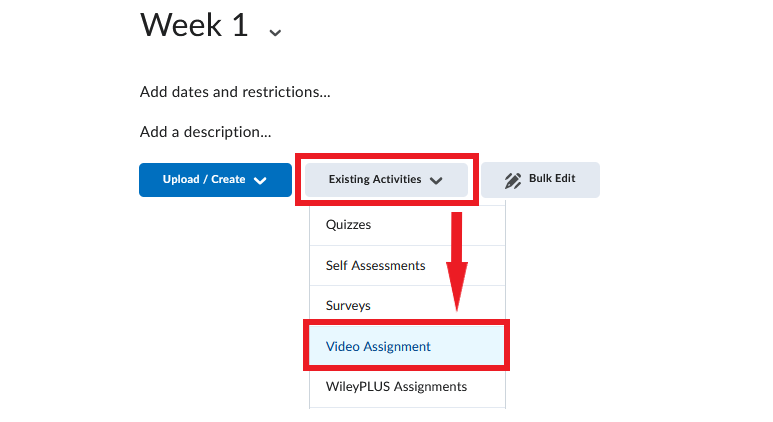
- In the content module you selected, click Existing Activities. A dropdown menu will open. Select Video Assignment from the list.
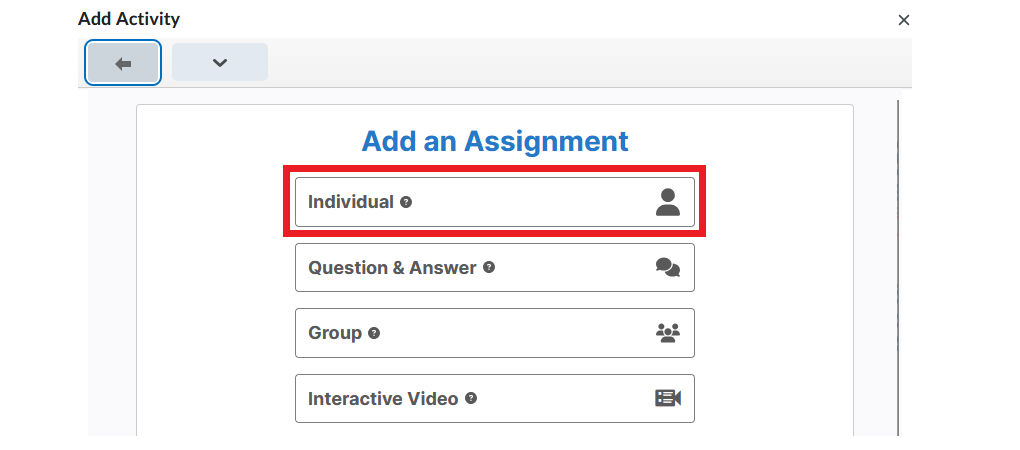
- In the new window that opens, select Individual from the list of available assignment options.
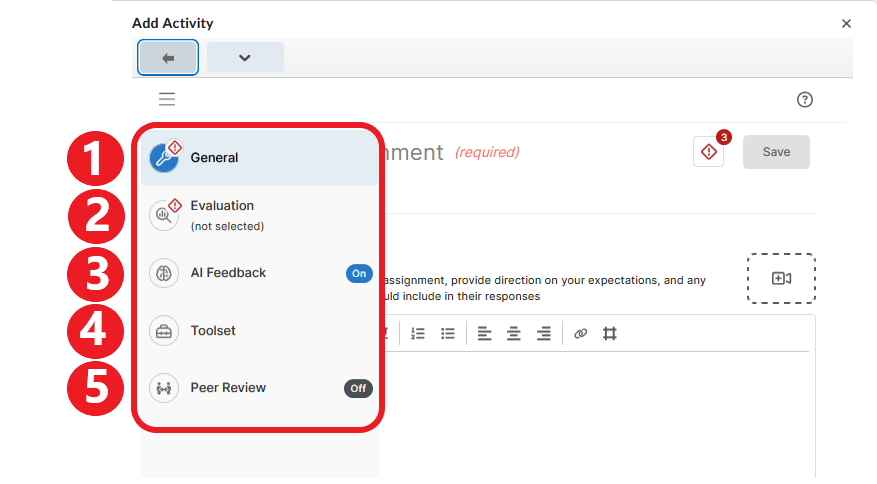
- Configure the assignment using the menu on the left side of the screen. (You may need to hover the cursor over the menu to reveal what the icons represent.) The menu for an individual video assignment contains five categories of information:
- General
- Evaluation
- AI Feedback (ON by default)
- Toolset
- Peer Review (OFF by default)
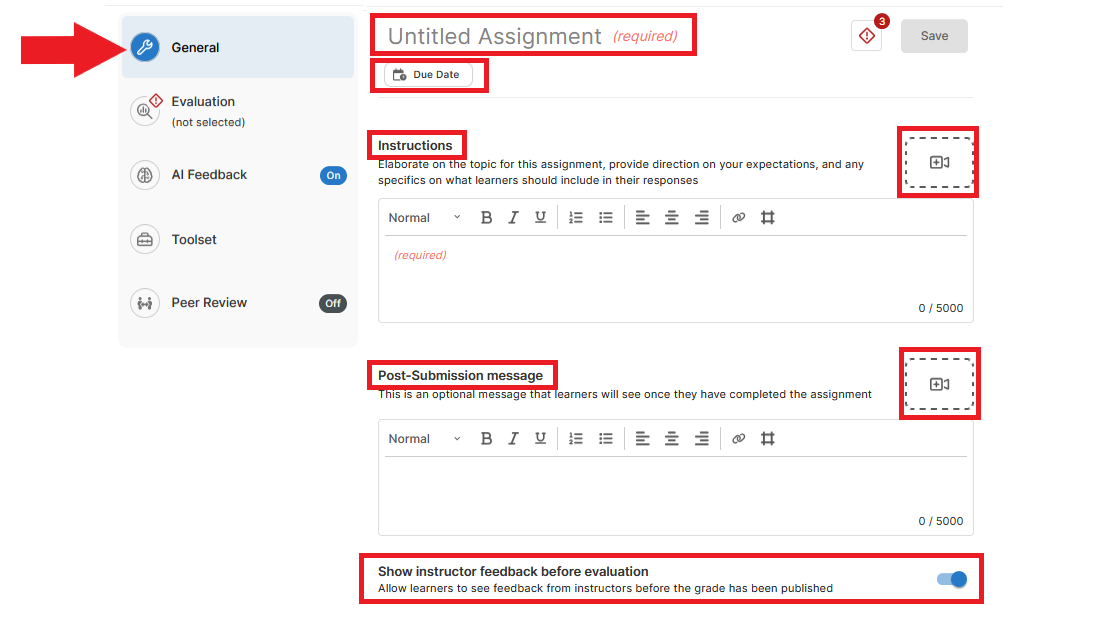
1. General Information
In the General section, enter the following:
- Assignment Title (required)
- Due Date
- Instructions – Written instructions are required. Optionally, you can also record video instructions by clicking the camera icon to the right (
).
- Post-Submission message – You can optionally include a written or a video message that students will see when they submit their recording.
- Show instructor feedback before evaluation. This option is ON by default. If you leave it ON, students will be able to see your feedback on their submission before the assignment grade is published. If you prefer to release feedback at the same time as the grade, turn this option OFF by clicking the toggle button.
2. Evaluation
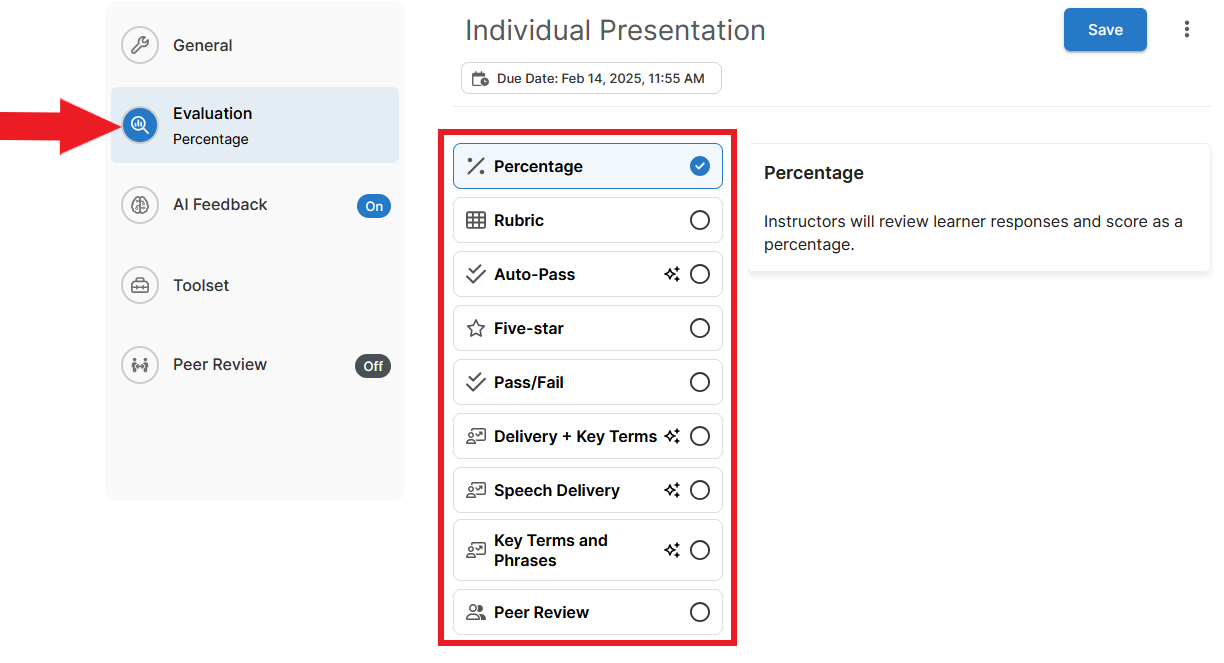
In the Evaluation section, choose how you want to evaluate the assignment. Only one evaluation method can be selected. The available options are:
- Percentage
- Rubric (if you select this option, you will need to create a rubric within the video assignment tool)
- Auto-Pass
- Five-Star
- Pass/Fail
- Delivery + Key Terms
- Speech Delivery
- Key Terms and Phrases
- Peer Review
Click on each evaluation method to see more information about that method. For more information on scoring methods in for video assignments, please visit this Bongo resource.
3. AI Feedback
AI Feedback is a tool that automatically transcribes a recording, analyzes it, and provides feedback on the following parameters:
- quality of speech delivery (speech rate, filler words, clarity)
- students’ use of specific words and phrases (this function is optional; for details, see More options below).
Note
AI Feedback can help students prepare better submissions. Students can create a recording, have it auto-analyzed using AI Feedback, and decide whether the recording is ready for submission or if they should re-record.
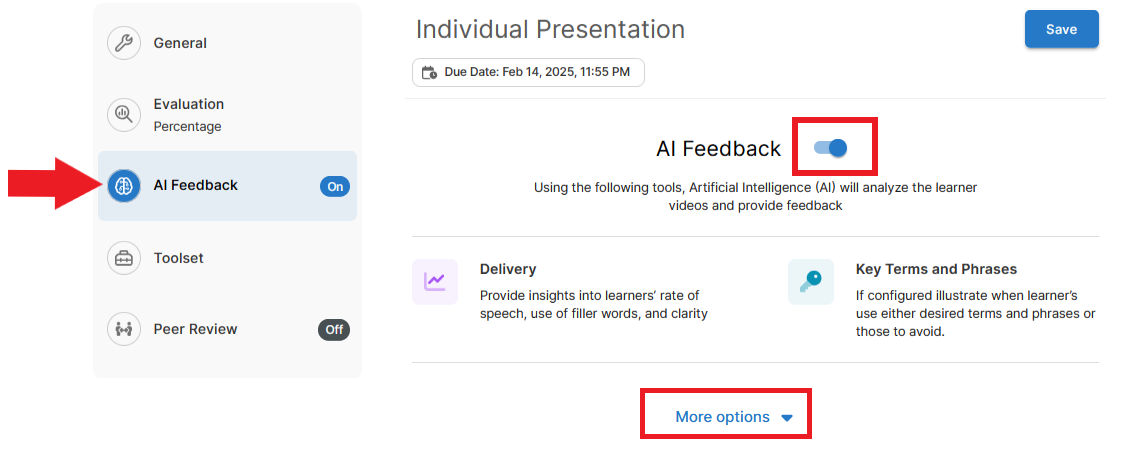
AI Feedback is turned ON by default. If left ON, the AI analysis and score will be available to students and the instructor. You can turn this function OFF by clicking the toggle button next to AI Feedback.
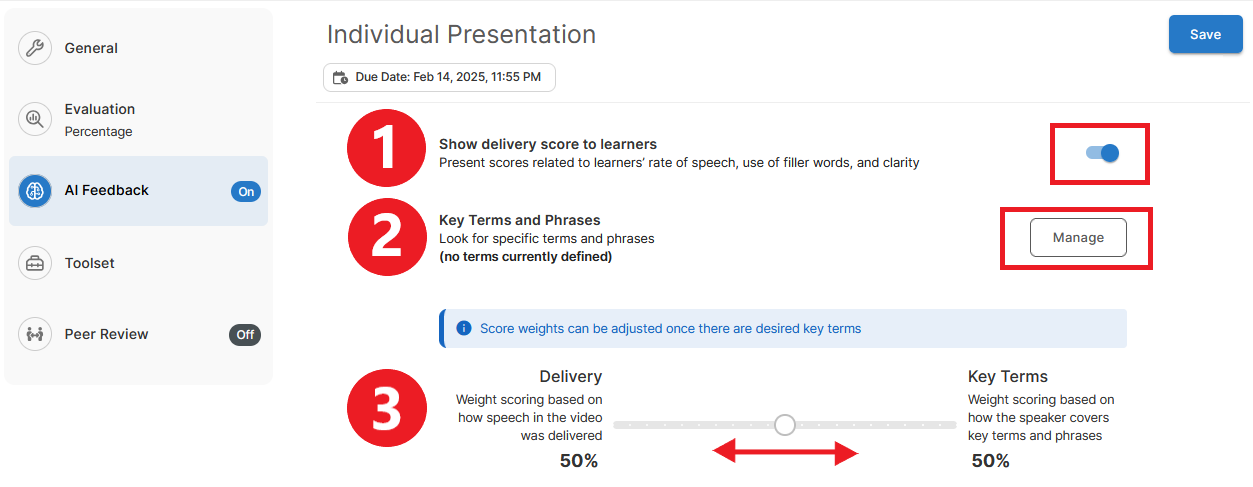
If you decide to keep AI Feedback ON, click More options to set additional parameters. Under More options you can:
- Hide the score generated by AI Feedback from students – students will still get a detailed analysis of their speech but without a numerical score.
- Enter key terms and phrases you would like students to use in their recordings (these terms will be identified and highlighted in the auto-generated transcript).
- Determine what portion of the grade should be based on speech delivery in relation to the use of key phrases.
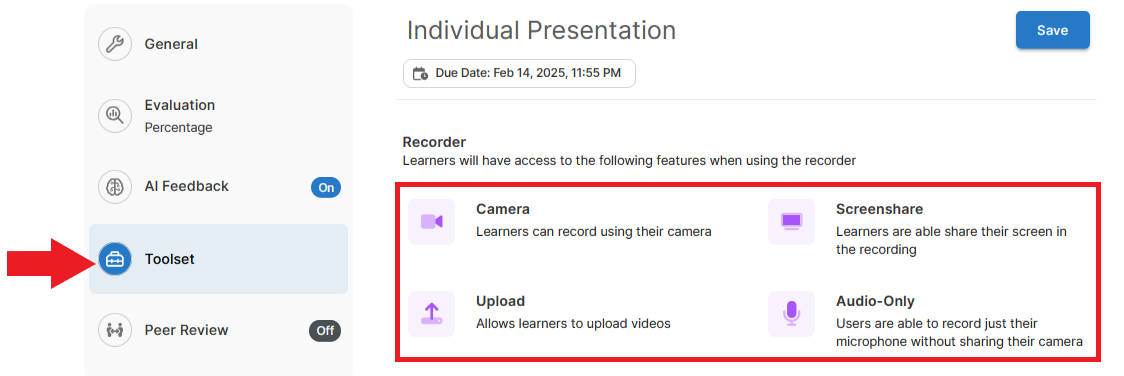
4. Toolset
The Toolset section lists the tools students will have access to when preparing their submissions. Students can:
- use a camera
- share their screen
- create an audio-only recording
- upload an existing recording from their device
Note that for an individual video assignment, the instructor cannot disable any of these tools.
5. Peer Review
The peer review function is turned OFF by default. If you wish to incorporate peer review in the assignment, enable it by switching the toggle button to the ON position. Then click More options to set additional parameters.
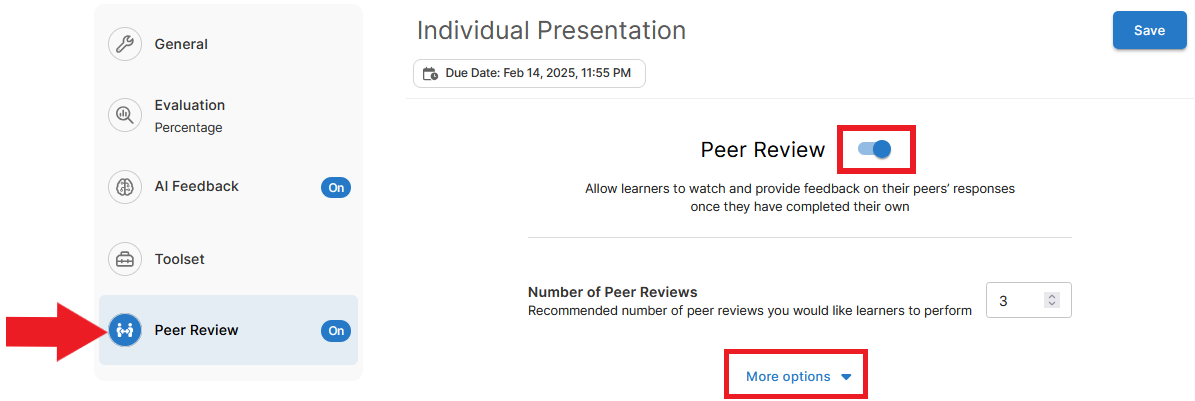
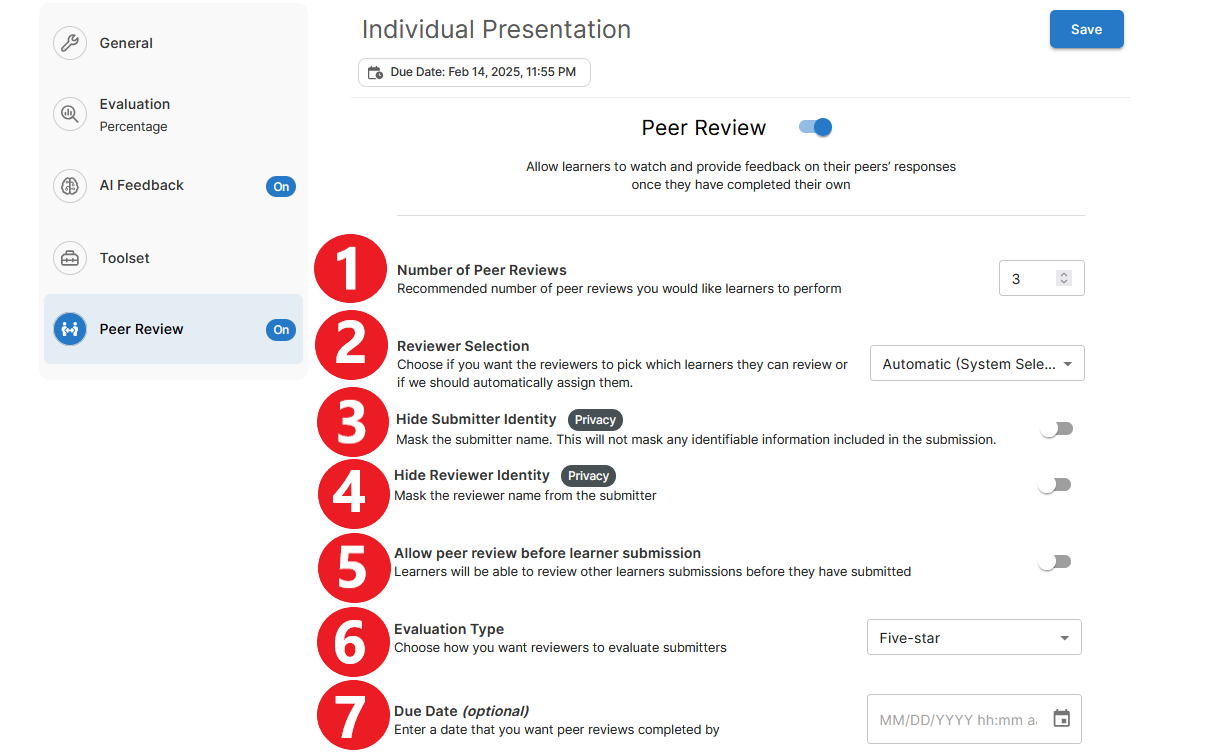
Under More options, you can set the following:
- the number of reviewers per submission
- the way reviewers will be assigned to submissions (A. the system can assign them randomly, or B. students can choose which submission(s) they want to review)
- whether to hide or reveal the identity of the submitter
- whether to hide or reveal the identity of the reviewer(s)
- whether to make peer feedback available to students before recordings have to be submitted to the instructor (this option would give students a chance to reflect on peer feedback and re-record if necessary)
- the evaluation method the peer reviewers should use (two options are available: A. a five-star rating, or B. a rubric provided by the instructor)
- optionally, a due date for the peer reviews
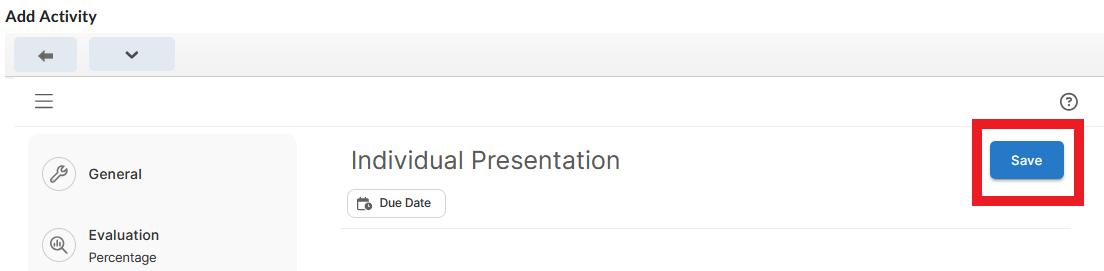
When you have finished creating the video assignment, click Save at the top of the page.
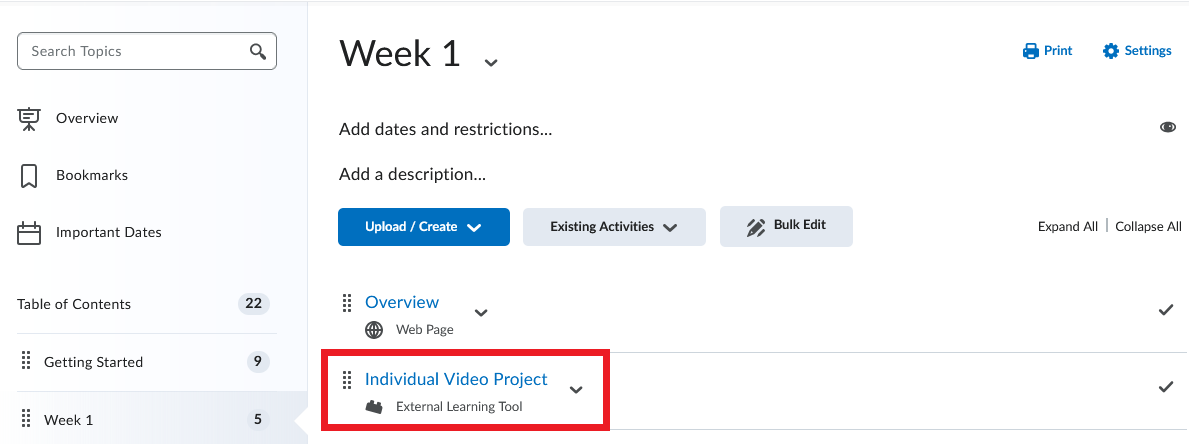
The new assignment will now appear in a content module in Brightspace.
For more information on the individual video assignment, please refer to this Bongo resource.
2. Create a Group Assignment
Log in to Brightspace and go to your course site.
Select Content in the course navbar.
- Under the Table of Contents, select the content module where you want to place the video assignment.
- In the content module you selected, click Existing Activities. A dropdown menu will open. Select Video Assignment from the list.
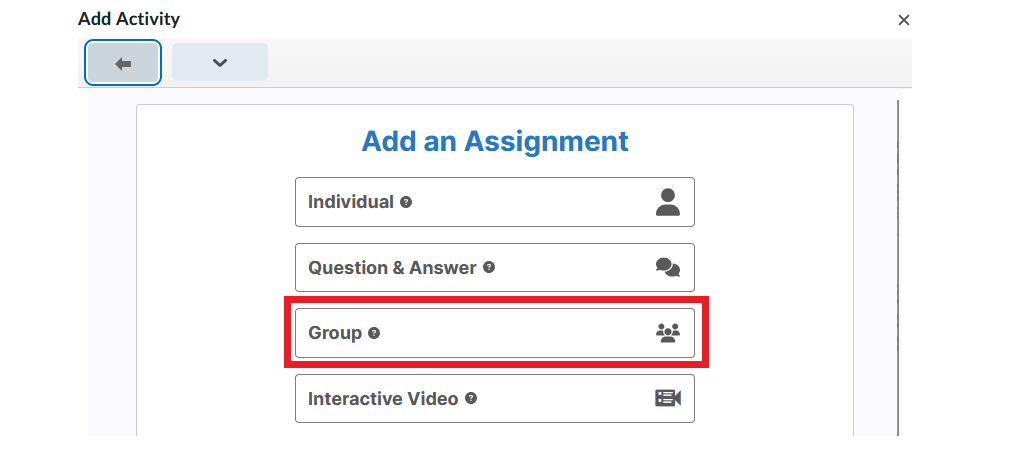
- In the new window that opens, select Group from the list of available assignment options.
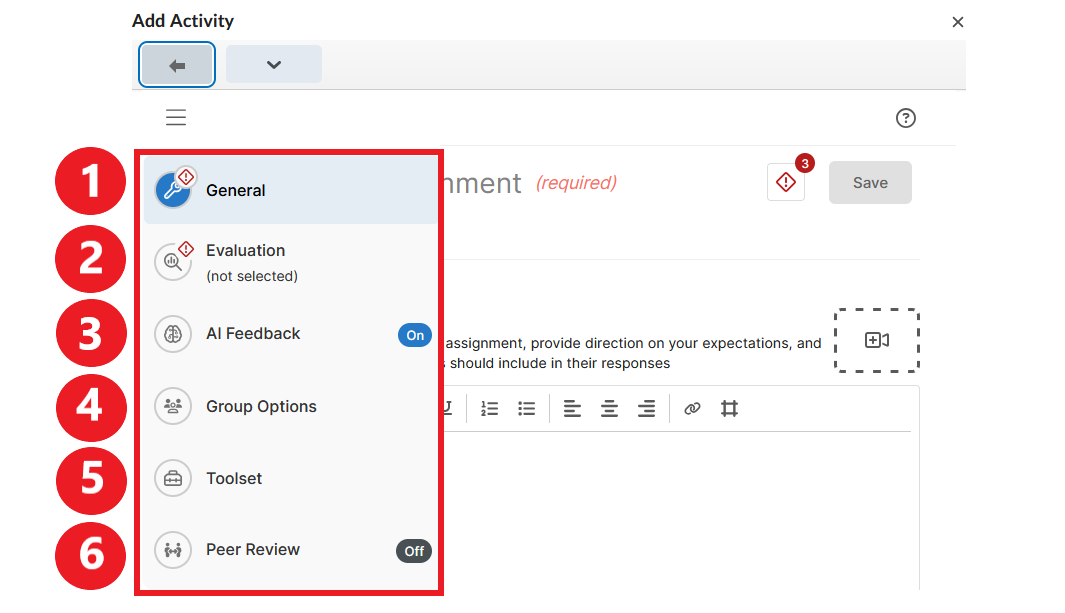
- Configure the assignment using the menu on the left side of the screen. (You may need to hover the cursor over the menu to reveal what the icons represent.) The menu for a group video assignment contains six categories of information:
- General Information
- Evaluation
- AI Feedback (ON by default)
- Group Options
- Toolset
- Peer Review (OFF by default)
1. General Assignment Information
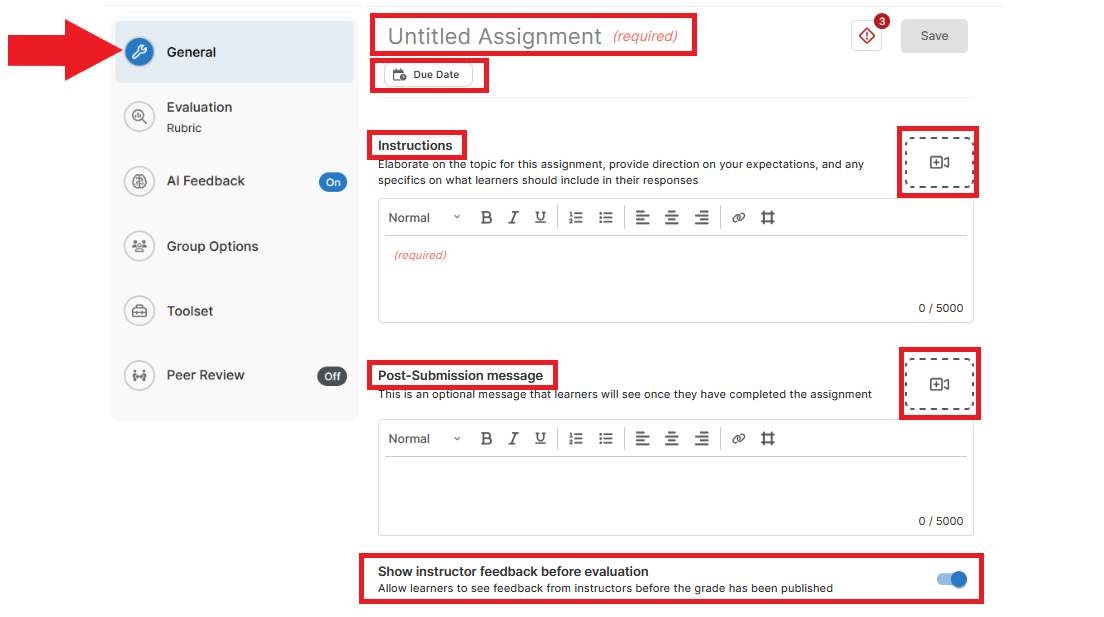
In the General section, enter the following:
- Assignment Title (required)
- Due Date
- Instructions. Written instructions for the assignment are required. Optionally, you can also record video instructions by clicking the camera icon to the right(
- Post-Submission message. You can optionally include a written or a video message that students will see when they submit their recording.
- Show instructor feedback before evaluation. This option is ON by default. If you leave it ON, students will be able to see your feedback on their submission before the assignment grade is published. If you prefer to release feedback at the same time as the grade, turn this option OFF by clicking the toggle button.
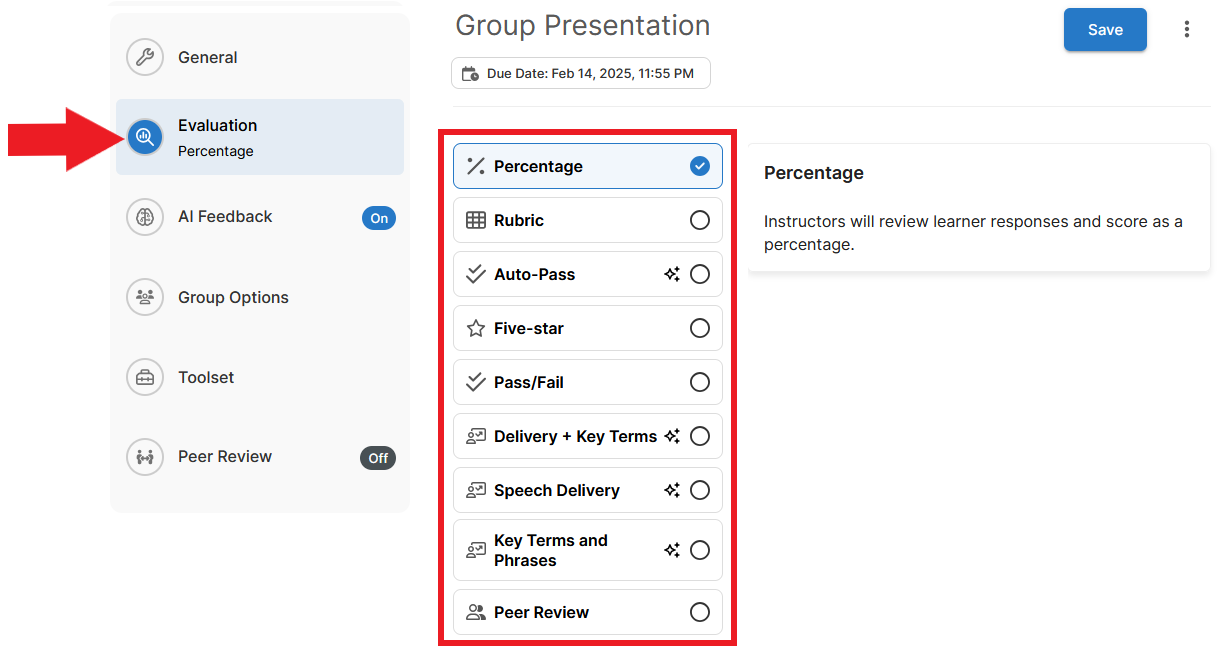
2. Evaluation
In the Evaluation section, choose how you want to evaluate the assignment. Only one evaluation method can be selected. The available options are:
- Percentage
- Rubric (if you select this option, you will need to create a rubric within the video assignment tool)
- Auto-Pass
- Five-Star
- Pass/Fail
- Delivery + Key Terms
- Speech Delivery
- Key Terms and Phrases
- Peer Review
Click on each evaluation method to see more information about that method. For more information on scoring methods in the Video Assignment tool, please visit this Bongo resource.
3. AI Feedback
AI Feedback is a tool that automatically transcribes a recording, analyzes it, and provides feedback on the following parameters:
- quality of speech delivery (speech rate, filler words, clarity)
- students’ use of specific words and phrases (this function is optional; for details, see More options below)
Note
AI Feedback can help students prepare better submissions. Students can create a recording, have it auto-analyzed using AI Feedback, and decide whether the recording is ready for submission or if they should re-record.
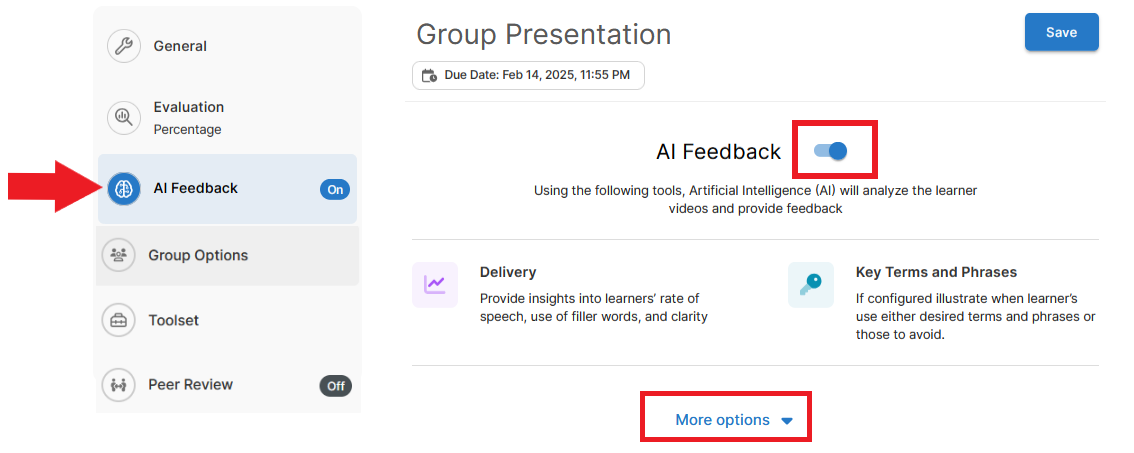
AI Feedback is turned ON by default. If left ON, the AI analysis and score will be available to students and the instructor. You can turn this function OFF by clicking the toggle button next to AI Feedback.
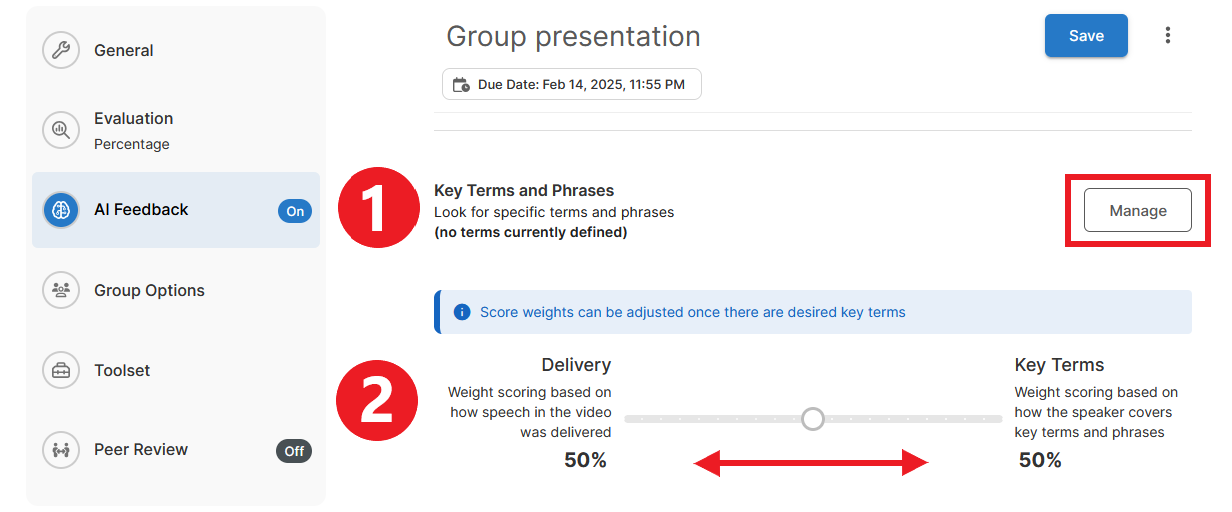
If you decide to keep AI Feedback ON, click More options to set additional parameters. Under More options you can:
- Enter key terms and phrases you would like students to use in their recordings (these terms will be highlighted in the transcript auto-generated transcript).
- Determine what portion of the grade should be based on speech delivery in relation to the use of key phrases.
4. Group Options
Note
Before students can be assigned to groups within the video assignment tool, they first need to click on the assignment link in Content in Brightspace. Until they click that link, their name will not appear on the video assignment page.
Under Group Options, decide how you want to create groups for the assignment. The following options are available:
- You can manually place students in groups.
- Students can select their own groups (if they do not select a group by a certain date, the instructor can manually place them into groups).
- Students can be randomly assigned to groups by the system.
Note
Regardless of the option selected at this stage, instructors can make changes to the groups at any time.
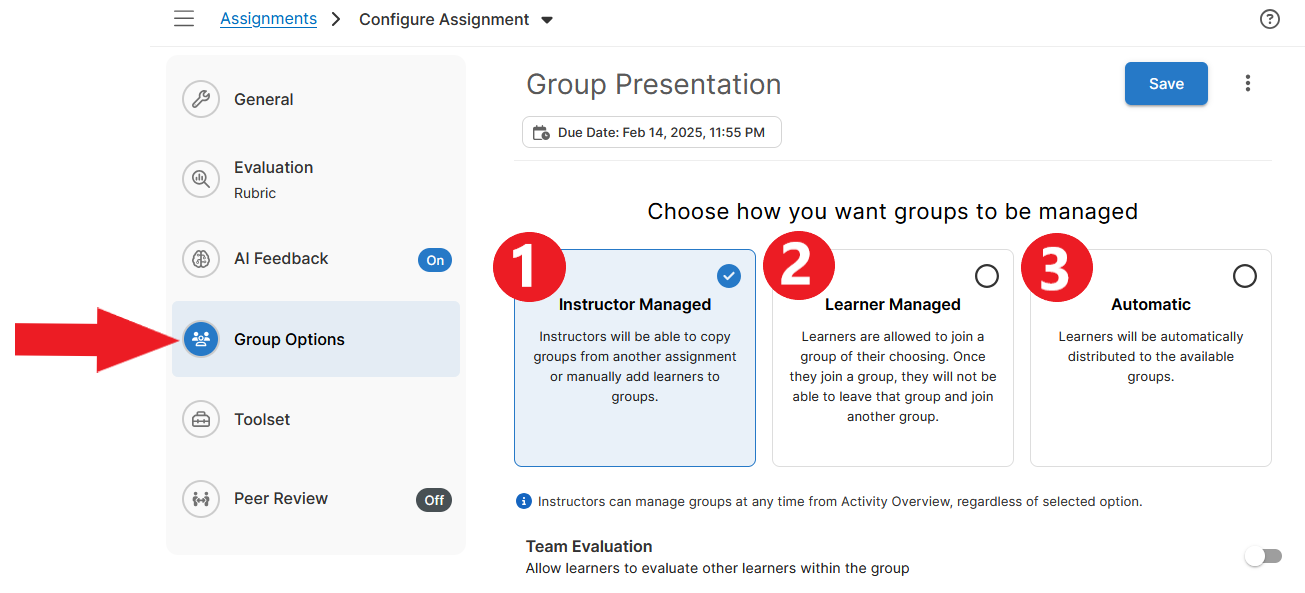
If you selected Learner Managed or Automatic option for group formation, you will be prompted to determine the maximum number of groups you want to create.
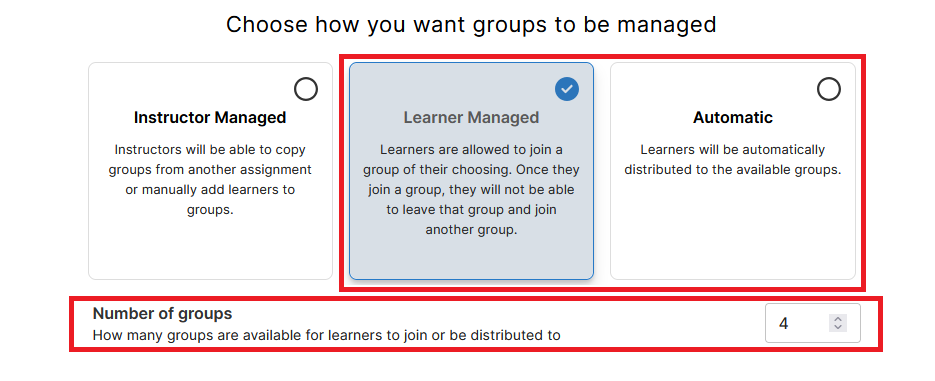
By default, Team Evaluation is turned OFF. If you want students within each group to evaluate each other, turn this option ON by clicking the toggle button on the right. Then click the downward arrow and select one of two available evaluation methods:
Five-Star
Rubric (if you select this option, you will need to create a rubric within the video assignment tool)

Note
Team evaluations are anonymous. Each group member will only see the average score they were given by the other members of their team. Instructors may take the score into account when deciding on the final grade for each student.
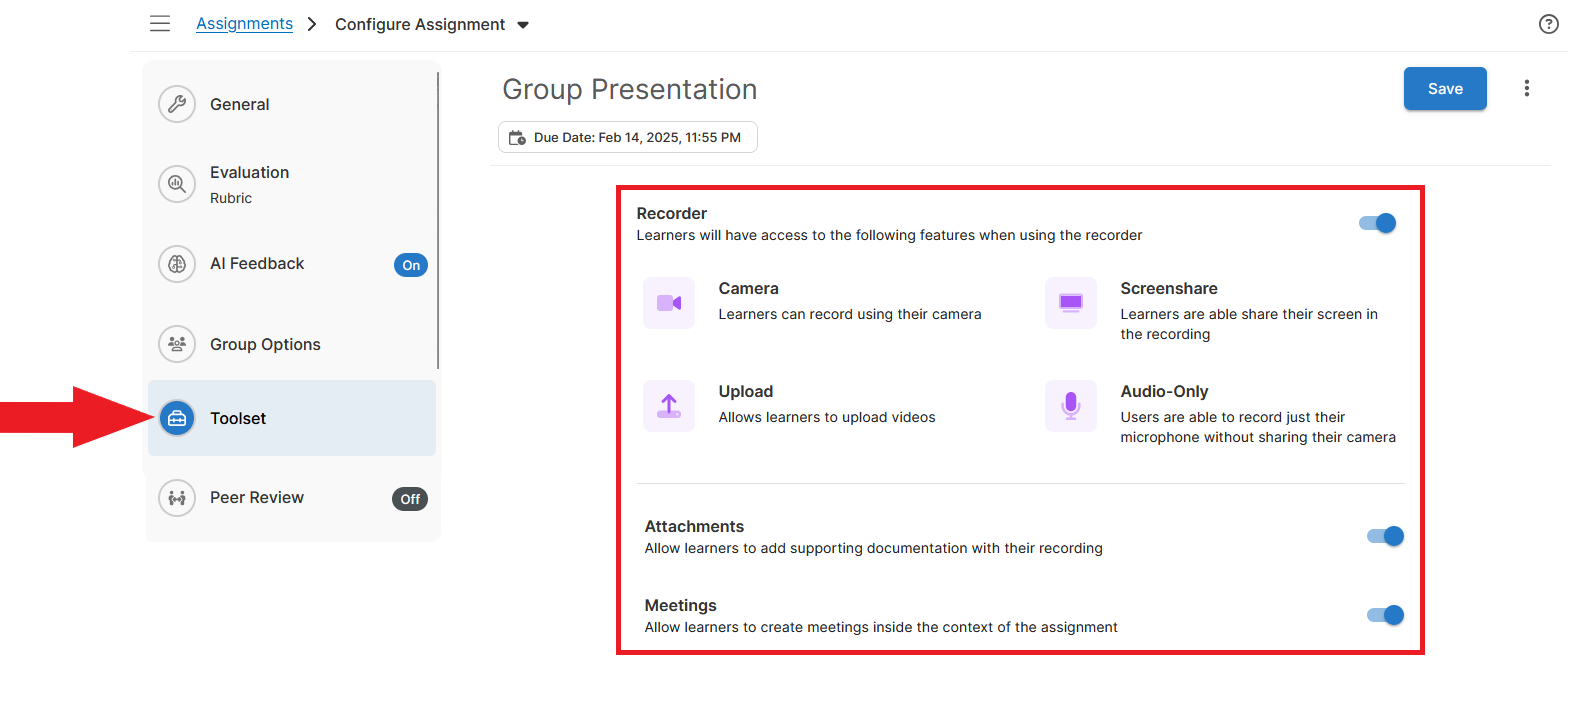
5. Toolset
The Toolset section lists the tools students will have access to when preparing their submissions. Students can:
- use a camera
- share their screen
- create an audio-only recording
- upload an existing recording from their device
- add attachments to their submission (e.g. PPT slides)
- schedule online room meetings to practice and create their recordings
Please note that the instructor can disable some or all of these functions.
6. Peer Review
The peer review function is turned OFF by default. If you wish to incorporate peer review in the assignment, enable it by switching the toggle button to the ON position. Then click More options to set additional parameters.
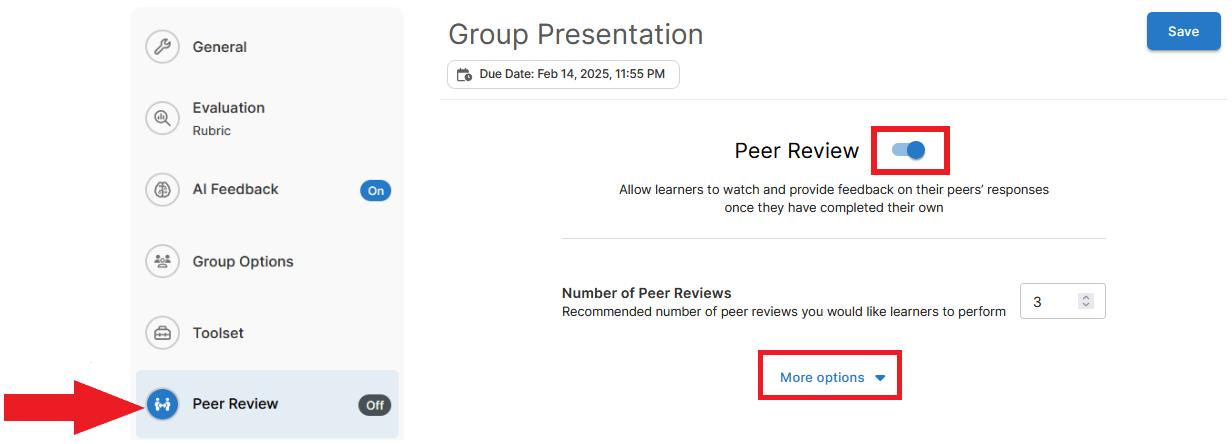
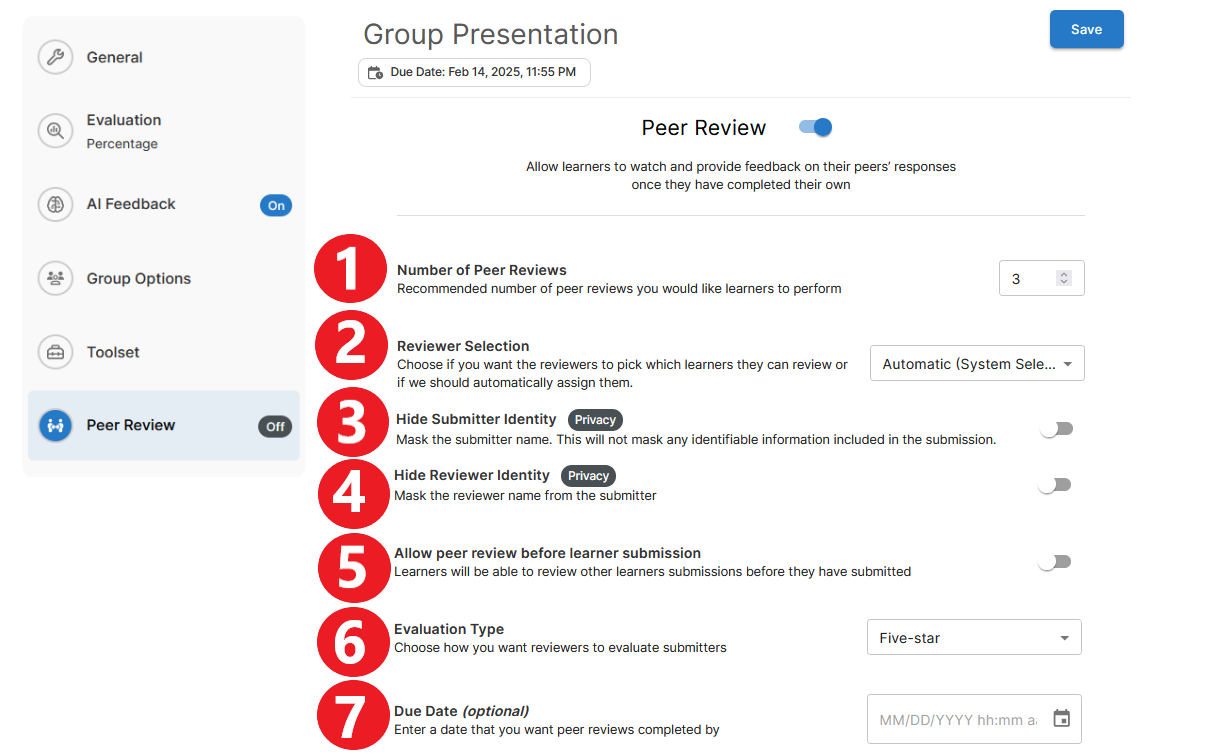
Under More options, you can set the following:
- the number of reviewers per submission
- the way reviewers will be assigned to submissions (A. the system can assign them randomly, or B. students can choose which submission(s) they want to review)
- whether to hide or reveal the identity of the submitter
- whether to hide or reveal the identity of the reviewer(s)
- whether to make peer feedback available to students before recordings have to be submitted to the instructor (this option would give students a chance to reflect on peer feedback and re-record if necessary)
- the evaluation method the peer reviewers should use (two options are available: A. a five-star rating, or B. a rubric provided by the instructor)
- optionally, a due date for the peer reviews
When you have finished creating the video assignment, click Save at the top of the page.

The new assignment will now appear in a content module in Brightspace.
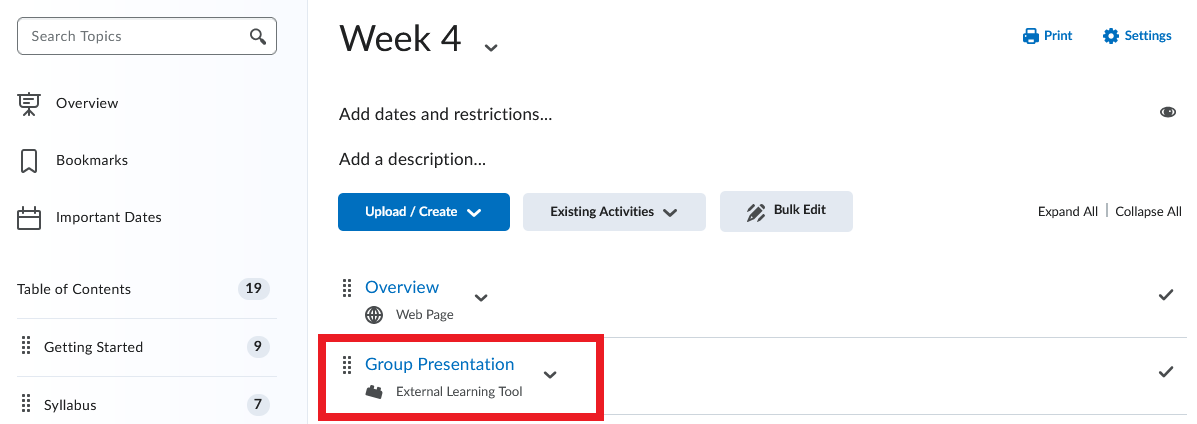
For more information on the group video assignment, please refer to this Bongo resource.
3. Create a Question-and-Answer Assignment
Log in to Brightspace and go to your course site.
Select Content in the course navbar.
- Under the Table of Contents, select the content module where you want to place the video assignment.
- In the content module you selected, click Existing Activities. A dropdown menu will open. Select Video Assignment from the list.
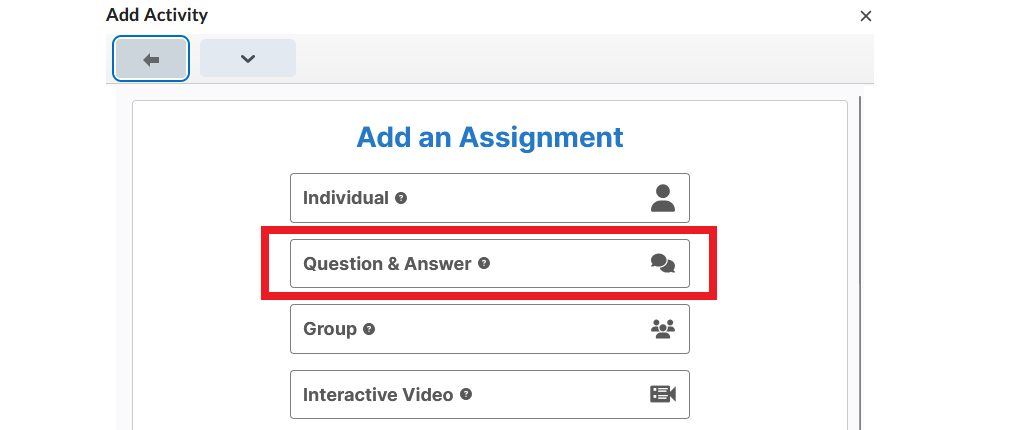
- In the new window that opens, select Question and Answer from the available assignment options.
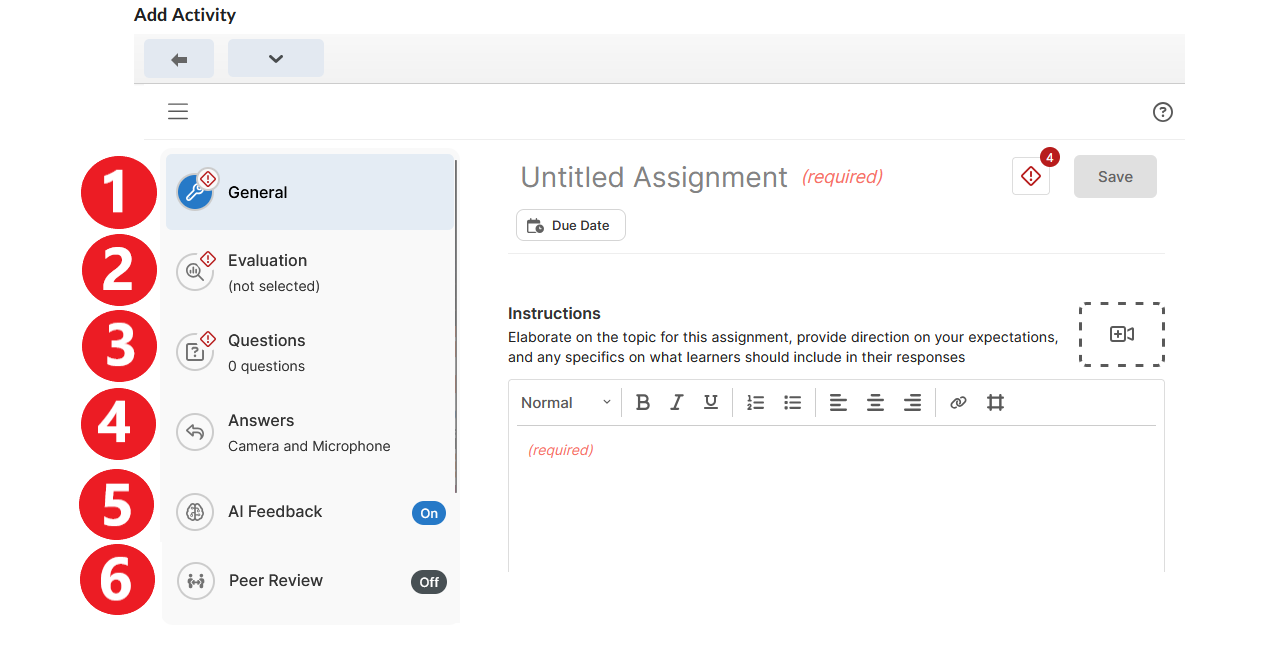
- Configure the assignment using the menu on the left side of the screen. (You may need to hover the cursor over the menu to reveal what the icons represent.) The menu for a question-and-answer assignment contains six categories of information:
- General Information
- Evaluation
- Questions
- Answers
- AI Feedback (ON by default)
- Peer Review (OFF by default)
1. General Assignment Information
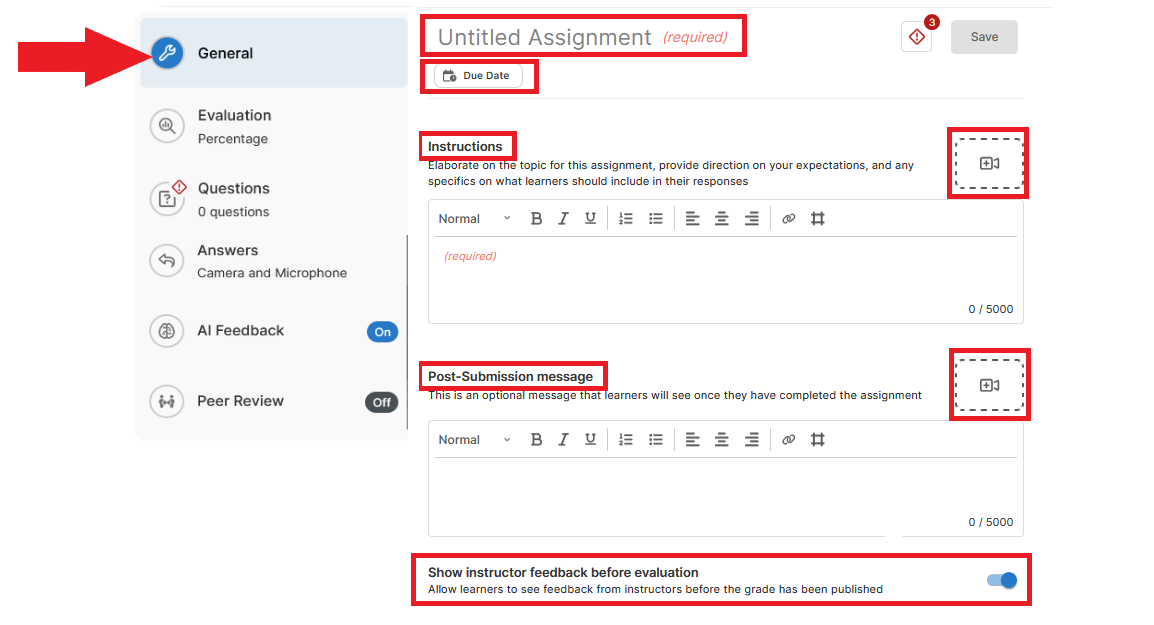
In the General section, enter the following:
- Assignment Title (required)
- Due Date
- Instructions. Written instructions are required. Optionally, you can also record video instructions by clicking the camera icon to the right (
- Post-Submission message. You can optionally type and/or record a message that students will see when they submit their recording.
- Show instructor feedback before evaluation. This option is ON by default. If you leave it ON, students will be able to see your feedback on their submission before the assignment grade is published. If you prefer to release feedback at the same time as the grade, turn this option OFF by clicking the toggle button.
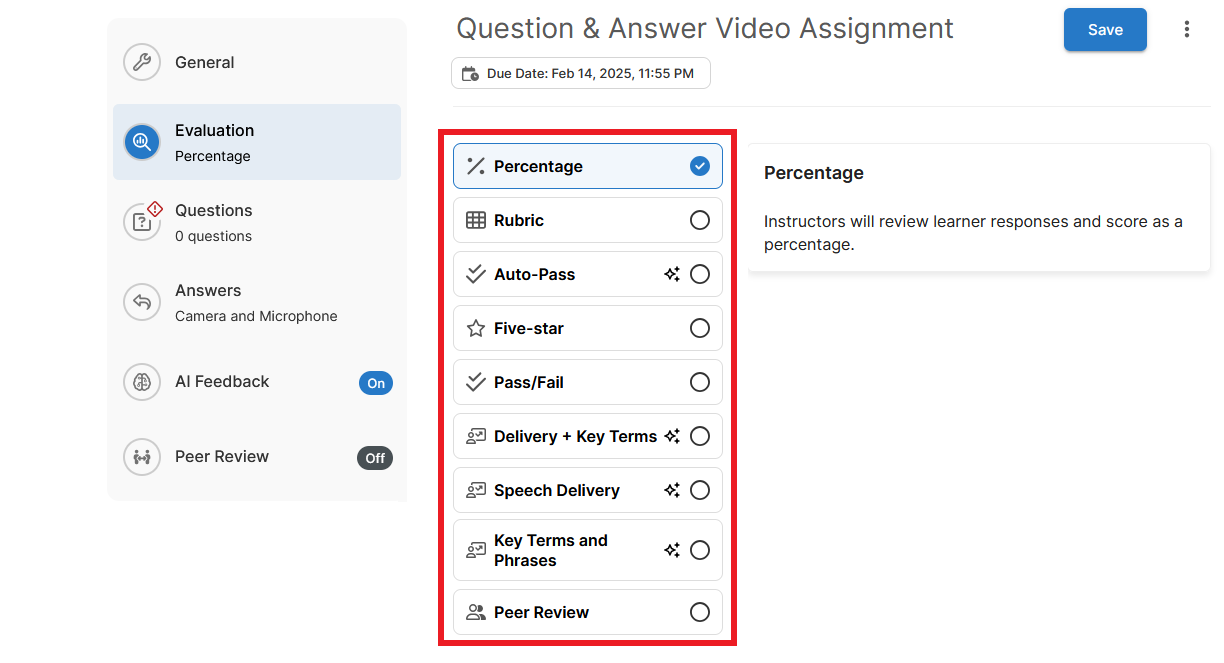
2. Evaluation
In the Evaluation section, choose how you want to evaluate the assignment. Only one evaluation method can be selected. The available options are:
- Percentage
- Rubric (if you select this option, you will need to create a rubric within the video assignment tool)
- Auto Pass
- Five Star
- Pass/Fail
- Delivery + Key Terms
- Speech Delivery
- Key Terms and Phrases
- Auto Analysis
- Peer Review
Click on each evaluation method to see more information about that method. For more information on scoring methods in the Video Assignment tool, please visit this Bongo resource.
3. Questions
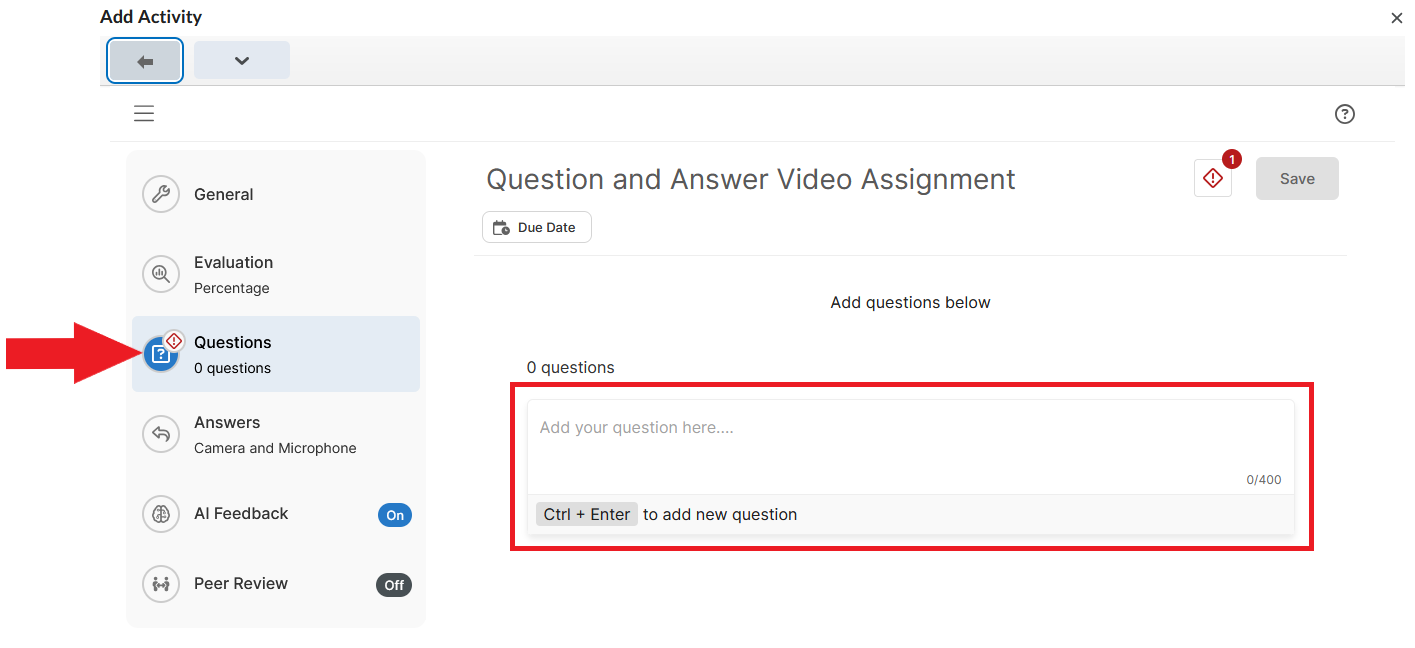
In the Questions section, you can enter up to 20 questions. These questions will be displayed to students one at a time, and students will have to record a response to each question.
Note
Question order can be randomized for each student. Also, instructors can populate an assignment with up to 20 questions, but have students answer only a few randomly selected questions from that pool. These settings are available in the Answers section below.
Start by typing your first question in the text field, and press Control + Enter to save it.
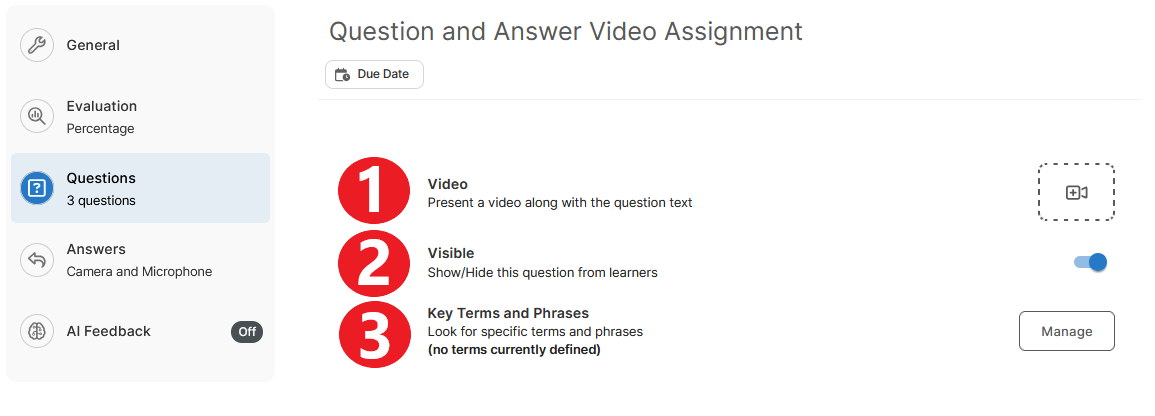
Once you create a question, additional options for that question will appear. You can:
- Add a video to a question (both the question text and the video will be presented to students).
- Hide a particular question from students by clicking the toggle button.
- Enter key terms and phrases you want students to use in their response to that particular question (these terms will be identified and highlighted by the AI Feedback tool). NOTE: For this feature to work, AI Feedback needs to be enabled for the assignment – see point #5 below.
Continue with the remaining questions. Once you finish adding questions, you can make the following changes:
- reorder questions by clicking the ‘drag’ icon next to a question and moving it to a different place in the sequence
- delete a question by clicking the trash icon next to it

4. Answers
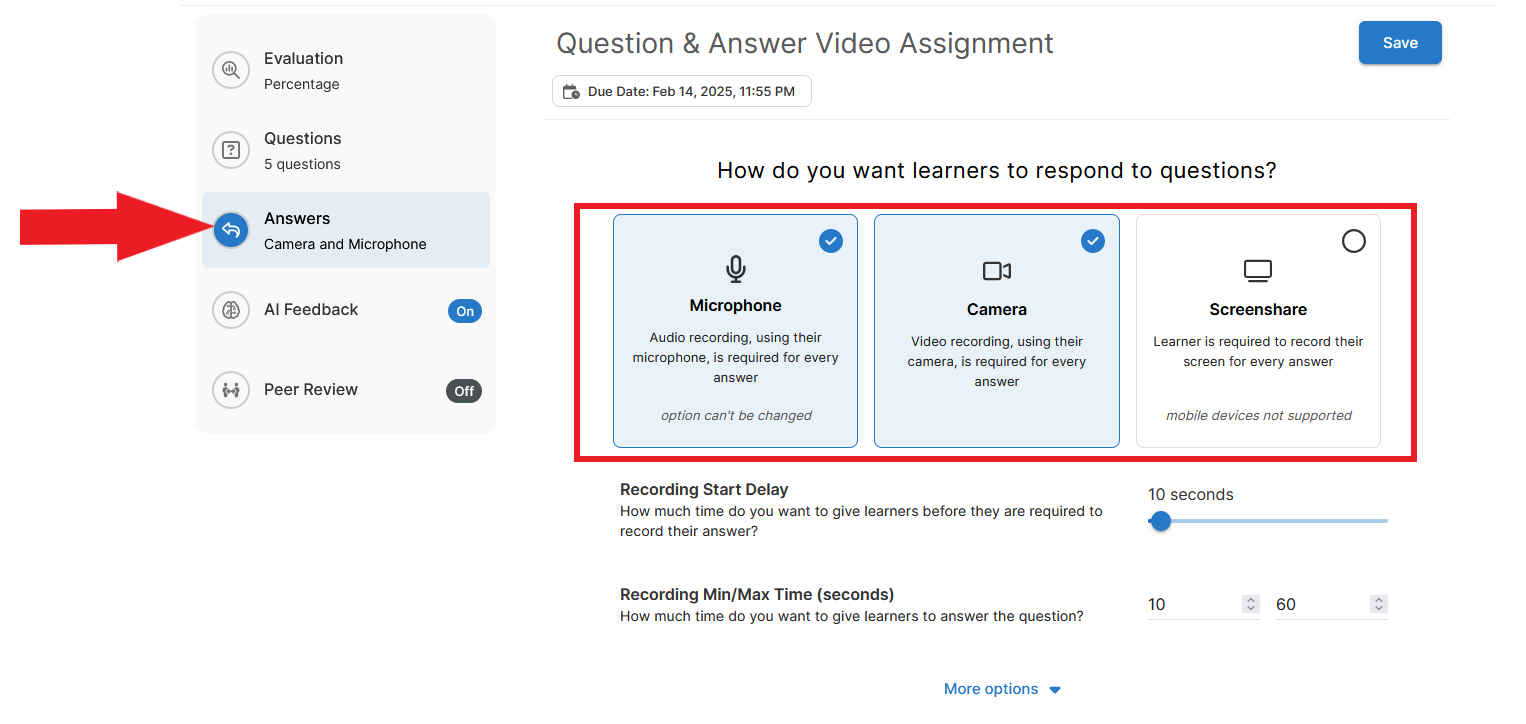
In the Answers section, select the tools you want to make available to students to record their answers. The options are:
- Microphone (enabled by default and cannot be disabled)
- Camera (if selected, students will have to use a camera to record every answer)
- Screenshare (if selected, students will have to share their screen to record every answer)
Note
If Screenshare is selected, students will need to use a device that supports screen recording. Mobile devices do not have this functionality.
Next, set the timing for student responses:
- Recording Start Delay. Determine how many seconds students should have between the time they view a question and the recording of the answer begins. The delay allows students to gather their thoughts and prepare a response.
- Minimum and Maximum Recording Time (no upper limit)
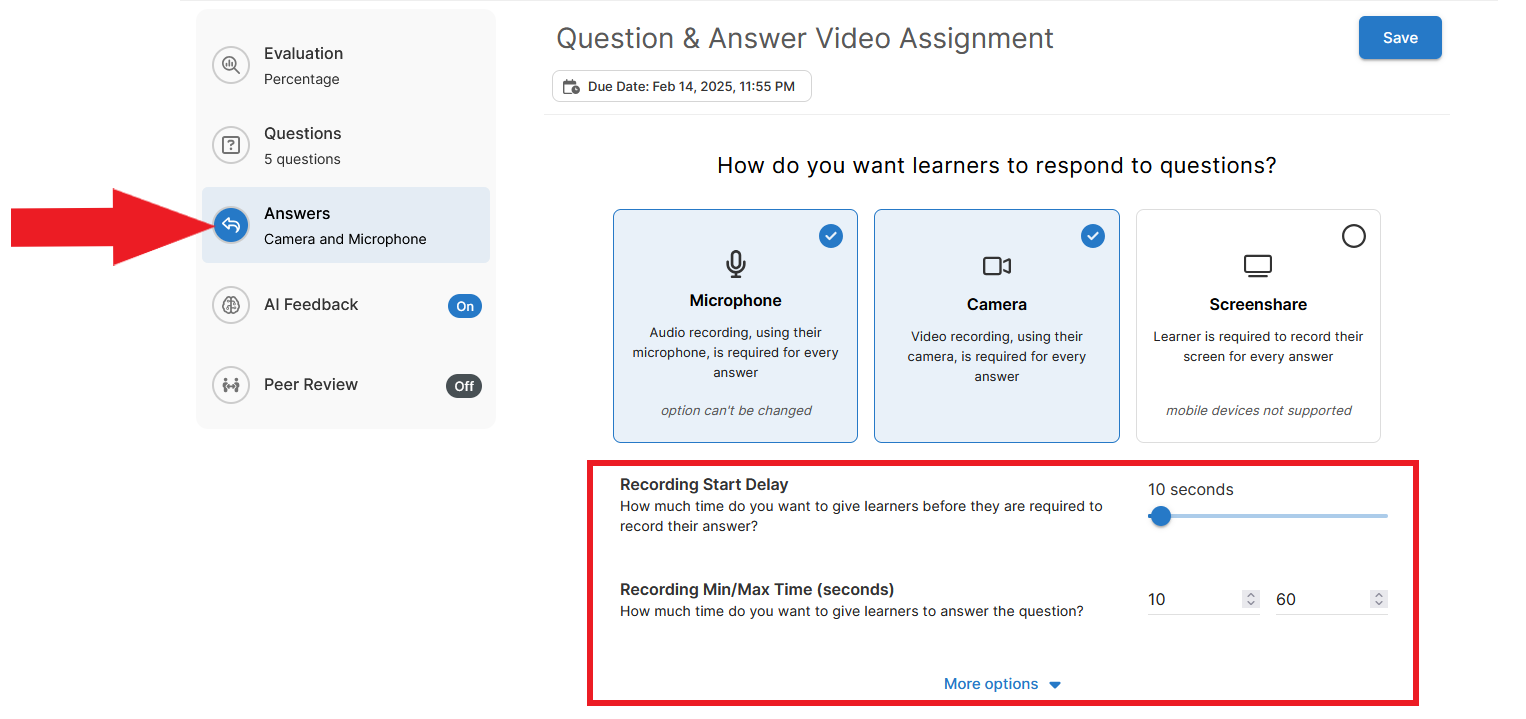
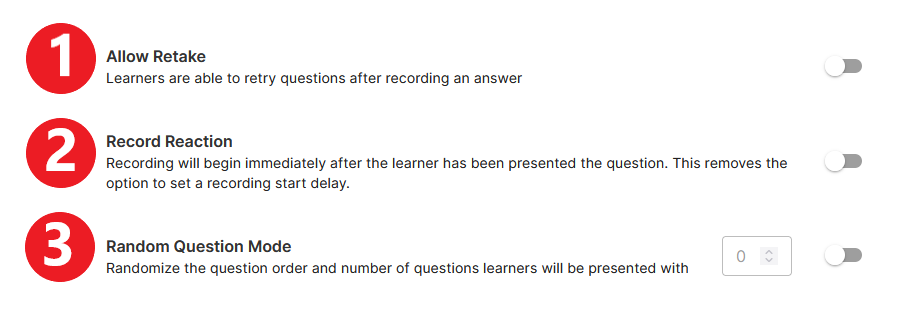
Under More Options, additional settings are available. You can:
- Allow students to re-record their answers (students will record their response, view the recording, and decide whether to submit it or rerecord).
- Set the recording to start immediately after a student sees a question (students will not have any time to gather their thoughts).
- Randomize the order in which the questions will be presented to students (you can have each student answer all questions but in a different order, or you can have each student answer only a few questions from a larger pool)
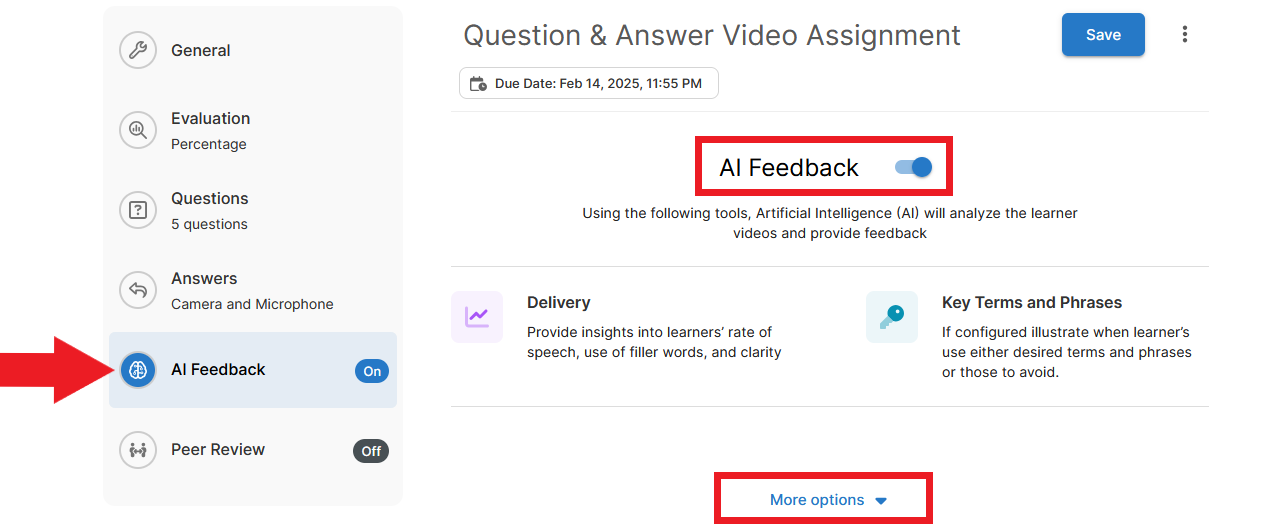
5. AI Feedback
AI Feedback is a tool that automatically transcribes a student’s recording, analyzes it, and provides feedback on the following parameters:
- quality of speech delivery (speech rate, filler words, clarity)
- students’ use of specific words and phrases. NOTE: Key words and phrases have to be entered in the Questions section (see point #3 above).
Note
In a Question and Answer video assignment, AI Feedback analysis is available to students only after they have submitted their recordings for evaluation. Thus, students cannot use the auto-analysis to improve their responses before submitting them.
AI Feedback is turned ON by default. If left ON, the AI analysis will be available to students and the instructor. You can turn this function OFF by clicking the toggle button next to AI Feedback.
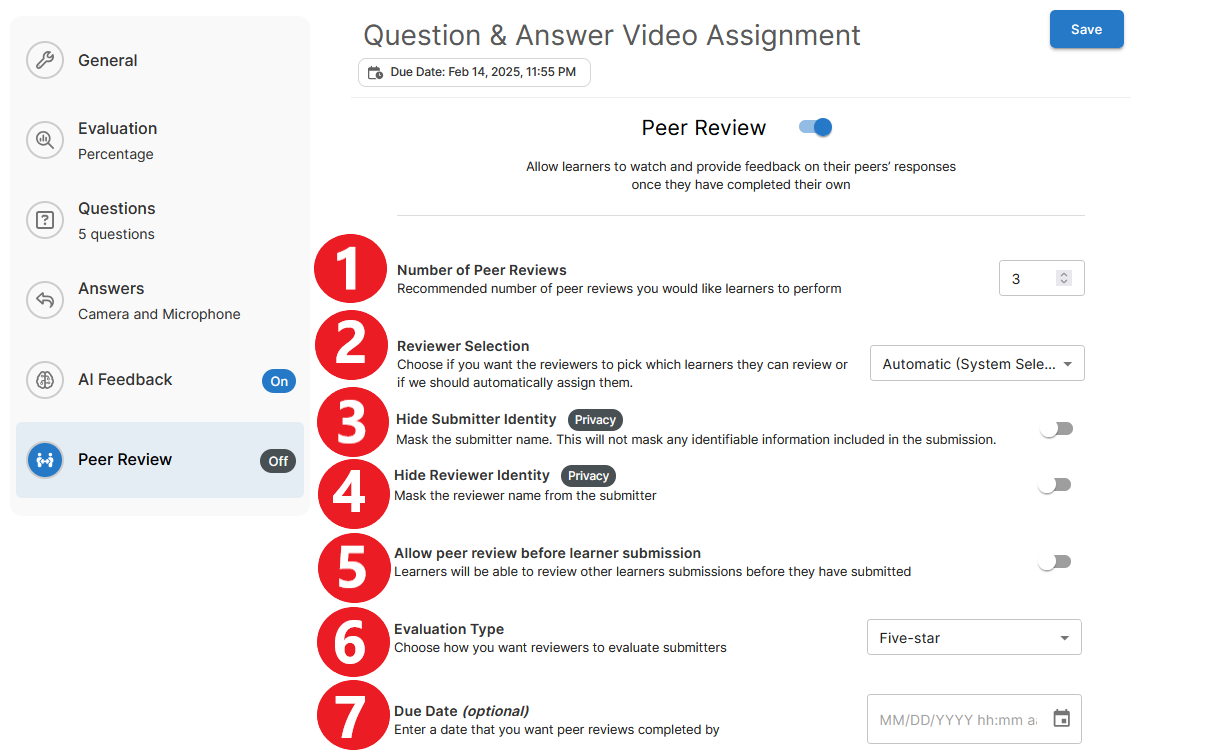
6. Peer Review
The peer review function is turned OFF by default. If you wish to incorporate peer review in the assignment, enable it by switching the toggle button to the ON position. Then click More options to set additional parameters.
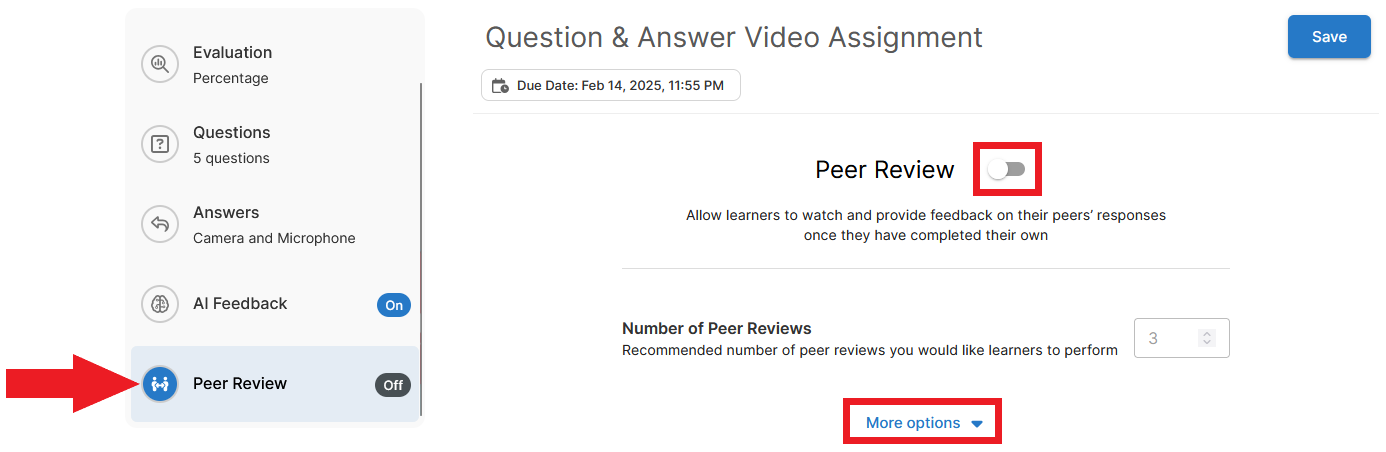
Under More options, you can set the following:
- the number of reviewers per submission
- the way reviewers will be assigned to submissions (A. the system can assign them randomly, or B. students can choose which submission(s) they want to review)
- whether to hide or reveal the identity of the submitter
- whether to hide or reveal the identity of the reviewer(s)
- whether to make peer feedback available to students before recordings have to be submitted to the instructor (this option would give students a chance to reflect on peer feedback and re-record if necessary)
- the evaluation method the peer reviewers should use (two options are available: A. a five-star rating, or B. a rubric provided by the instructor)
- optionally, a due date for the peer reviews
When you are finished creating the video assignment, click Save at the top of the page.

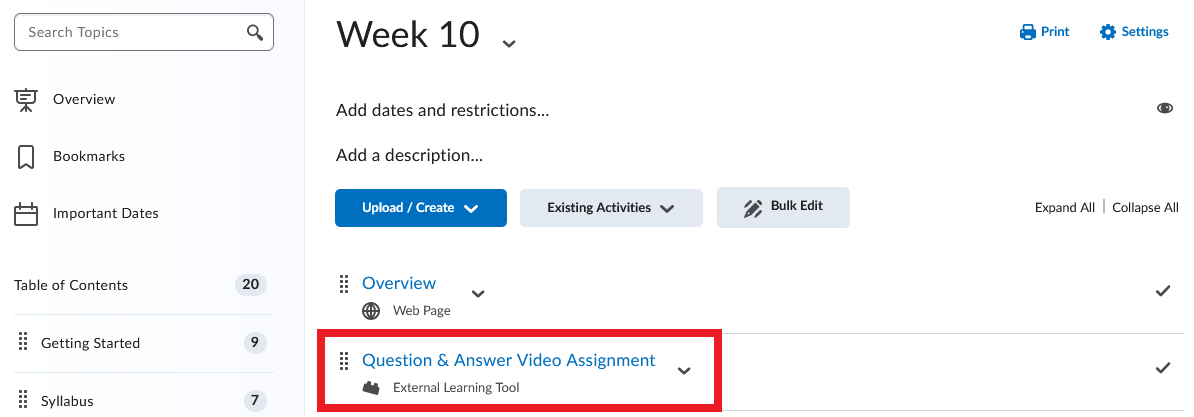
The new assignment will now appear in a content module in Brightspace.
For more information on the question-and-answer video assignment, please refer to this Bongo resource.
4. Create an Interactive Video
Log in to Brightspace and go to your course site.
In the course navbar, select Content.
- Under the Table of Contents, select the content module where you want to place the video assignment.
- In the content module you selected, click Existing Activities. A dropdown menu will open. Select Video Assignment from the list.
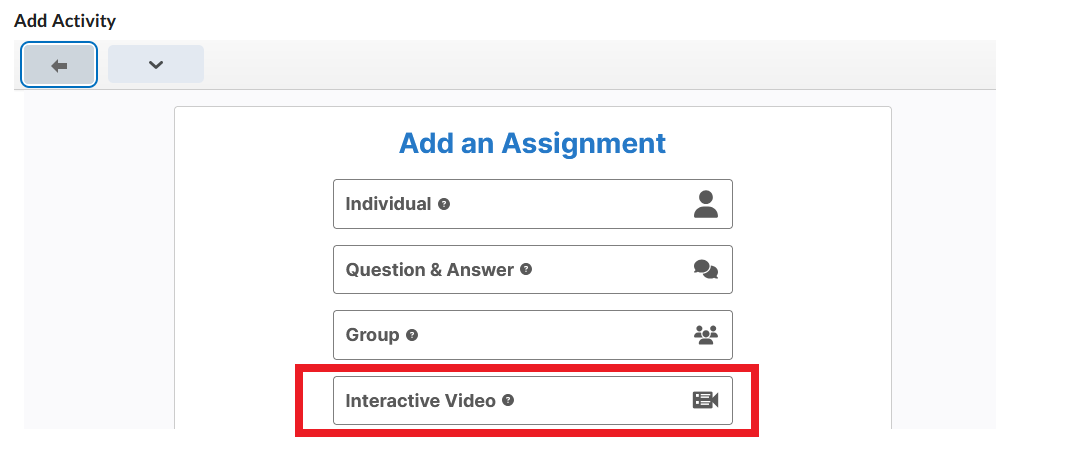
- A new window will open. Select Interactive Video from the available assignment options.
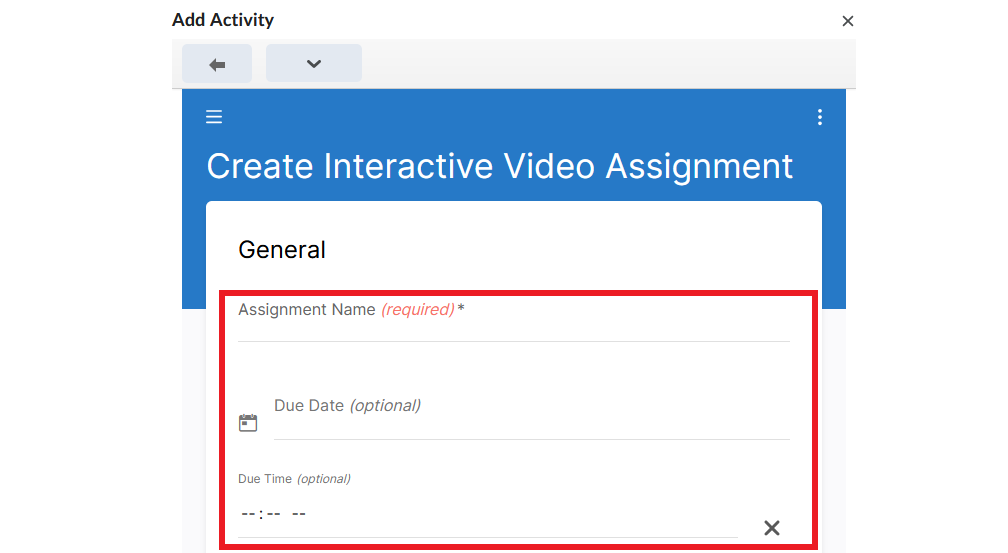
- In the General section, enter the Assignment Name and optionally a Due Date and Time for the assignment.
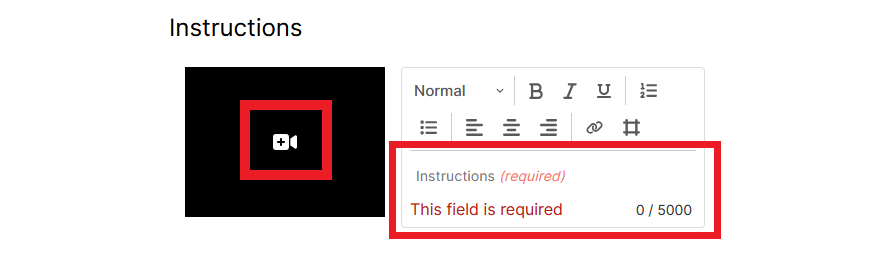
- In the Instructions section, enter written instructions for the assignment in the text field (required). Optionally, you can also record or upload video instructions by clicking the camera icon (
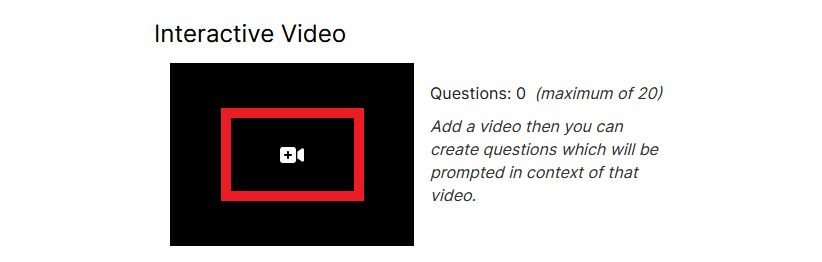
- In the Interactive Video section, click the camera icon (
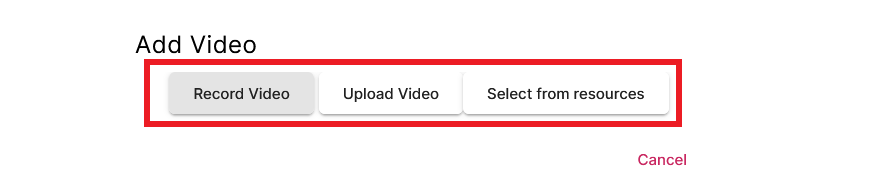
- You can add a video in one of the following ways:
- by recording a video directly in the video assignment tool (you can record video and audio, but no screensharing is available)
- by uploading a previously recorded video from your computer
- by selecting a video from your existing Bongo recordings
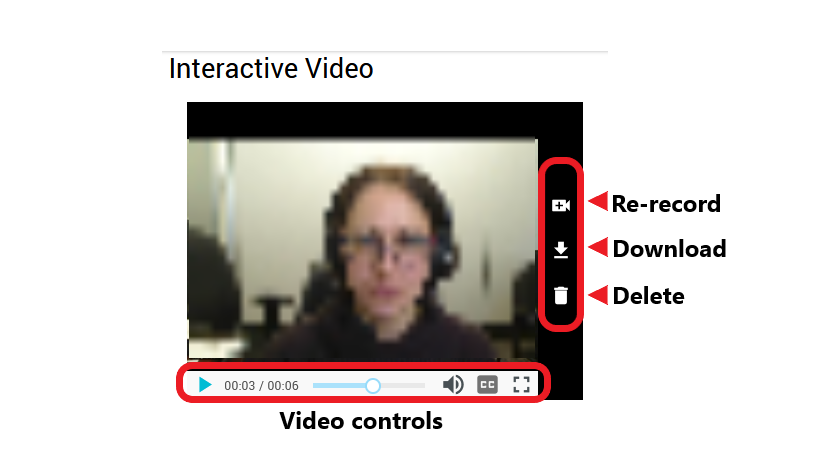
- Once you have added your video, you can preview it and decide whether you wish to use it or if you prefer to rerecord.
Adding Questions
Once you have added a video, you can start adding questions to it. You can create up to 20 questions.
Note
In this assignment type, students watch a portion of the video, the video pauses, and a question appears on the screen. Once students provide a response to the question, the video resumes and the steps repeat (if the assignment involves multiple questions).
- First, identify the specific times in the video where you would like to place questions for students. Questions can be added throughout the video or they can be presented at the end.
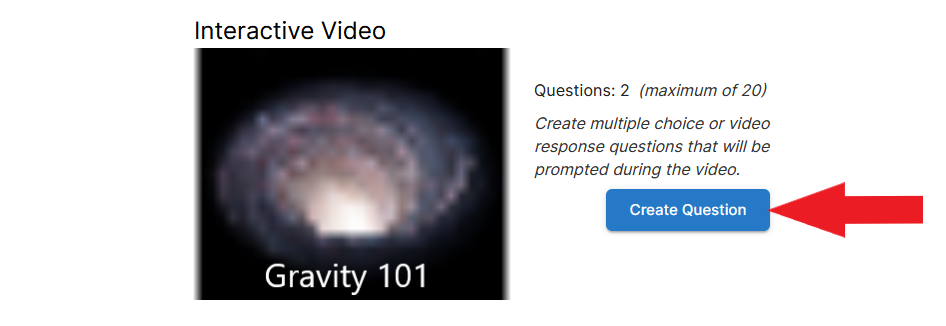
- To start adding questions, click the Create Question button next to the video panel.
- You can create two types of questions in this assignment type:
- Multiple Choice – a question appears on the screen and students select an answer
- Video Response – a question appears on the screen and students record their response to the question
Note
It is not possible to limit the amount of time students have to answer questions in an interactive video. If you use Multiple Choice questions, students have unlimited time to answer each question. If you use Video Responses, students have unlimited time to prepare a response, and 120 minutes to record it. Therefore, this assignment type is not recommended for high-stakes evaluations.
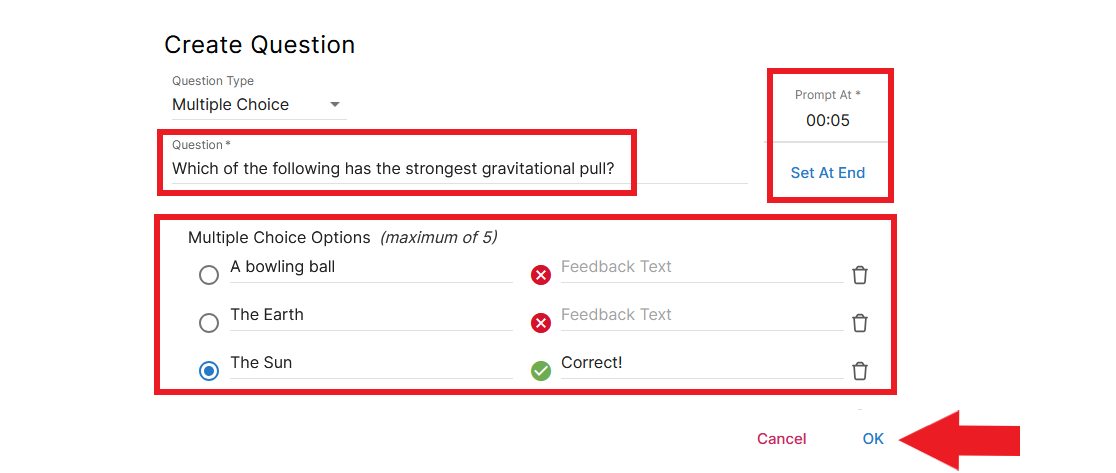
- If you select Multiple Choice, you will be prompted to enter the following information:
- question text
- answer choices
- the correct answer
- the specific time in the recording when the question should appear
- optionally, you can also enter Feedback Text – the text that will appear when a student selects a particular answer. For example, if the selected answer is incorrect, the Feedback Text may contain an explanation why the choice is incorrect.
- When finished, click OK.
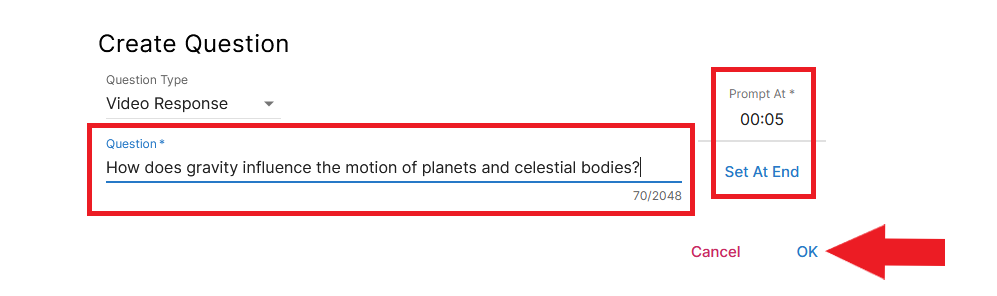
- If you select Video Response, you will be prompted to enter:
- question text, and
- specific time in the recording when the question should appear
- When finished, click OK.
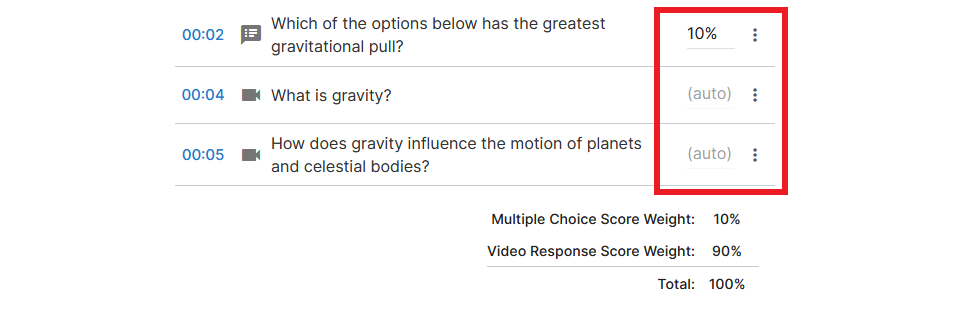
- If you are using Multiple Choice questions (alone or in combination with Video Responses), you need to enter the value of each Multiple Choice question towards the assignment grade.
- The value of Video Responses, however, cannot be adjusted. Each response is weighted equally in relation to one another, whether only Video Responses are used or if they are used in combination with Multiple Choice questions.
Evaluation
If the interactive video includes Multiple Choice questions (alone or in combination with Video Responses), the only available evaluation method is percentage.
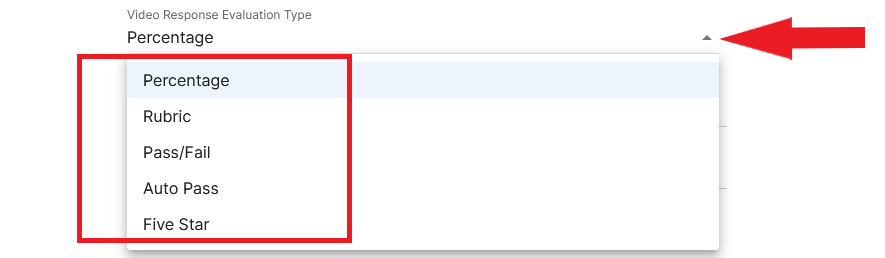
If the interactive video includes Video Response questions without any Multiple Choice questions, you can choose one of the following evaluation methods:
- Percentage
- Rubric
- Pass/Fail
- Auto Pass
- Five-Star
Peer Review
Note
In an interactive video assignment, peer review is only available if Video Response questions are used. If Multiple Choice questions are used, peer review is not available.
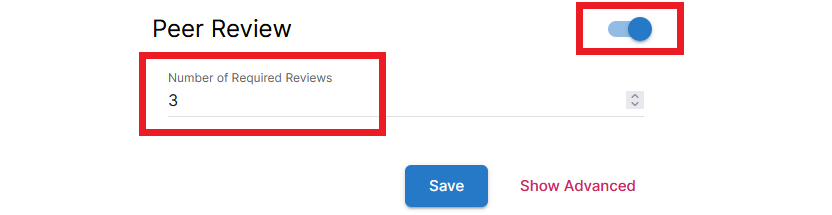
Decide if you wish to incorporate peer review into the assignment.
- If you do, leave the Peer Review toggle in the ON position (default) and enter the number of peer reviews to be completed on each student’s submission.
- If you opt not to use peer review, switch the Peer Review toggle OFF.
Note
Additional peer review settings are available – click Show Advanced to view them.
- If you are finished creating your video assignment, click Save at the bottom of the window. (If you wish to explore additional configurations, click Show Advanced next to the Save button, and refer to the next section.)

Show Advanced
Peer Review
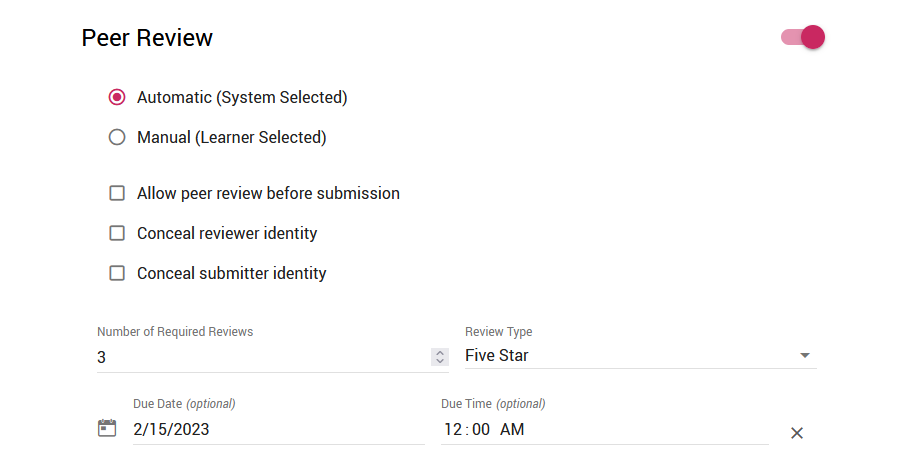
If peer review is part of the assignment, additional settings can be configured here. You can set:
- how to assign reviewers to submissions (A. the system can assign them randomly, or B. students can choose which submission(s) they want to review)
- whether to make peer feedback available to students before recordings have to be submitted to the instructor (this option would give students a chance to reflect on peer feedback and re-record if necessary)
- whether to hide or reveal the identity of the submitter
- whether to hide or reveal the identity of the reviewer(s)
- what evaluation method reviewers should use (two options are available: A. a five-star rating, or B. a rubric provided by the instructor)
- optionally, a due date for the peer reviews
Rubric Self-Assessment
This option is turned OFF by default. It can be turned ON only if Rubric is the selected evaluation method for the assignment (see Evaluation above). If you enable the Rubric Self-Assessment option, students will be able to assess their own performance using the attached rubric after they submit their assignment.

Restricted Submission Summary Details
This option is turned OFF by default. If you turn it ON, students will not be able to see the questions or their own answer(s) in the recording after they submit it.

- When finished, click Save. The new assignment will now appear in your module in Brightspace.
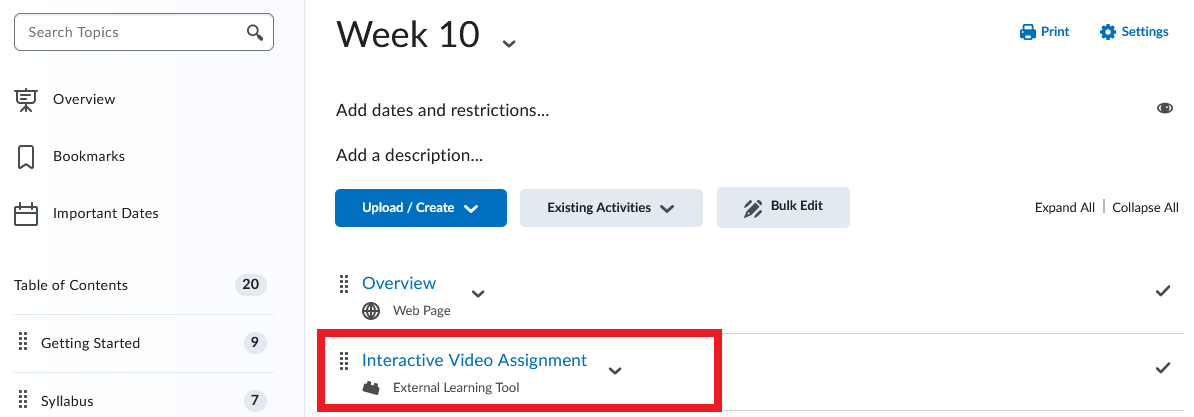
For more information on the interactive video project, please refer to this Bongo resource.
Editing Video Assignments
Once you have created a video assignment, you can make changes to it at any time.
Editing assignments listed in course content
If the assignment is listed in a content module in Brightspace, follow the steps below.
- Log in to Brightspace and go to your course site.
- Select Content in the course navbar.
- Go to the content module where the video assignment is located, and click the title of the assignment.
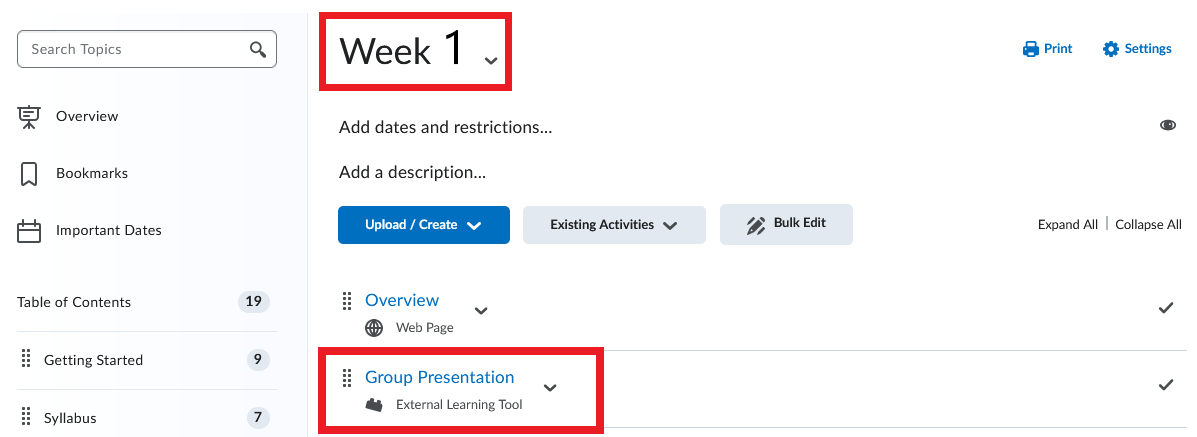
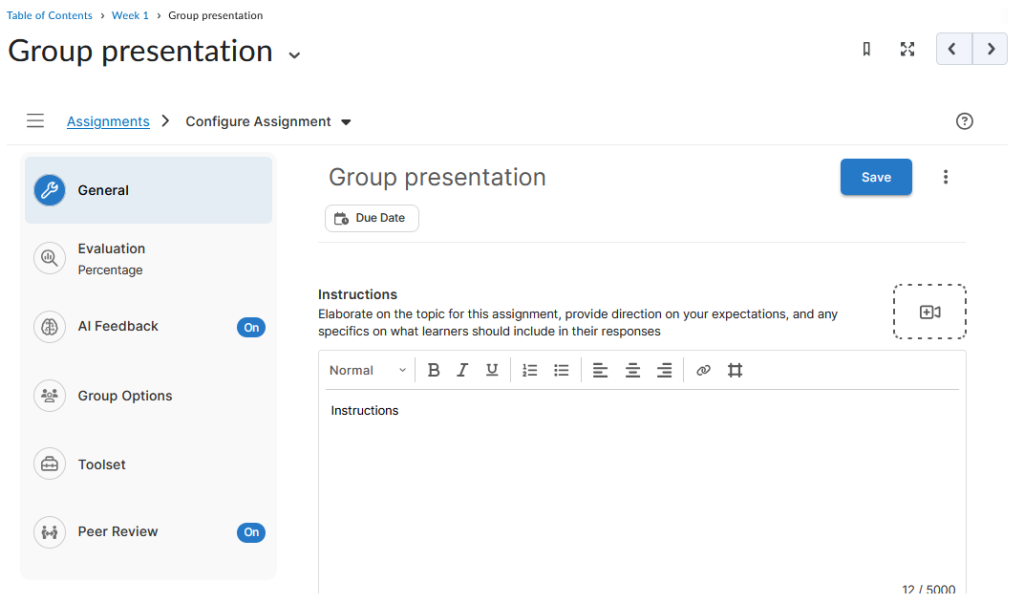
- On the assignment page, click the downward arrow next to the word Overview and then click Configure.

- The creation/editing page for the video assignment will open. Review and modify the settings, and save your changes.
Editing video assignment not in listed in course content
If you have previously created a video assignment in a course, but it is not currently listed in a content module in Brightspace, you can still edit it by following the steps below.
- Log in to Brightspace and go to your course site.
- Select Content in the course navbar.
- Under the Table of Contents, select a content module.
- In the content module you selected, click Existing Activities. A dropdown menu will open. Select Video Assignment from the list.
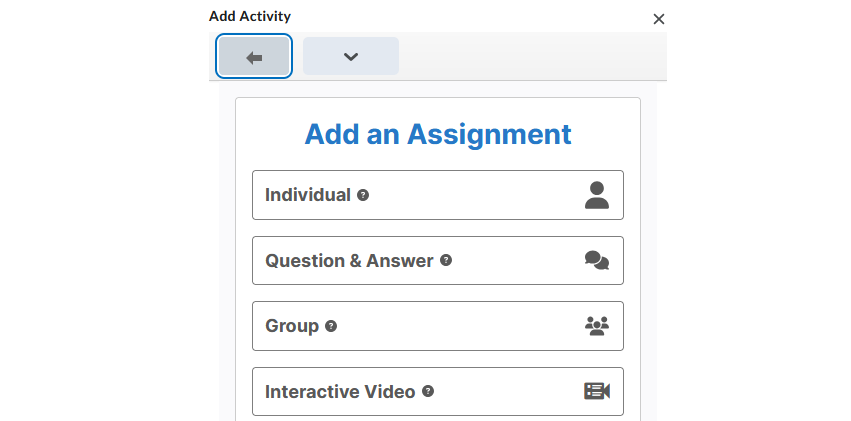
- In the new window that opens, select any assignment option—this step will take you to the Bongo platform, where you will see a list of all video assignments you have previously created in the course.
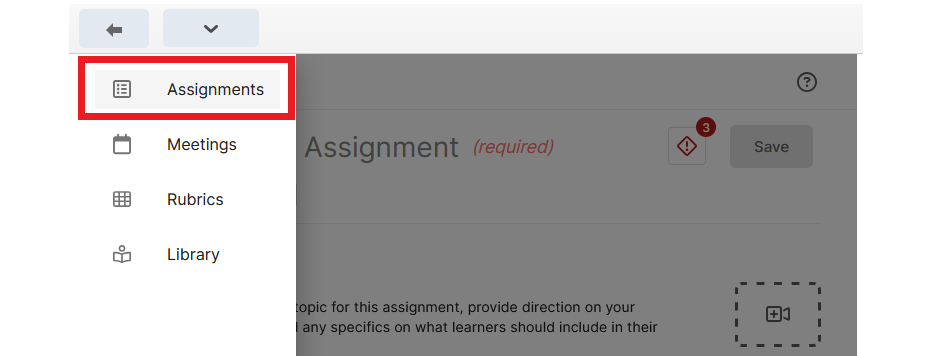
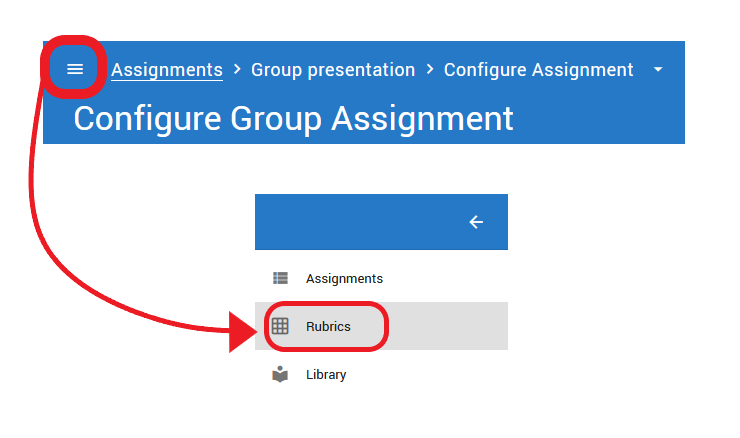
- In the top left corner of the new window, click the icon with three horizontal lines.
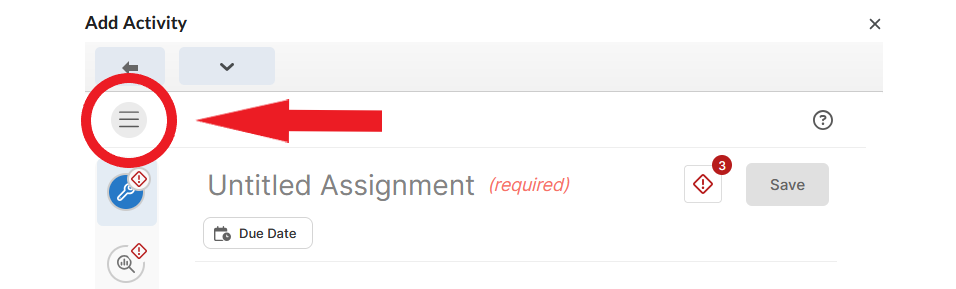
- A menu will appear with access to the following tools:
- video assignments you have previously created in the course
- Online Rooms meetings (if any)
- rubrics for video assignments
- a library of your Bongo recordings (if you have any).
- Select Assignments from the menu.
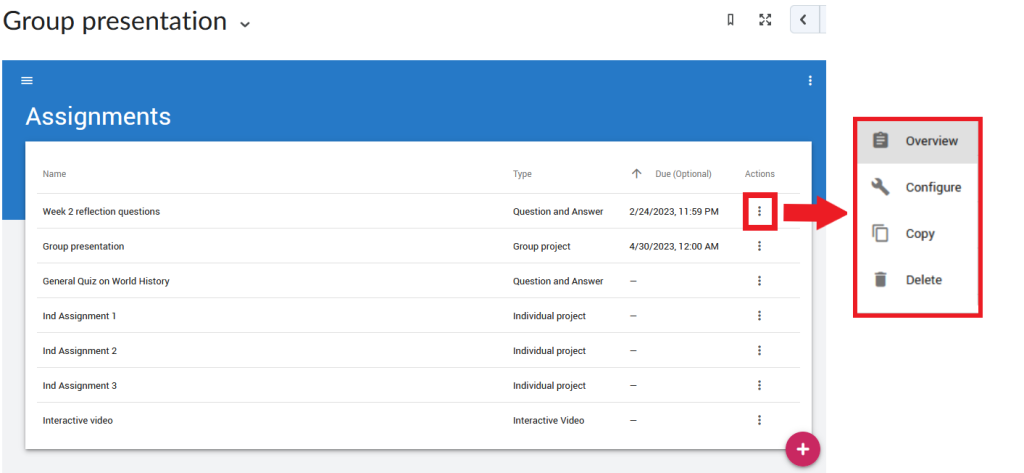
- You will now see a list of the video assignments you have created in the course. Select the assignment you want to modify. Open the menu for that assignment by clicking the three-dot icon under Actions. Here you can view, edit, copy, or delete the assignment.
Grading Video Assignments
When setting up a video assignment, instructors must choose the method they will use to evaluate student submissions. The following evaluation methods are available:
- Percentage: Videos are graded on a scale from 0 to 100 percent.
- Rubric: Submissions are graded using a rubric that the instructor has imported into or created in the video assignment tool. Rubrics can also be made available for peer review and for self-assessment in an Interactive Video assignment.
- Auto Pass: Videos automatically receive a score of 100% upon submission. Students who have not submitted do not get a grade.
- Five Star: Videos are scored using a 5-star rating scale. Each star is worth 20%. For example, if you select 4 stars, the student gets a score of 80%.
- Pass/Fail: Submission are graded as either 0% or 100%.
- Delivery + Key Terms: Videos are automatically scored based on students’ speech delivery (rate of speech, clarity, and use of filler words) and their use of Key Terms and Phrases (if they have been entered for the assignment).
- Speech Delivery: Videos are automatically scored based only on students’ speech delivery (rate of speech, clarity, and use of filler words).
- Key Terms and Phrases: Videos are automatically scored based on students’ use of Key Terms and Phrases (if they have been entered for the assignment).
- Peer Review: Submissions are scored by peers based on a five-star rating or a rubric. A new score based on the average of all peer scores is published as each review is completed.
For more information about each type of evaluation, please visit this Bongo resource.
Evaluating with a Rubric
A rubric is one of the grading options available for video assignments. Rubrics can be used by instructors, and they can also be made available for peer review. In the Interactive Video assignment, a rubric can also be enabled for student self-assessment.
If you wish to use a rubric, you need to create it in the Video Assignment tool (NOT in Brightspace).
Adding a rubric while creating an assignment
Create your video assignment as outlined on the ‘Creating Video Assignments’ page in this resource.
In the Evaluation section, select Rubric as the evaluation method.
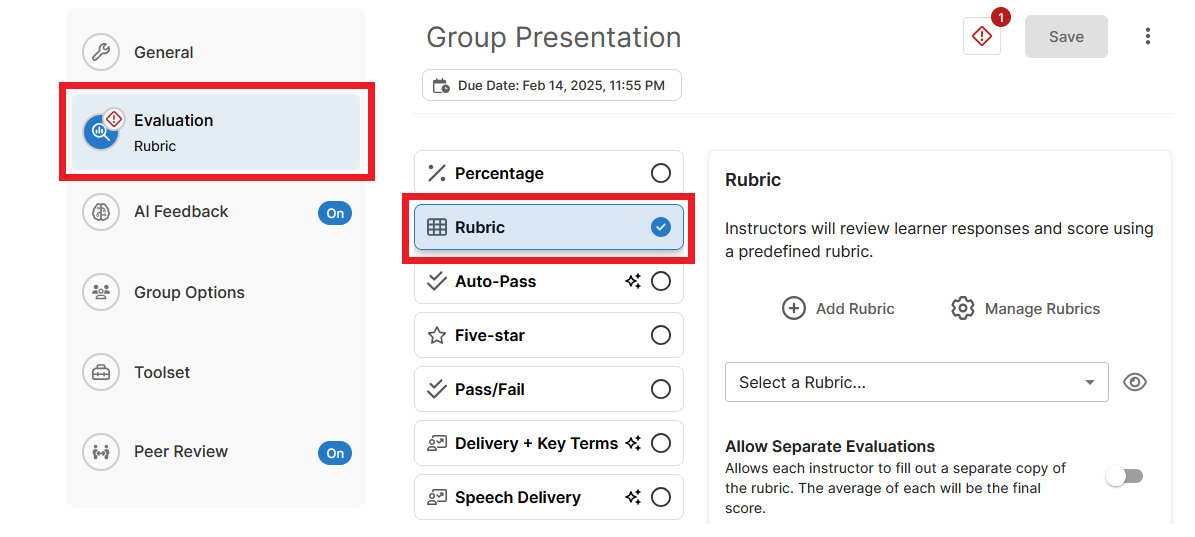
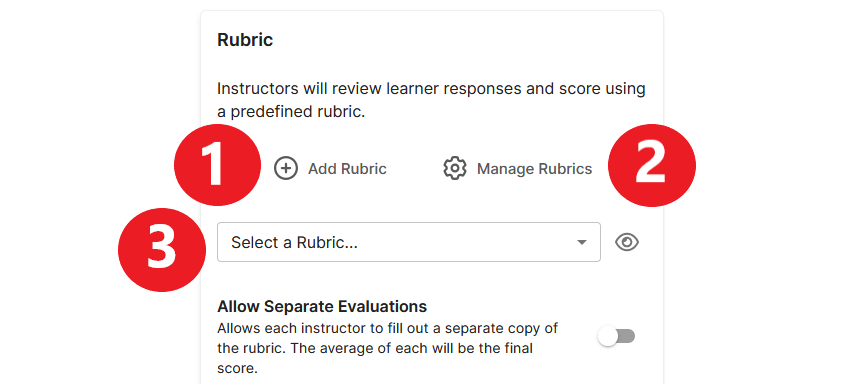
- Once you have selected Rubric as the evaluation method, you have three options:
- Add Rubric – A window will open where you can create a new rubric
- Manage Rubrics – You can preview existing rubrics and modify one of them to suit the current assignment
- Select a Rubric – Open the menu to see your previously created rubrics (if any) and select one for this assignment
Note
The Add Rubric option also gives you the option to import a rubric for the video assignment. If you choose this route, you will need to properly format the rubric and save it as a .csv file. A template and a guide are provided when you select Add Rubric > Import Rubric.
- Configure and/or add your rubric and click Save at the top of the page.
Adding a rubric to an existing assignment
In your Brightspace course, go to the content module where the video assignment is located. Click the name of the assignment.
- In the top menu bar, click the downward arrow next to the word Overview and then click Configure.
- The editing window for the assignment will open. In the Evaluation section, select Rubric as the evaluation method.
- Once you have selected Rubric as the evaluation method, you have three options:
- Add Rubric – A window will open where you can create a new rubric
- Manage Rubrics – You can preview existing rubrics and modify one of them to suit the current assignment
- Select a Rubric – Open the menu to see your previously created rubrics (if any) and select one for this assignment
Note
The Add Rubric option also gives you the option to import a rubric for the video assignment. If you choose this route, you will need to properly format the rubric and save it as a .csv file. A template and a guide are provided when you select Add Rubric > Import Rubric.
- Configure and/or add your rubric and click Save at the top of the page.
Note
You can also manage video assignment rubrics directly in the Rubrics tool in Bongo. To access the tool, go to a content page with a video assignment in Brightspace, click the hamburger icon in the top left corner, and select Rubrics.
Grading Video Assignments
Once students have uploaded their video assignments, you are ready to grade and provide feedback on their submissions.
Grading Submissions
- In your Brightspace course, go to the content module where the video assignment is located and click the assignment title.
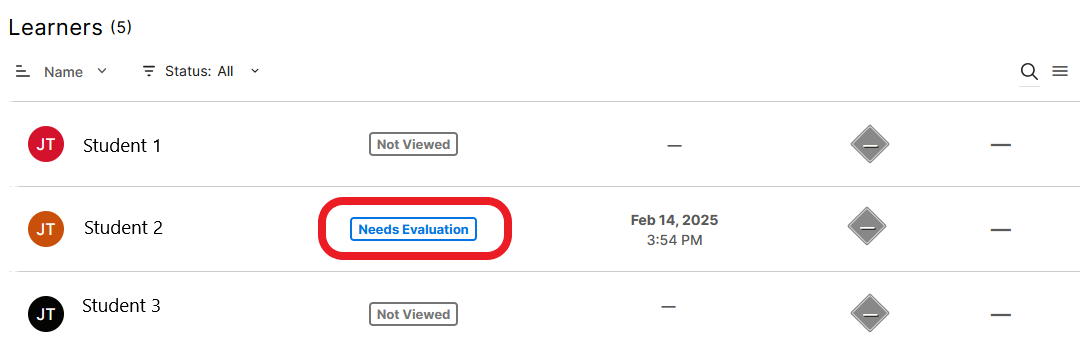
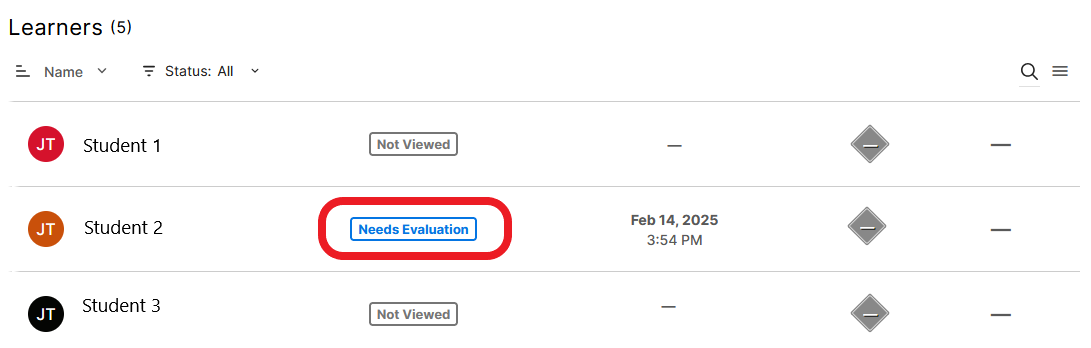
- You will see a list of students or groups along with assignment status indicator next to each (Viewed, Not Viewed, Needs Evaluation etc.).
- If you are ready to grade, click any name (or group) with a Needs Evaluation status.
- View and grade the submission using the method you had selected. Then choose one of two options:
- Save and Publish the grade immediately, or
- Save as Draft (the grade will be saved, but you will publish it later, e.g., when all students’ submissions have been graded).

At this point, you can provide additional feedback on the submission (discussed in the next tab), or you can proceed to grade the next submission.
Providing Feedback
In addition to assigning a numerical grade to a student’s submission, you can also provide feedback in the text field next to the video submission. You can provide feedback in two ways:
by recording a video (up to 15 minutes in length)
by typing comments in the text box.
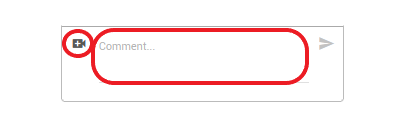
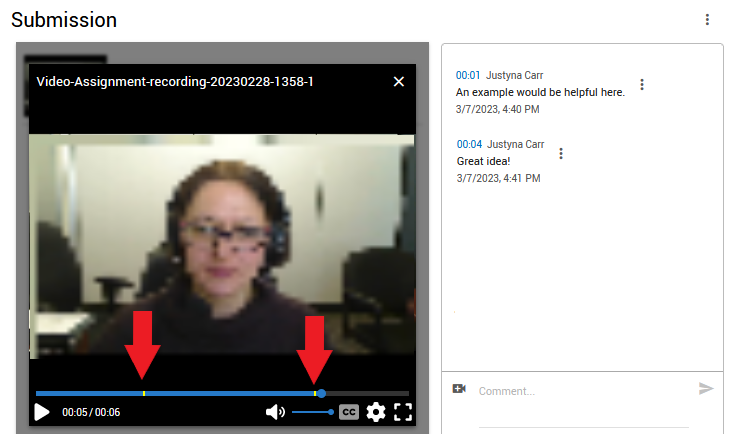
- You can either provide overall feedback, or you can add time-stamped comments referring to specific points in the video. To provide time-stamped feedback, simply play the submitted video, pause at a point where you would like to add a comment, and type your comment in the text box. The comment will then be linked to the specific time in the recording.
Save as Draft (the grade will be saved, but you will publish it later, e.g., when all students’ submissions have been graded).
When finished, you can:
Save and Publish the grade immediately, or
Linking Video Assignment Grades to the Brightspace Grade Book
One advantage of using Video Assignments for evaluation is that the grades you assign in the Video Assignment tool can be sent directly to your Brightspace grade book.
In order to link your video assignment to the Brightspace grade book, follow the steps below:
- In your Brightspace course, go to the content module where the video assignment is located.
- Click the name of the assignment.
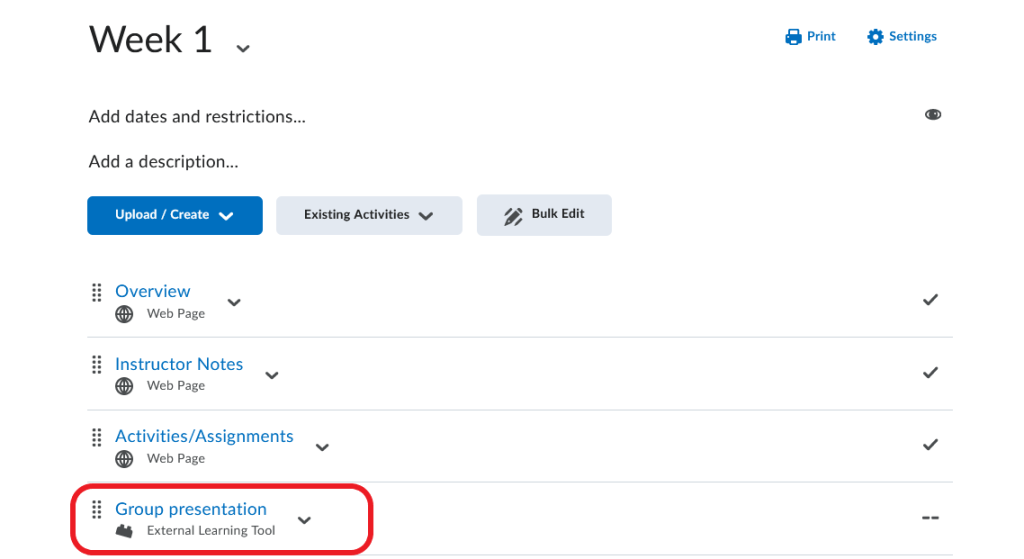
- Scroll down the page to the Assessment section under ‘Activity Details‘.
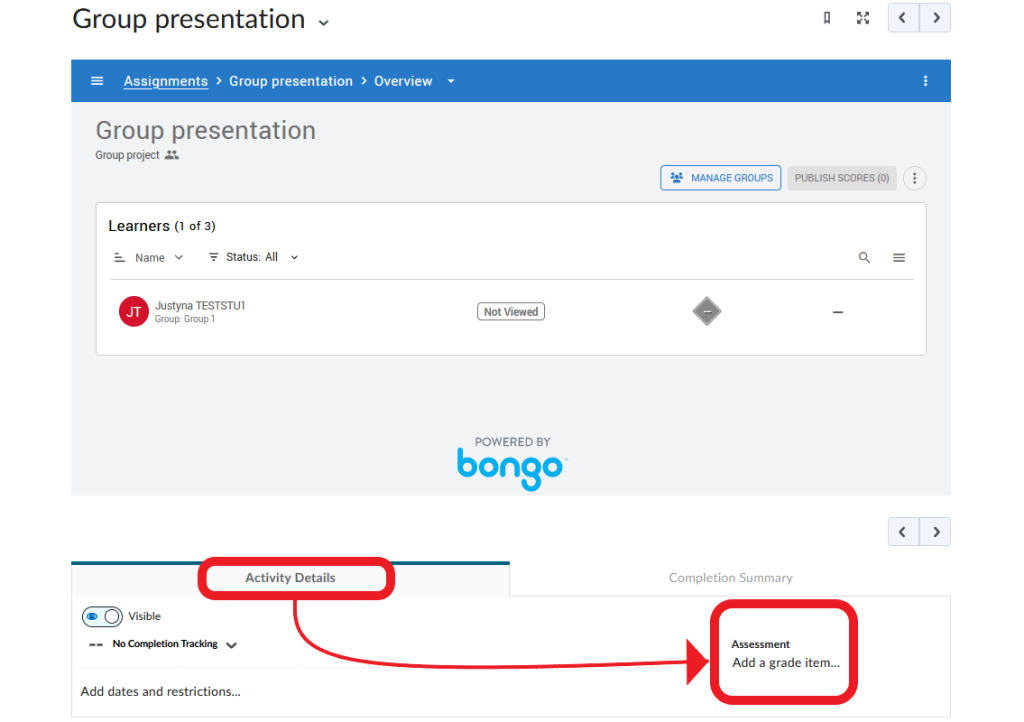
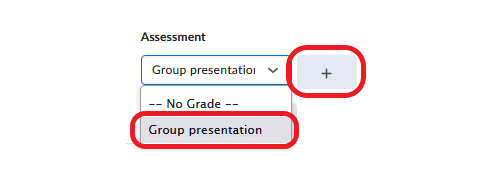
- Link the video assignment to an existing grade item (select one from the menu) or create a new grade item (click the plus sign).
Resetting a Grade
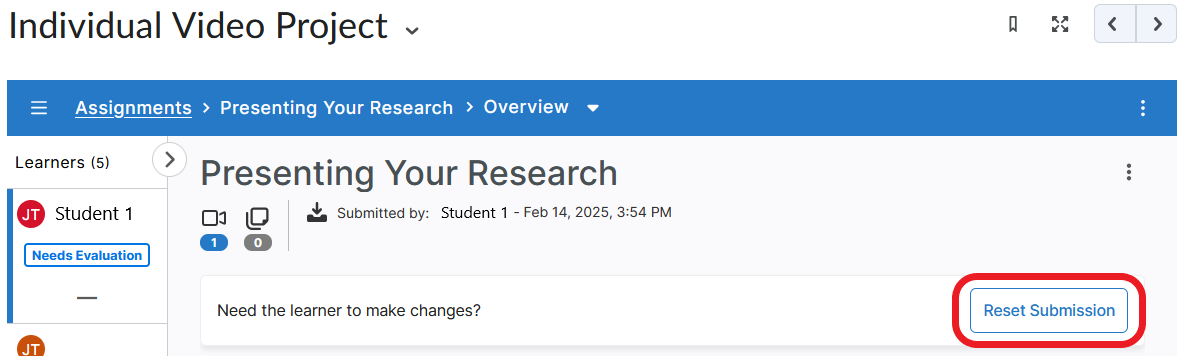
As an instructor, you have the option to reset any video assignment submission, and give students an opportunity to re-record and resubmit a video.
- In your Brightspace course, go to the content module where the video assignment is located. Click the assignment title.
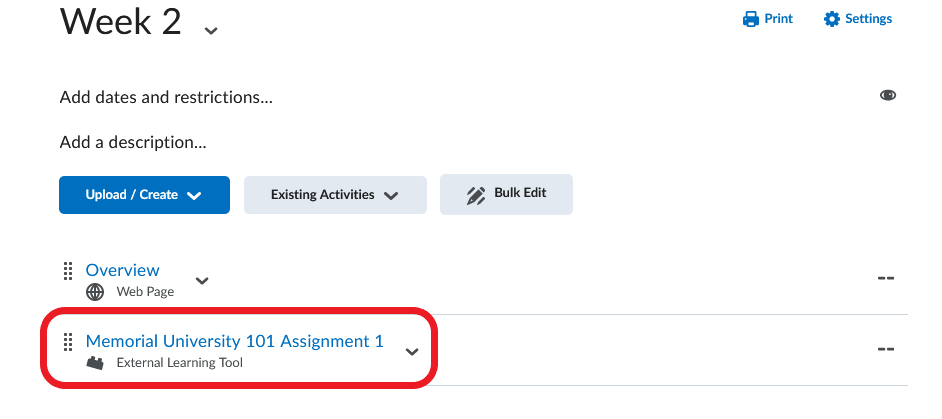
- Select the submission you want to reset.
- Click the Reset Submission.
Video Assignment FAQs
Below you can find some frequently asked questions about the Video Assignment tool. Click each to view the answer.
What is the Video Assignment?
It is a tool created by Bongo and integrated with Brightspace that can be used for video-based assessments. It allows instructors to incorporate new forms of evaluation, such as real-world simulations, role-play scenarios, debates, peer reviews, and other creative ways to evaluate students. Students can easily record themselves (individually or in groups) and easily share the recordings with the instructor though Brightspace.
Why would I use the Video Assignment in my course?
You can use it to deliver structured, video-based assessments that evaluate learners on speeches, oral presentations, language skills, and more. Instructors can easily grade video assessments and add time-stamped feedback, showing learners exactly where they need to improve. Through video-based assessments, learners can demonstrate both their knowledge and their soft skills in an engaging, easy-to-use way.
Where can students find resources on the Video Assignment tool?
Students can access our student resources site for this tool on CITL’s Student Resources site.
How long can a video be?
The maximum size of a video submission is 20 gigabytes, which is equivalent to about 1.5 hours of high-quality video.
What are the technical requirements for students?
A high-speed internet connection
A video recording device (either a webcam on a desktop/laptop computer, or a video recorder app on a tablet or smartphone)
An up-to-date internet browser (NOTE: Firefox and Chrome are recommended.)
Recommended but NOT required – A standard video-editing program like Microsoft Movie Maker, iMovie, Google Vids, or WeVideos. Some of these programs may be on your computer, and others are available on the web at no cost.
Note
Students should record in medium to low quality settings. Recording high quality or high definition videos will increase the size of the file and require further editing.
Can I set up Video Assignments for groups?
Yes. You can randomly or manually place students in groups to complete a video assignment.
Can I set up peer review in a Video Assignment?
Yes, peer review is available. Additionally, there is an option for students to self-evaluate.
Can I use a rubric to grade a Video Assignment?
Yes. You can create a rubric directly in the Video Assignment tool. You can import a rubric from a .csv spreadsheet file but it will need to be in the proper format. More information on how to create a rubric can be found in the evaluation section above.
Can the Video Assignment grades be linked to my Brightspace grade book?
Yes. If you link the video assignment activity to the Brightspace grade book, student scores will be transferred automatically. For details on how to link the two, please refer to the evaluation section above.
I have set up a video assignment in my course. However, some of my students are not listed on the video assignment page. Why?
Sometimes the list of students on the video assignment page will not match the classlist in Brightspace. That is because students need to click on the Video Assignment link in Brightspace in order to be added to the list in Bongo.
For more information on the Video Assignment tool, please contact the CITL Support Centre.