Recording Lectures with Online Rooms
While Online Rooms are typically used for synchronous class meetings, the tool can also be used to record lectures, which can then be easily shared with students in Brightspace. Instructors can use Online Rooms to do one or both of the following:
- Record live lectures during scheduled class time, with students present in the Online Rooms session.
- Record lectures outside the scheduled class time, with no students present in the session.
This resource explains how you can set up recording sessions in Online Rooms without inviting the students (scheduling sessions for students is discussed here) and how to share the resulting recordings in your Brightspace courses. Click on the items below to expand and view details.
> Schedule Your Recording Session
To schedule an Online Rooms session for the purpose of recording a lecture, follow the steps below.
- Log in to your Brightspace course.
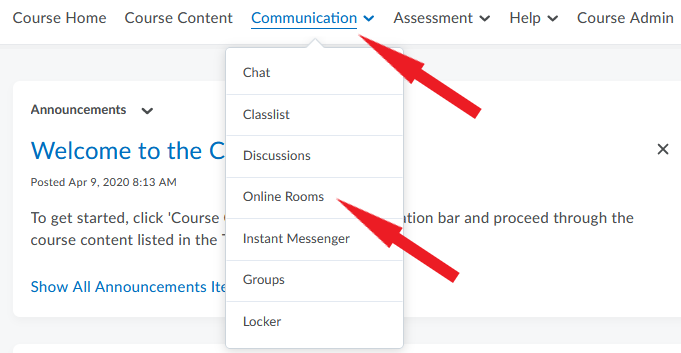
- On your course homepage, click Communication in the navbar.
- Select Online Rooms from the drop-down menu.
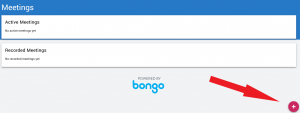
- On the Meetings page that opens, click on the pink circle in the bottom right corner of the screen.
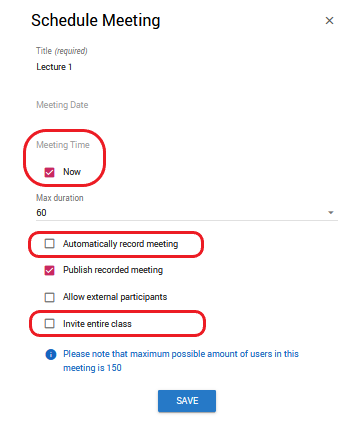
- In the Schedule Meeting window that opens, consider the following settings:
- If you are ready to begin recording your lecture, select Now as your Meeting Time.
- If you want your session to start recording automatically as soon as you launch it, select Automatically record meeting.
- If you want to start recording the session manually after you launch it and prepare your content, unselect Automatically record meeting. You will be able to use the Record button inside the Online Rooms.
- Leave Publish recorded meeting selected – this ensures that the recording you generate is shareable.
- Unselect Invite entire class – this ensures that students do not receive a notification to join the session you are scheduling.
- Click Save. You are now ready to launch your session and begin recording.
> Launch and Record Your Lecture
To launch and record your session, please follow the instructions on the Launching Sessions page in this resource.
> Preview and Share Your Recording
After you record a lecture in Online Rooms, it may take up to an hour for the recording to be processed and ready for sharing (longer recordings take more time to process). To check the status of your recording, and to preview and share it when ready, follow the steps below.
- In your Brightspace course site, click Communication in the navbar and select Online Rooms from the menu.
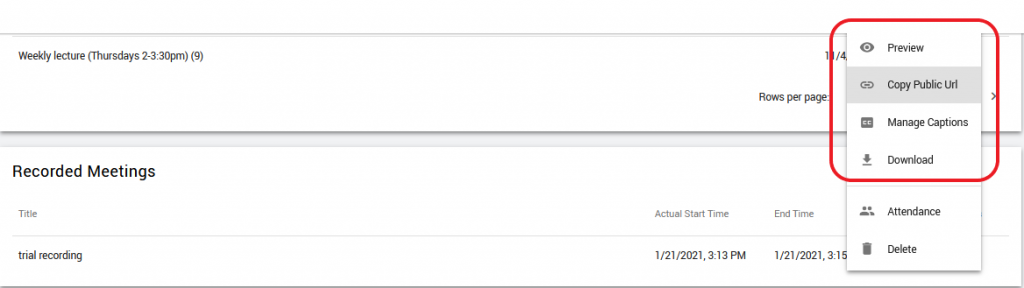
- On the Meetings page that opens, scroll down until you see a list of your Recorded meetings.
- Locate the recording you want to share. A check mark under Status indicates that the recording has been processed and is ready to be shared.
- Click on the 3 dots to the right of the meeting title (under Actions).

- Click Preview to view the recording in a pop-up window.
- If you are satisfied with the recording, select Copy Public URL from the menu. (Note that you also have to option of downloading the file to your computer if you wish.)
- You can now share the URL in your Brightspace course in the location of your choice (e.g. in a content module, in an announcement).