Creating H5P Resources
The following video is a step-by-step tutorial in accessing CITL’s H5P resources site and creating an H5P object.
Note: You will need to log in to the H5P Resources Environment to create a new resource or to edit an existing one.
Creating a New Resource
- Go to the H5P Resources Environment hosted by CITL (windmere.citl.mun.ca) and log in with your MUN username and password if prompted.
- In the top left corner of the screen, select My resources.
- In the top right corner of the screen, turn on Edit mode.
- Select Add an activity or resource.
- Select Interactive Content, then click Add.
- Scroll down to the ‘Editor’ section of the page, and select the type of interactive object you want to create (you can click Details next to each object type for information, screen shots, and a content demo).
- Create your object. You may want to view the examples and tutorials provided with each activity type.
- Click Save and return to course.
H5P Tutorials: H5P has a variety of tutorials for authors on their website. These tutorials provide an overview of the resource type and the steps to help you create the resource. CITL tutorial videos are in coming soon.
Copying and Editing an Existing Resource
Tip: This is useful if you want a similar object in a course but want to make minor changes based on the instructor, class, semester, etc.
Option 1: Copy
- Go to the H5P Resources Environment hosted by CITL (windmere.citl.mun.ca) and log in with your MUN username and password if prompted.
- In the top left corner of the screen, select My resources.
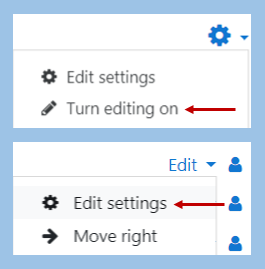
- In the top right corner of the screen, turn on Edit mode.
- Find the resource you would like to edit, and to the right, click Edit and then, from the drop-down menu, Edit settings.
(Note: Clicking the pencil icon next to the resource title will allow you to change the name of the resource only) - In the Editor area click Copy.
- Return to My resources and click Add an activity or resource.
- Select Interactive content and click Add.
- In the Editor area, click Paste.
- Make the required changes
- Click Save and return to course.
Option 2: Reuse
- Click to open a resource in My resources
- Click Reuse.
- Click Copy content.
- Return to My resources and click Add an activity or resource.
- Select Interactive content and click Add.
- In the Editor area, click Paste.
- Make the required changes
- Click Save and return to course.