Creating a Classic Activity: Steps
For a Classic activity, the instructor assigns one assignment to all students and the students complete a draft version of the assignment. Each student, working individually, completes the create, assess, and reflect phases of the assignment in peerScholar.
Note
The design of peerScholar makes it easy to set up a Classic activity. This resource will be an additional guide starting with the initial setup in Brightspace.
Step 1: Create a Link from Brightspace to the peerActivity in peerScholar
peerScholar is fully integrated with your Brightspace course. Creating a link to peerScholar in the course will allow instructors to create an associated activity. When instructors click the link, they will launch peerScholar and they can create, edit, or manage the associated activity. When students click the link, they will launch peerScholar and the associated activity will appear allowing them to complete the current/open phase.
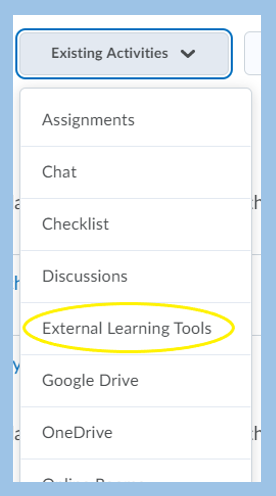
Option 1: Create link in the table of contents
- Open the module where you want the link to appear
- Click the Existing Activities dropdown menu and select External Learning Tools
- Click peerScholar
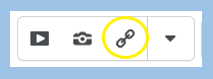
Option 2: Create a link on a content page
- Highlight the text you want for the link
- Click the Insert Quicklink icon in the tools menu
- Click External Learning Tools
- Click peerScholar
Step 2: Build the activity
- Launch the peerScholar activity by clicking on the peerScholar link in Brightspace (see options 1 and 2 above)
- Set up the activity in peerScholar
- Choose New Activity on the left
- Choose Classic
- Click Create Activity
- Expand the Classic Activity section and enter a name for your peer review assignment
- Configure the Create phase of the activity
- Add instructions that students will need to complete this phase
- Attach required resources
- Appropriate resources may include a rubric, a sample assignment, or a demo video
- Configure the Assess phase of the activity
- Choose the number of peer assignments that each student will have to assess
- This will also be the number of peer assessments that the students will receive
- Build the assessments that students will use as they review, assess, and provide feedback to each of their peers – add and create one or more assessments
- Turn Self-Assessment on or off as required
- Choose to use the peer assessments that you created or add and create assessments specifically for self-assessment purposes
- Add/edit the Assess Instructions that students will need to complete this phase
- Choose the number of peer assignments that each student will have to assess
- Configure the Reflect phase of the activity
- Turn Revise and Submit on or off as required
- Turn Assess the Feedback on or off as required
- A feedback assessment is available for students to use when assessing the feedback that their peers provided (this can be edited or deleted)
- Add and create additional feedback assessments as needed
- Add/edit the Reflect Instructions that students will need to complete this phase
- Click Continue to complete this section
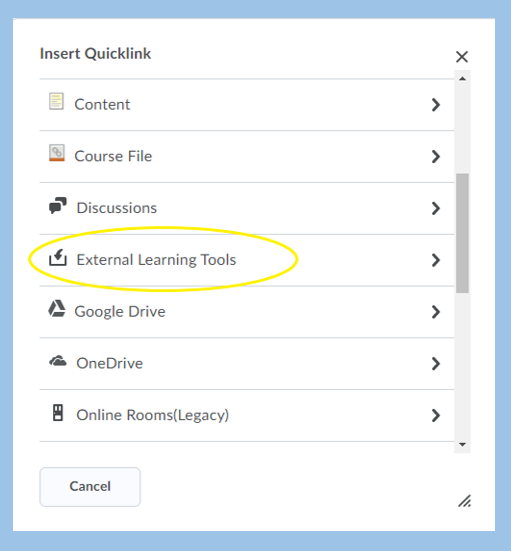
Step 3: Set the dates
There are two options for scheduling the phases of peer review in peerScholar:
Manually control due dates – an instructor can close the current phase and open the next phase manually, at any time. This is valuable for sessions when timelines are flexible or for in-class activities.
Schedule due dates – an instructor can schedule due dates and times so that each phase opens and closes automatically per the schedule. This is effective for fully online courses.
Note
Only one phase of an activity can be open at any point in time. An open phase must close before the next phase can open.
- Choose Schedule Due Date (this would be the best option in most cases)
- Set the Create, Assess, and Reflect Phase dates by clicking the pen icon in the associated box and selecting the dates for the phase to open and close. Click Confirm Dates. Adjust the time as required.
Note
Turning “Submit Late” on for the Create Phase and the Reflect Phase will allow students to submit at any time and may hinder the peer review process. If all students submit late there will be no peer assignments to assess!
Step 4: Customize the grading
Tip
Have your grading scheme for the assignment ready – you will need it for this step.
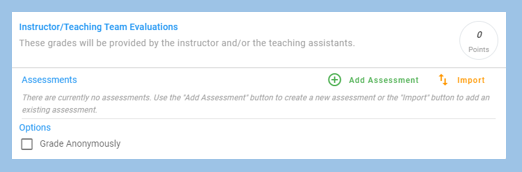
- Click Instructor/Teaching Team Evaluations
- Add/Import one or more assessments that instructors or teaching assistants will use as they review, assess, and provide feedback to each student
- Set the points for each assessment – this should reflect the number of points for instructor evaluation in your grading scheme
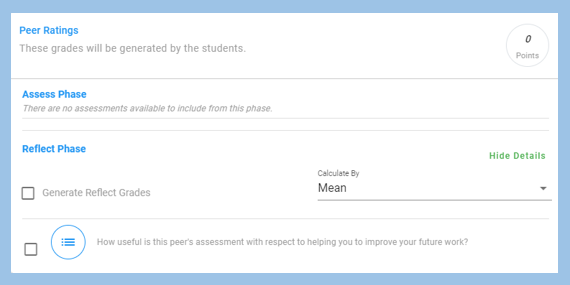
- Click Peer Ratings
- If you want peer ratings to be part of a student’s overall grade for the assignment, click Generate Assess Grades
- Choose how you want to calculate the grade from the peer group – select Mean, Median, Mode, or Drop
- Set the points for each assessment – this should reflect the number of points for peer feedback in your grading scheme
- If you want to assign points for reflecting on the usefulness of a peer’s assessment, click Generate Reflect Grades
- Choose how you want to calculate the grade from the peer group – select Mean, Median, Mode, or Drop
- Set the points that this can contribute to the student’s overall grade – see your grading scheme
- If you want peer ratings to be part of a student’s overall grade for the assignment, click Generate Assess Grades
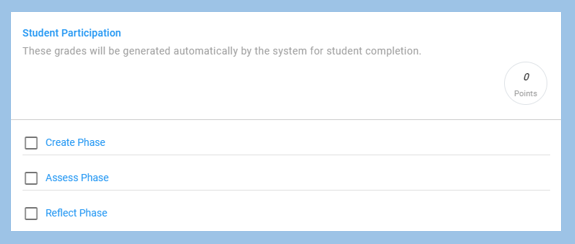
- Click Student Participation
- Check the box for each phase and configure as needed, assigning points per your grading scheme
- Review the summary
- Create Phase
- The point value assigned to student participation in the Create phase will be displayed here
- Assess Phase
- The point value assigned to student participation in the Assess phase will be displayed here
- The point value assigned to peer ratings in the Assess phase will be displayed here
- Reflect Phase
- The point value assigned to student participation in the Reflect phase will be displayed here
- Overall
- This is contribution of the Instructor/Teaching Team Evaluations
- Total points
- The number of points that are achievable on this assignment will be displayed at the bottom of the Summary
- Create Phase
Step 5: Assign grading (optional)
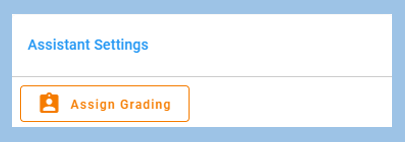
Instructors can assign students to teaching assistants who will then be responsible for grading the work of those students. There are three ways to add students to each teaching assistant for grading purposes: Randomize, Bulk Assign, or Assign Students.
- Randomize – randomly assign students to the teaching assistants
- Assign – manually assign students to the teaching assistants by clicking on the + icon next to each students name and select the teaching assistant from the dropdown menu
- Bulk – assign via a CSV file a large set of students to the teaching assistants
Click Finish to complete and save your activity. The activity Overview page will open.
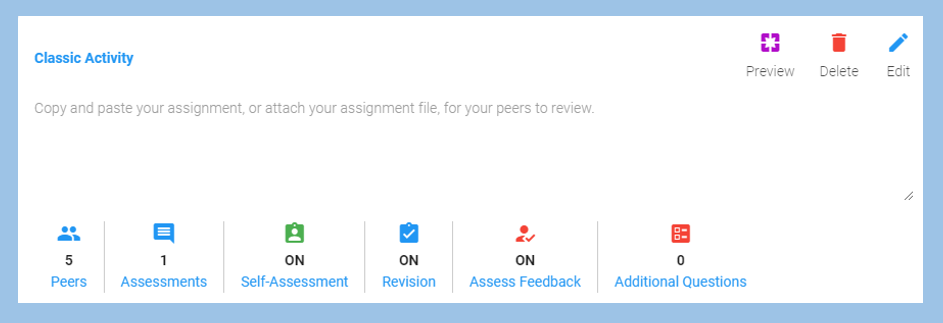
Step 6: Review
The Overview page of your peerScholar activity will have the following features for review and progress tracking purposes. You can click Edit at any time to make changes to the activity.
Step 7: Make it Visible
On the Overview page of the activity, toggle the Show Activity/Hide Activity to ensure that the “Activity is now visible to students” when needed.
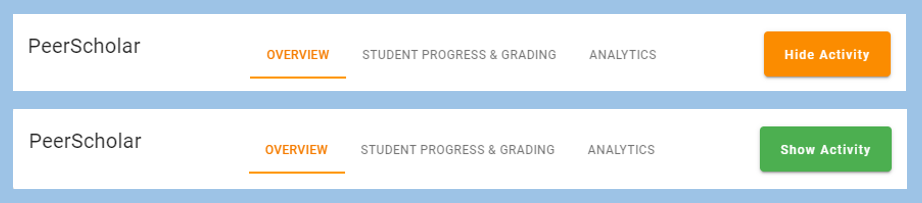
Note
You can hide an activity while you are in the process of creating it or, if another activity is in progress, you can hide subsequent activities to avoid confusion.