Navigating Webex Sessions
You have a number of options for starting a Webex meeting as a host or joining a meeting as a participant, depending on how the meeting was created. If you have the Webex application installed, you can join any meeting when the Join button next to the meeting name becomes green. If you do not have the Webex application installed, you can start or join a meeting in several different ways.
Launching a Session
You can start a Webex meeting in one of three ways. Click the options below for details.
Start a ‘Personal Room’ meeting from the Webex portal
- Go to your Webex dashboard.
- If you want to start an unscheduled ad-hoc meeting that does not require a password, your Personal Room in Webex may be the best option.
- Press the copy button to the right of your Personal Room and send that link to whomever you want to join.
- Select Start a Meeting. You will be directed to your Personal Room in Webex.
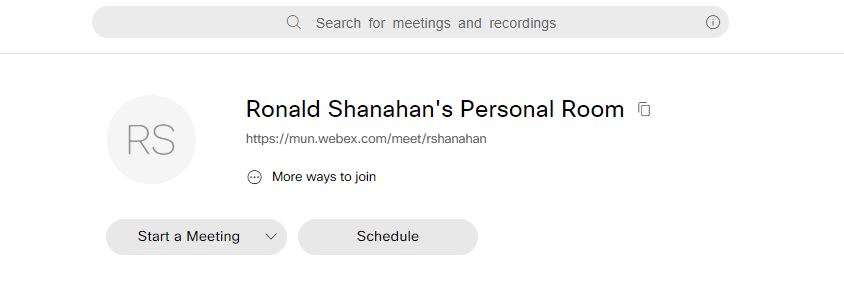
- Then, wait for people to join. You will have to admit them into the room as they arrive. Webex will prompt you to admit them.
Note
You and your users may have to install an app depending on what device you are using to connect.
Start a scheduled meeting from the Webex portal
- Go to your Webex dashboard.
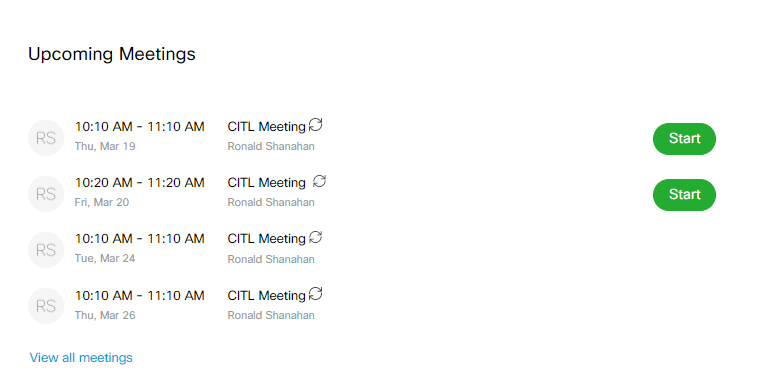
- Meetings that you have scheduled will appear in the Upcoming Meetings section of your dashboard.
- Select the meeting you want to launch and click Start. Your meeting space will launch.
Start a scheduled meeting from Brightspace
The Webex Integration will allow you to launch your meetings from your upcoming meetings section within your Brightspace course site.
- Log in to your course in Brightspace.
- Locate and click the Webex link.
- Select the Virtual Meetings tab, then select the Upcoming tab to view your upcoming meetings.
- Press HOST to launch your meeting. The Webex application will begin to load on your device.
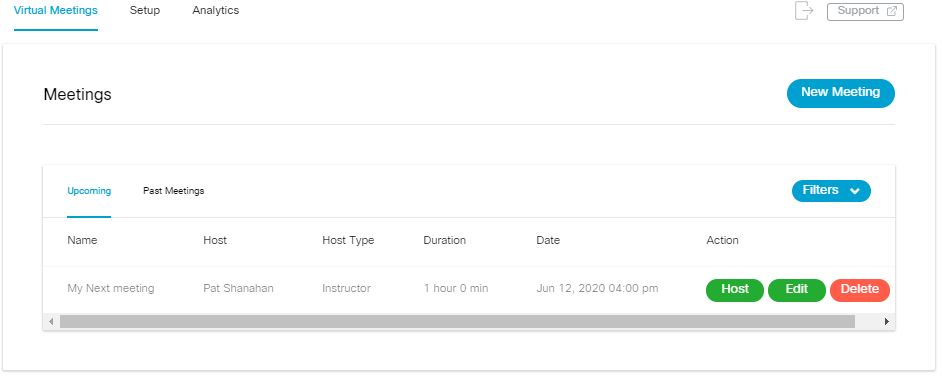
Once your meeting has loaded, students will be able to join the meeting.
Joining a Session
There are several ways to join a meeting as participant. Click the options below for details.
Join a meeting from Brightspace (for students)
Students who are a members of a Brightspace course site will be able to join meetings created within the site.
- Log into your Brightspace course
- Locate and click on the Webex link (typically located in the navigation bar or within the content tool).
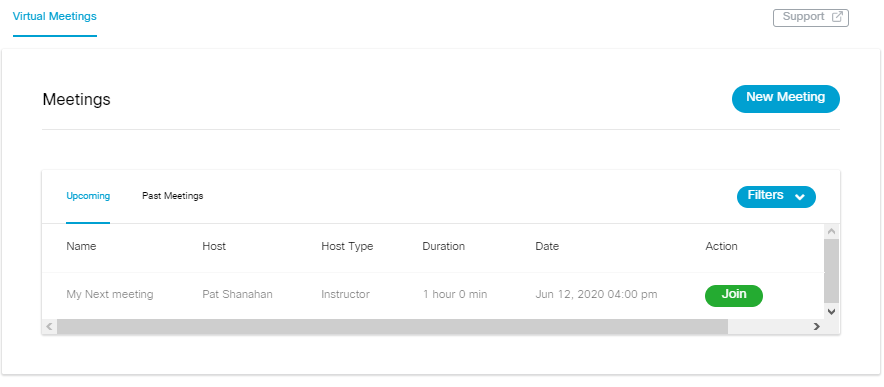
- Find the meeting you wish to join on the list of Upcoming Meetings, and click JOIN
- The Webex application will direct you through the process of joining a meeting.
Note
Participants will not be able to join a meeting until it has been launched the host. They will receive a error message indicating that the meeting has not started yet or has ended.

Join from an email invitation
If you have received an invitation via email, you can simply click on the Join meeting button.
Follow the prompts to join the session.
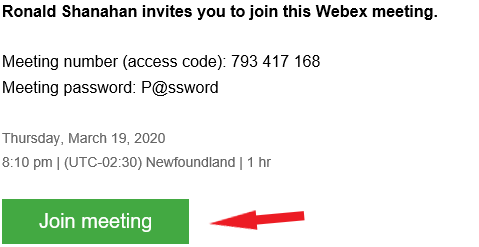
- Depending on the type of device you are using to connect, you may have to download software.
Note: If you are apprehensive about clicking links in emails, review the Joining with a meeting number (access code) and password section below.
Join with a meeting number (access code) and password
You can also join a meeting with a meeting number (access code) and password.
- Go to https://mun.webex.com.
- Locate the Join a Meeting box on the page, enter your meeting number and press enter.
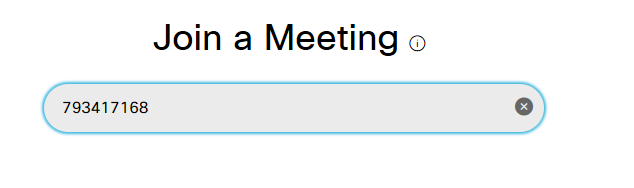
If a password is required, you will be asked to enter it. If not, Webex will start taking you through the process of joining the meeting.
Join with a URL
If you only receive a url to join a meeting, you likely have been asked to join someone’s ‘Personal Room’ in Webex. This is a meeting space typically used for unscheduled, ad-hoc meetings. The url will likely look something like https://mun.webex.com/meet/USERNAME. Make sure that the url starts with https://mun.webex.com.
Note
You do not need to have a WebEx account to join a Webex meeting. You will be asked to provide your name during the process of joining the meeting.
Tools commonly used in Webex
Participant Tool

The participant tool is used to view the list of participants in your meeting. This tool has several other features you may find useful when hosting a meeting.
- Type of device: The participant list can tell you the type of device a participant is connecting with. Look for the mobile
 or desktop
 icons to the left of their name.
 - Raised hand: A participant has the ability to raise their hand. If a participant has raised their hand, the
 image will appear next to their name.
 - Mute a participant: As the host, you have the ability to mute a participant. To mute a participant, select the
 button to the right of their name.
 - Private chat: If you want to send a private chat message to a participant, select them on the participant list and click
 to the right of their name. The chat panel will appear with their name selected.
 - Making Presenter: To make a participant the presenter, select their image bubble to the left of their name. You will be prompted to confirm the new presenter.
Chat

The chat tool is used for text communication with the participants in your meeting. There are two types of chats you can have.
- Everyone: Use this type when you want everyone to see the text you want to send.
- Private: Use this type when you only want one person to see the text you want to send.
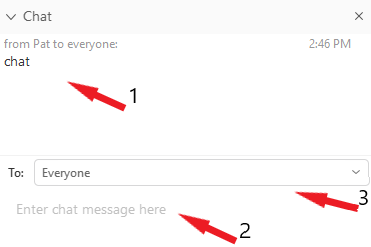
- Messages sent to everyone will appear here. The private messages that you send will also appear here.
- Type your message here.
- Use this dropdown menu to select your message recipient.
Breakout Sessions
Breakout Sessions is a feature of Webex Meetings that allows the host or co-hosts to divide participants into smaller groups where they can work together and share ideas. To set up breakout sessions in your Webex session, follow the steps below.
- Launch your Webex session.
- In the menu at the top of the meeting window, click Breakout Sessions.
- Make sure that Enable Breakout Sessions is selected. If not, click on it so that a check mark appears next to it.
- In the same menu, click Breakout Session Assignments.
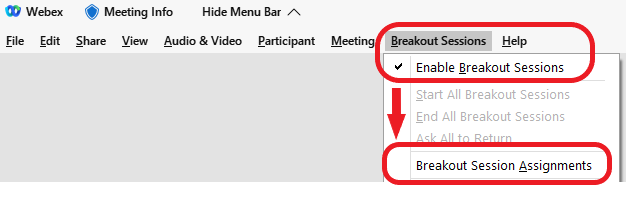
- In the Breakout Session Assignment window that pops up, decide:
- how many breakout sessions you want to create (Note: you can add and/or delete sessions later or during the meeting)
- whether participants will be assigned to sessions automatically by the system, manually assigned by you, or whether they can choose which session they want to join on their own.
- Click Create Assignments.
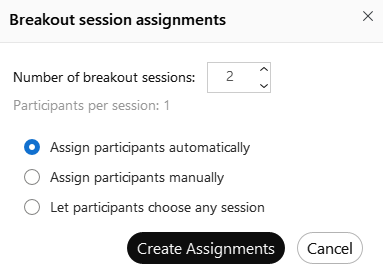
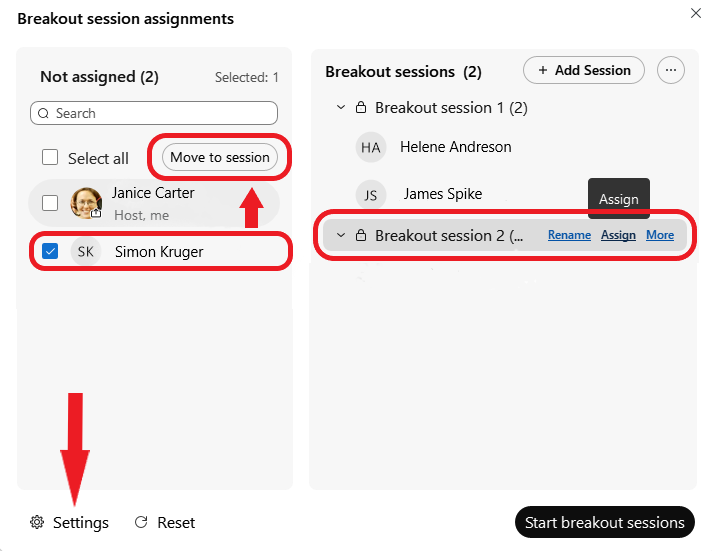
- If you have chosen to manually assign students to breakout sessions, you will be prompted to do it now in the Breakout Session Assignments window. Participants can be added in one of two ways:
- In the Not Assigned section, select the names of the participants you want to put in a group. Click Move to Session and select the breakout session to which you want to add them. Repeat until all participants have been assigned.
- In the Breakout Sessions section, hover over the session to which you want to assign members and select Assign from the options that appear. Select participants from the list that displays, and they will be automatically added to the group. Repeat with the remaining breakout sessions.
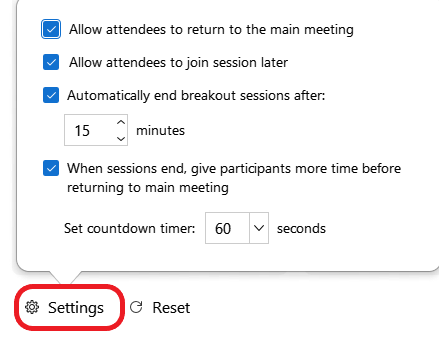
- Before you click the Start Breakout Sessions button, click Settings.
- Select your preferences for the breakout sessions.
- When you want to bring everyone back to the main Webex room, click End All Breakout Sessions. Otherwise, breakout sessions will end automatically after the amount of time you scheduled them for in Step 9.
If you are ready to launch the breakout rooms at this point, click Start Breakout Sessions. If you are not ready, you can close the Breakout Session Assignments window and launch the sessions later. To do so, go to the top menu in the Webex meeting window, clicking Breakout Sessions, then Start All Breakout Sessions.
Polling
The polling tool allows you to create questions to pose to your participants during the meeting. There are three question types available
- Multiple choice – Single Answer
- Multiple choice – Multiple Answer
- Short answer.
> Creating a question
- Choose your question type.
- Press New.
- In the Poll Questions section, enter your question. Note: the short answer type will not require possible options. The multiple choice types will.
- In the Answer section, choose Add.
- Enter your possible answers. Your question should start taking shape in the Poll Questions section.
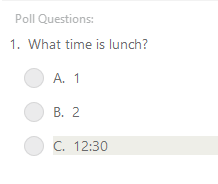
- The Webex Polling tool requires a length of time with which the poll will be available answer. To specify the this time and whether or not the timer is displayed to participants, select Options… in the Answers section.
- When you are ready to present your poll question to your participants, select Open Poll.
- Your Polling panel will switch to reporting mode.
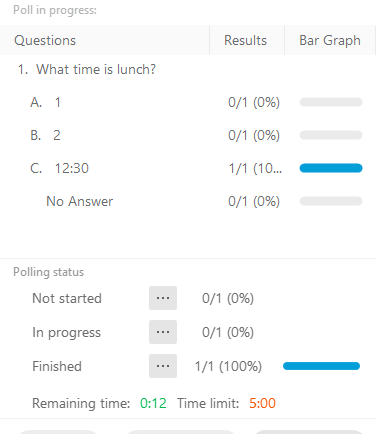
- The responses will be updated as people answer questions.
- Select Poll results in the Share with attendees section if you want to share the responses with your participants.
Note: If you are creating a Short answer question, and you want to see the responses, make sure to select Record individual responses in the Answer section. Otherwise, you will only see Not started, In progress and Finished. When the short answer question is closed, select the Individual results link in the Share with attendees section to review the answers.
Sharing Content
Webex has the ability for the meeting host to share content. This content could be an application open on your desktop, a web browser or some other media. Here are the steps required to start sharing in your meeting:
- Select Share from the menu bar on the top of your screen.
- Select what you wish to share
- Content – prompts you to choose a desktop application to share
- Web Browser – loads a new tab in the default browse
- Media – ask for a URL (youtube, etc.)
- Meeting window – shares the meeting window
- The Webex meeting window will reconfigure to include what you have shared. You will see a new menu bar above what you are sharing.
- When you are done sharing, press…
Note: You may want to confirm with attendees that they can see what you are sharing. This will help ensure that it is working as expected.
While you are sharing something, you will see a new menu bar appear in the meeting. This new menu bar will only be available while something is being shared. If the item you are sharing is maximized full screen, this new menu bar will often auto hide off the top of the screen. Moving the mouse to the top of the screen will make the menu appear. Once you press Stop Sharing, the menu bar will disappear.

Menu Items:
- Stop Sharing: Press this when you are done sharing. Once stopped, the meeting window will revert back to its configuration before you started sharing.
- Pause: If you want to pause sharing for a few moments, press ‘Pause’. The meeting participants will stop seeing the what you have shared until you press ‘Resume’.
- Share: If you want to change what you are sharing, use the share button and select something different.
- Assign: Webex has the capability to assign elevated access to the meeting.
- Mute Me: This button mutes your audio.
- Video: Controls whether you are displaying your video.
- Recorder: Lets you record the meeting, either in the cloud or to your computer.
- Participants: Display the participant list window which shows everyone in your meeting, and allows you to see their capabilities. It also allows you to mute or remove participants.
- Chat: Displays the chat window which will allow you to send text messages to all participants or to an individual.
- Annotate: Enables the annotation tool. Please visit our annotation resources for more details.
- More: Displays other information about the meeting.
Document Annotation
Annotation is a Webex feature that allows the host to mark up a documents that is being shared in a meeting. This could be used to emphasize a part of the screen or add something that is missing. A participant in a meeting could also request or be asked to mark up the document being shared.
- To annotate something you are sharing, select Annotate in the sharing toolbar.

- This will provide you (the host) with the capability to mark up what you are sharing. Webex will provide you with a new floating tool bar with markers, text boxes and shapes. This toolbar will appear:
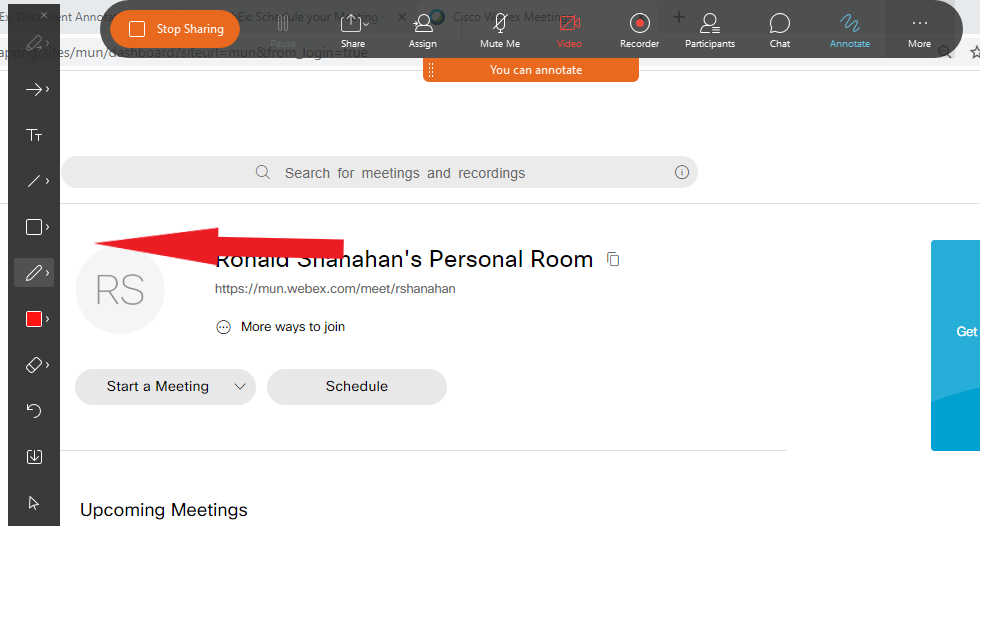
When you are done annotating, press the Annotate button again. This will disable the tool and give you back control of the other meeting tools.
Assigning Privileges
In Webex, the host can to provide elevated meeting access to participants. This feature is available on the Sharing toolbar. Select Assign.

You will have the option to select one of three options:
1. Make this participant a presenter: This option gives the selected participant the ability to share presentations, screen/desktop, or other application. The host has the ability to reclaim the presenter role and any time.
2. Pass keyboard and mouse control: This option gives a participant control of what the host is sharing. For instance, if the host is sharing an application such as Microsoft Word and provides a participant with this control, the participant can click and edit anything in that Microsoft Word application.
3. Allow to annotate: This option gives the participant the ability to annotate what the host is sharing. A host could do this to allow a participant to demonstrate understanding of the content being presented. Annotations on top of a screen share can be saved by the host or the participant as an image.
Frequently Asked Questions
Can I mute all participants?
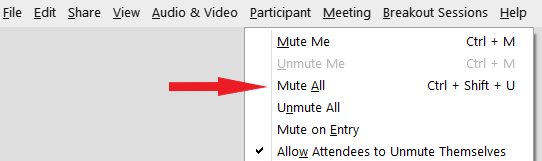
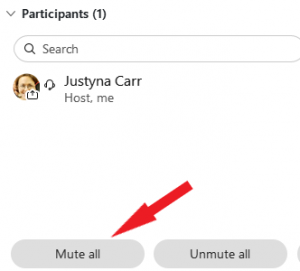
Yes. As the host, you can mute all microphones at any point during the meeting in one of two way:
- In the meeting window, select Participant in the menu on top, then click Mute All.
- Click Mute All at the bottom of the participant list.
My alternate host (cohost) cannot start the meeting through Brightspace. Why?
Brightspace only allows the event creator to start the meeting from within Brightspace. If you have alternate hosts (cohosts) assigned to your session, they will only be able to join it after you have launched the session from within Brightspace. However, they can launch the session they are co-hosting in other ways:
- From their Webex portal (https://mun.webex.com)
- From the Webex desktop application (if they have it installed)
- From the email invite they received when they were assigned as an alternate host (cohost)
Learn more about how to add alternate hosts (cohosts) to a Brightspace Webex session on this page.
If I stop and start a recording, does it save as one recording or two?
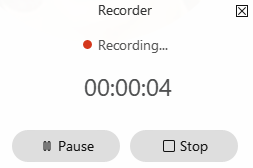
If you start a recording, stop it, and and then start again, it will save as two separate recordings.
If you want the recording pieces to remain together as a single recording, then use the Pause recording function instead of the Stop option.
How can I control what participants can do in my meeting?
When a session is in progress, you can control what permissions participants have for the meeting in a few places.
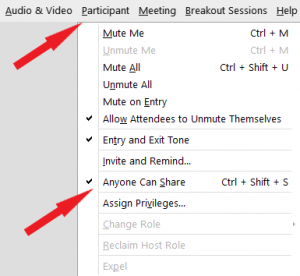
- Select Participant in the top menu bar and locate Anyone Can Share. If this setting is ON (check mark next to it), anyone in the meeting can initiate content sharing and become the presenter. If the setting is OFF (no check mark), only the meeting host can share. You can turn the setting on and off by clicking on it.
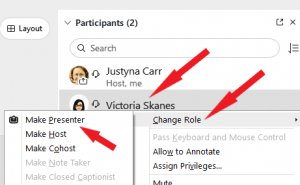
- If you want to give sharing privileges to a specific participant, you can do it through the session’s Participants list. Locate the name of the person you want to allow to share content and right-click on it. Select Change Role, then Make a Presenter from the menu.
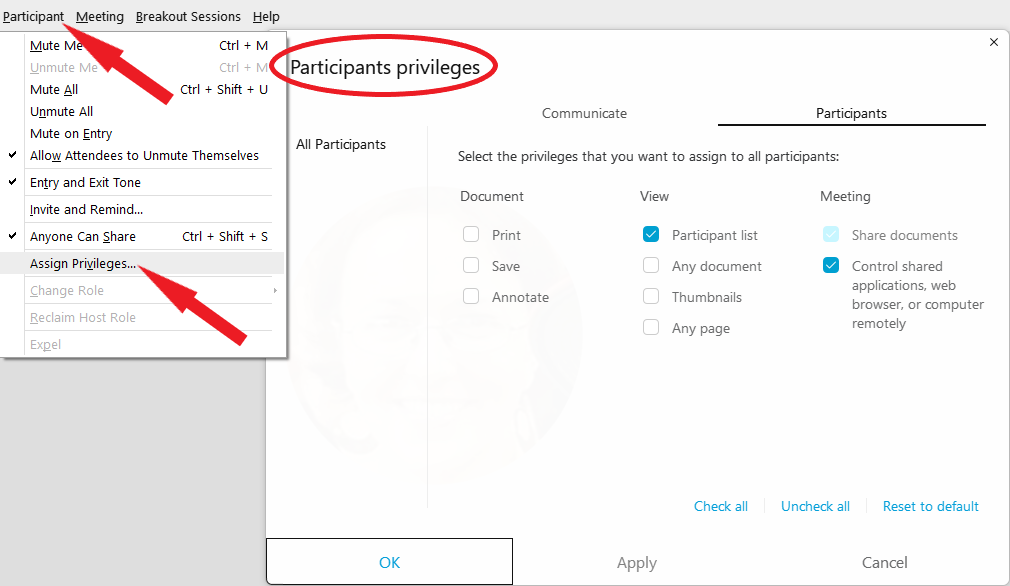
- If you want more granular control over what participants can do, go to the Participant menu in the top menu bar and select Assign Privileges. A new box will pop up that allows you to provide specific permissions to participants and what aspect of the meeting they have access to. You can control who they can communicate with under the Communicate tab, and what tools they have access to under the Participants tab.
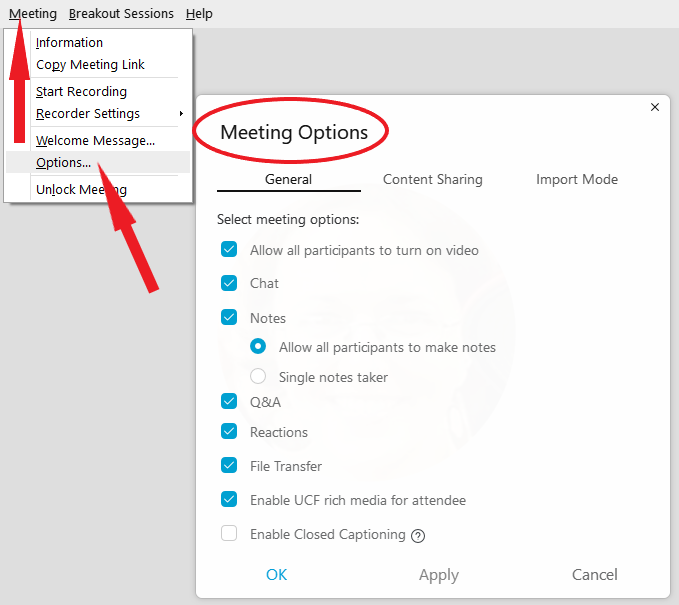
- You can also adjust meeting-wide participant privileges by going to Meeting (top menu bar) and then Options. A new window will pop up with a list of functions that you can enable or disable as you wish.
I am no longer the Host or Presenter. How can I get that role back?
If someone else is now in the host or presenter role in a meeting you created, you can reclaim the host role by clicking Participant in the top menu bar, and then selecting Reclaim Host Role. This should automatically make you the host of the meeting again.
How can I configure my Webex Meeting to be a more controlled environment?
In general, the default privileges given to participants in Webex Meetings provide a good balance of functionality and control. However, if you want your Webex sessions to be a more controlled environment, there are a number of settings you can change to achieve that. Some options are listed below with an explanation of how they work.
- Anyone Can Share
By default, a Webex Meeting is configured to allow anyone to share content in a session. This can cause interruptions if abused by participants. To disable this feature, go the Participant menu across the top of your meeting window, then uncheck Anyone Can Share. Now, only the presenter will be able to share content in the session. You can make someone else the presenter by right-clicking their name in the Participant list, clicking Change Role -> Make Presenter.
- Mute on Entry
One way to prevent audio disruptions in your session is to enable the Mute on Entry option. This setting will automatically mute the microphones of all participants entering your session. This helps reduce unwanted background noise as participants join the meeting with an open microphone. To enable mute on entry, go to the Participant menu at the top of your meeting window and check Mute on Entry.
- Mute All
If at any point you notice unmuted microphones from your participants, you can use the Mute all button at the bottom of the Participants list in the meeting window. This will mute the microphones of all participants except for the host and presenter.
- Lock the Room
If you wish to limit who can enter after the session has begun, locking the room can prevent new participants from entering. Go to the Meeting menu at the top of the meeting window, and click Lock Meeting. New participants will receive a message when they try to enter notifying them that the session is locked.
- Disable Entry/Exit Tone
If you have a large number of participants in your session, the entry and exit tone can be distracting. At any time, you can disable the tone by going to the Participant menu at the top of the meeting window and unchecking Entry and Exit Tone.
- Assign Privileges
The Assign Privileges option in Webex allows you to determine how participants can interact with each other and the session. You can access this screen by going to the Participant menu at the top of the meeting window and clicking Assign Privileges…. A new window will pop up.
On the Communicate tab you will see options that controls who participants can chat with. You could choose to disable private chats between participants, or to disable public chatting, depending on the format of your session.
On the Participants tab, you can control what participants can see and interact with in the session. By default, participants can see the participant list and control shared applications remotely (if you provide access). You can turn these features off, or optionally allow participants to have more permission in your sessions if that is desirable.
- Meeting Options
The Meeting Options function allows you to control what features of Webex Meetings are available for all participants. You can access these options by going to the Meeting menu at the top of the meeting window and clicking Options….
The General tab is the section that allows you to customize your meeting. Here you can optionally disable everyone’s video in the session (including presenters and hosts), disable chat, disable notes, disable file transfer, disable rich media, or enable closed captioning.
Of these options, disabling video or chat could provide greater meeting control depending on the nature of your session.
- Stop Individual’s Video
If a particular participant is sharing disruptive video, you can disable their ability to share video completely. To do this, go to the meeting’s Participants list, right-click on the participant’s name and select Stop Video. NOTE: You cannot re-enable a users video in the same manner. They will need to leave the meeting and rejoin in order to enable their video again.
When sharing content, should I share a screen or an application?
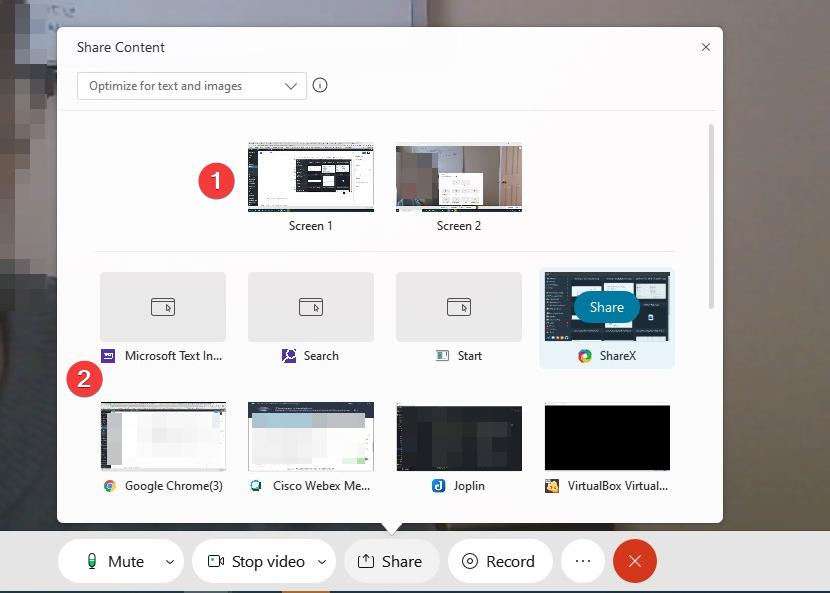
Webex allows you to share contents from your computer with everyone in your Webex session. When you click the Share button, you are presented with a number of options. Depending on the situation, one option may be preferable.
OPTION 1: Share Screen 1 (or Screen 2) [#1 in image below]
Sharing a screen does just that – shares the entire contents of whatever is displayed on that screen at the time of sharing, and for the duration of the screen share. This is the easiest option for sharing content as you can simply select a screen, and move applications that you want to display to that screen.
Pros: Easy to do. Can quickly change between applications that are shared during the session.
Cons: Shows everything that appears on the screen. You may end up sharing information you do not intend, like other open windows, or email notifications.
OPTION 2: Share Application [#2 in image below]
Underneath the screen options, you will have a list of applications open on your computer at the time you initiate sharing. You can select a specific application to share, regardless of what screen it is open on on your own computer.
Pros: Shares just this application. Any other content or notifications are hidden from your participants.
Cons: If you want to share two different applications during a session, you need to Stop Sharing when you are finished with one, and then begin sharing again with the other application selected for sharing.
The ‘Record in Cloud’ option is not available in my Webex meeting. How do I get it?
If you do not have the option to Record in Cloud (seen in the image below), it may be because of the Meeting Type you have selected when scheduling your session.
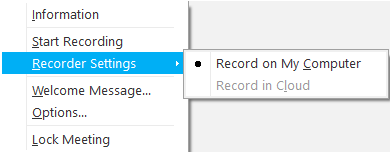
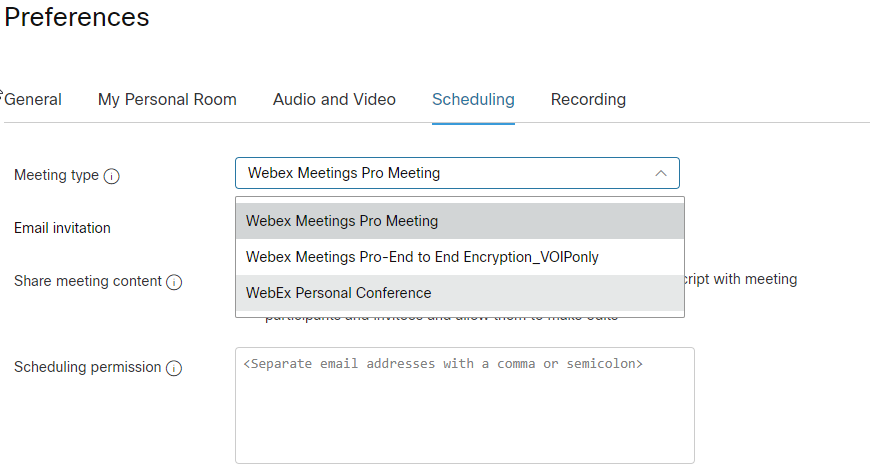
Webex has several meeting types, and some of them limit what you can do during your session. One meeting type, called Webex Meetings Pro-End to End Encryption_VOIPonly, will disable your ability to record to the cloud. To check if you are using the Webex Meetings Pro-End to End Encryption_VOIPonly meeting type, follow these steps:
- Log into your Webex dashboard.
- In the menu on the left, click Preferences.
- Select the Scheduling tab.
- Look at the Meeting type. If you have Webex Meetings Pro-End to End Encryption_VOIPonly selected as your meeting type, then this is your issue.
- Select Webex Meetings Pro Meeting from the dropdown menu and click Save. You can now launch a new Webex session and will have access to the Record in Cloud option.
Note
If you created a reoccurring meeting through Outlook, the Webex portal, or Brightspace, or if you scheduled future sessions, you will need to delete those sessions and recreate them in order have the new Meeting Type apply correctly.
If your issue still persists, contact the CITL Support Centre.