Intelligent Agents
‘Intelligent agents’ are a Brightspace tool that lets instructors monitor student activity in a course without having to check on each student’s progress manually. Intelligent agents can automatically identify students who have (or have not) completed certain course tasks, and they can send personalized emails to those students. Agents can be used to:
- Send a welcome message to students when they first access the course,
- Remind students that they have not yet viewed a particular content topic,
- Inform students that they missed an assessment deadline,
- Congratulate students on a high grade on a quiz or assignment, or on completing the last course module,
- Contact students who achieved a low grade on a quiz or assignment and remind them of office hours and other available supports,
- Acknowledge participation in a discussion forum.
Benefits of Using Agents
Using intelligent agents can benefit both instructors and students in many ways.
- Intelligent agents are an efficient way of monitoring course activity (no need for manual checks on student progress).
- Agents allow instructors to easily identify students who may need extra support.
- By using agents, instructors can devote time to other course activities and tasks (e.g. providing more individualized communication and feedback to students, where needed).
- Because emails sent by agents can be personalized, they can boost student engagement (for information on how to personalize emails, see section on Replace Strings).
- Agents can be created at the beginning of the semester, and then ‘act’ on behalf of the instructor throughout the term.
Creating Intelligent Agents
To create an agent, follow the steps below:
- Log in to Brightspace and go to your course site.
- In the course navbar, select Course Admin.

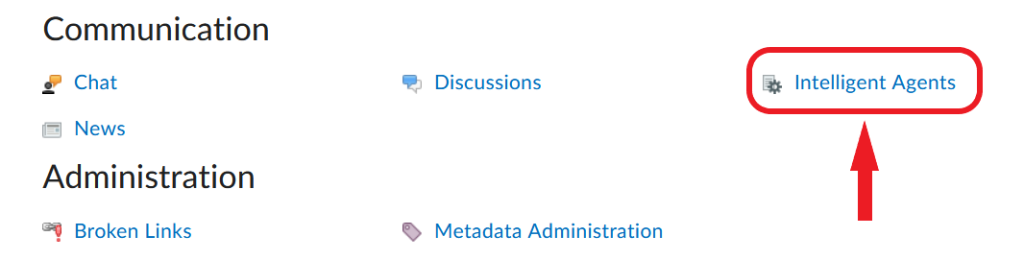
- Select Intelligent Agents from the list of available tools.
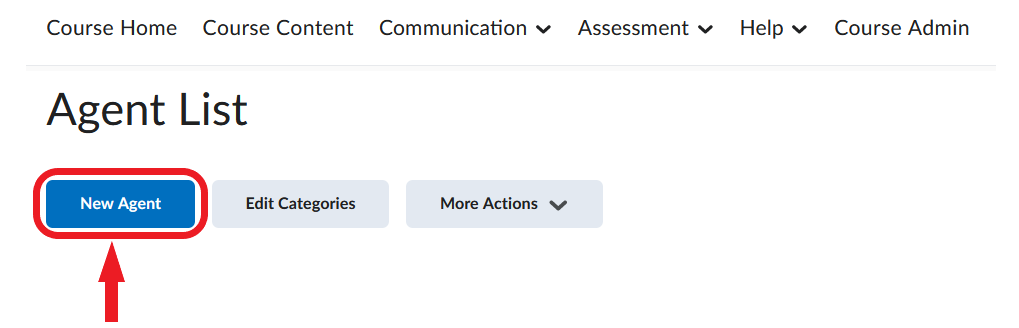
- A page titled ‘Agent List’ will open. To start creating an intelligent agent, click New Agent.
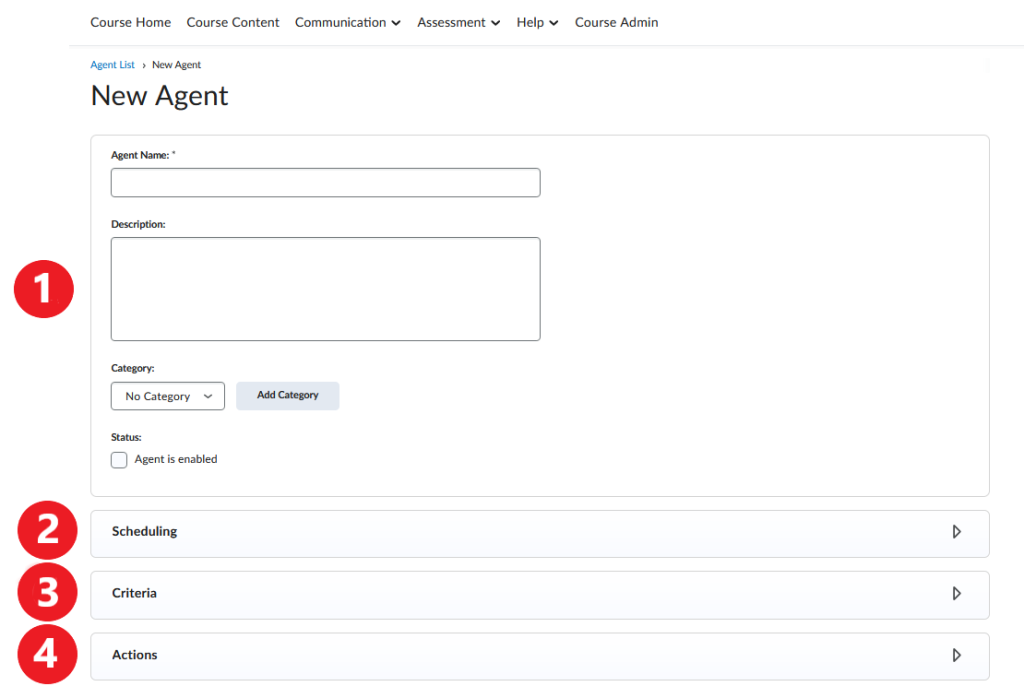
- The ‘New Agent’ page contains four main sections of information, as indicated in the image below: General agent information, Scheduling, Criteria, and Actions. For specifics on how to complete each section, please refer to the menu below the image.
4. Actions
The last step in creating an Intelligent Agent is setting the action(s) the agent should take after identifying students who have met the agent’s criteria.
A. Repetition – This option allows you to determine how many emails the agent should send to students who meet the criteria you had set. The options are to:
- Take action only the first time the agent’s criteria are satisfied for a user.
With this setting, a student who has been identified as having met the agent’s criteria will only receive one email, regardless of how many times the agent will run. Sample use: a missing grade on a course assessment.
- Take action every time the agent is evaluated, and the agent’s criteria are satisfied for a user.
With this setting, a student who has been identified as having met the agent’s criteria will receive an email each time the agent runs. Sample use: lack of login activity for a number of days.
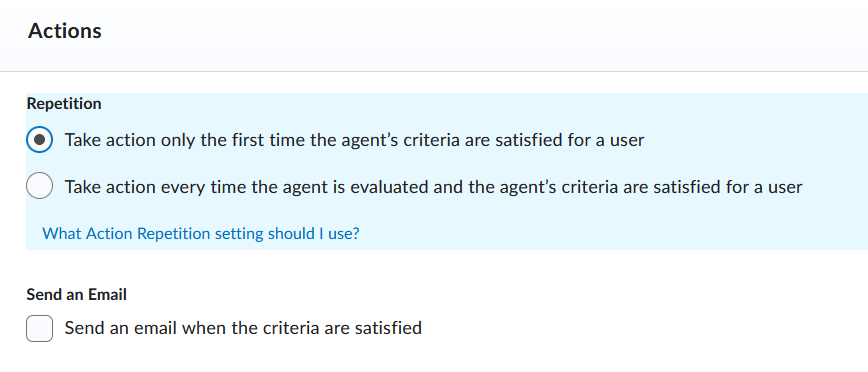
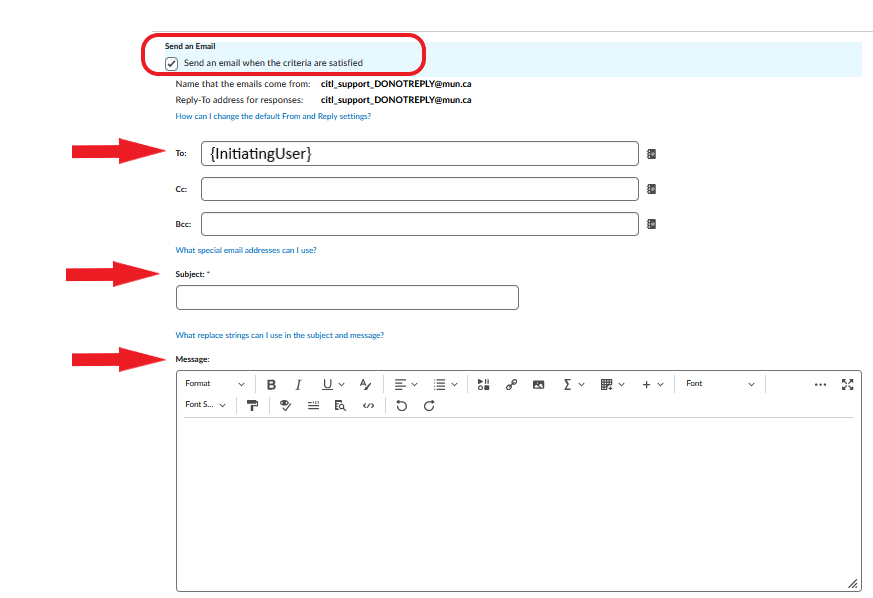
B. Send an email – Select this option if you want the agent to send emails to:
- students identified by the agent, or
- yourself – if you want the agent to send you updates about student activity
Once this setting is selected, additional options will appear underneath. Enter following recipient information:
- In the To field (and CC and Bcc, if applicable), enter: {InitiatingUser}. This is a special code called a ‘replace string’, which will prompt the Brightspace system to autofill the email address of the student receiving an email from the agent. Alternatively, you can enter your own email if you want agent updates to be sent to you rather than the students.
- Subject of the email
- Message the students (or you) will receive
Note
For more information on using ‘Replace Strings’ in emails sent out by intelligent agent, please refer to the next section on this page.
Click Save and Close at the bottom of the page to finish creating the agent.
1. General Agent Information
In the first section, enter general information about your agent.
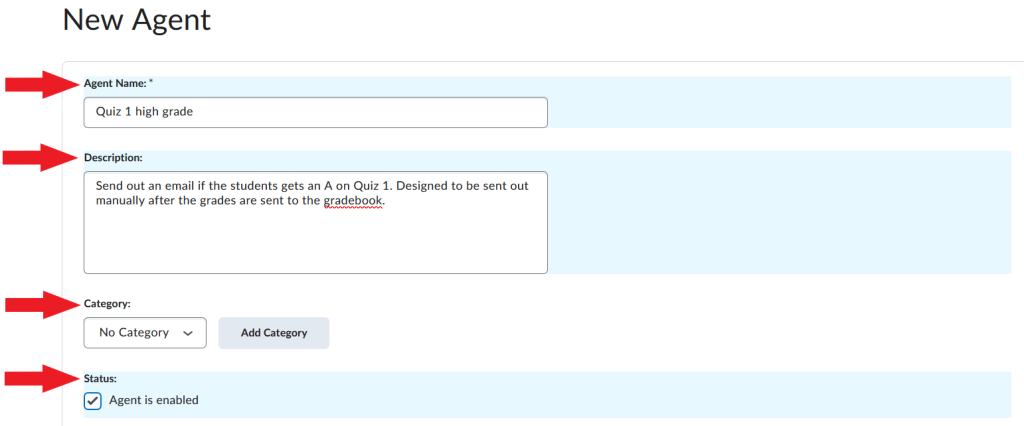
- In the Agent Name box, give the agent a title (e.g., Quiz 2 grade below 50 or Has not accessed course in 7 days)
- Optionally, you can enter a description of the agent.
Note
Agent name and description will only be visible to you, not the students.
- (Optional) Under Category, you can assign the agent to an existing category or create a new one.
Note
If you have multiple agents in your course, using categories may help you keep them organized.
Under Status, select Agent is enabled. Otherwise, you will need to return to this option and select it at a later time.
2. Scheduling
In the Scheduling section, determine whether you want to run the agent manually or if it should run automatically.
OPTION A: Manual Run
If you wish to run the agent manually once you are ready to do so, leave the default ‘No Schedule’ setting in place.

OPTION B: Automatic Run
If you want to schedule the agent to run automatically, click the downward arrow under ‘Frequency’ to view all scheduling options. The options are:
- One-time run
- Hourly
- Daily
- Weekly
- Monthly
- Annually
Depending on the frequency you select, additional options will appear underneath.
Note
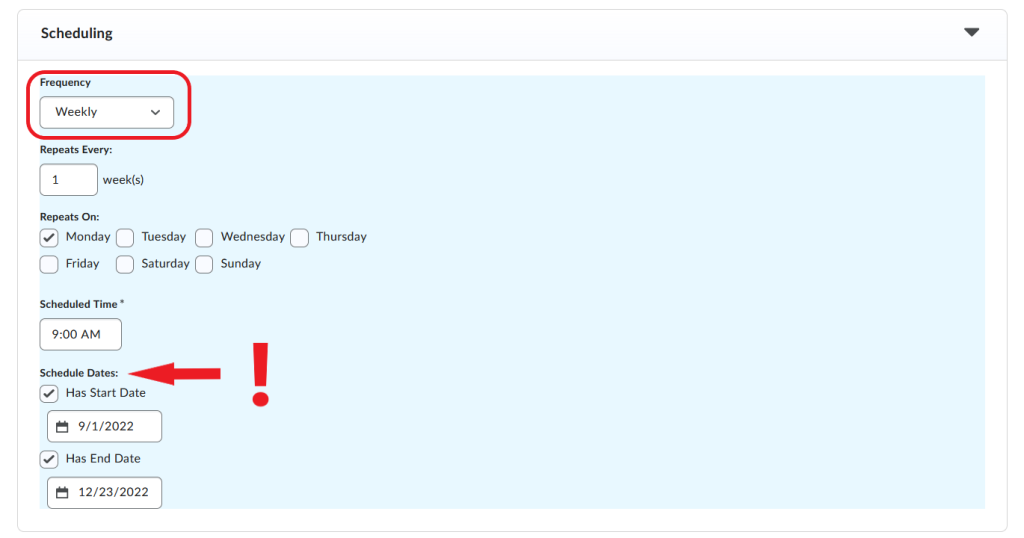
If you choose to run the agent automatically, make sure that the Start Date and End Date under ‘Schedule Dates’ match the duration of the semester. Otherwise, students will continue to receive automated emails after the semester ends.
EXAMPLE:
If you choose to run the agent Weekly, you will be prompted to enter the frequency of occurrence, the time of day the agent will run, and a date range (Start/End Dates).
3. Criteria
The Criteria section contains two main settings.
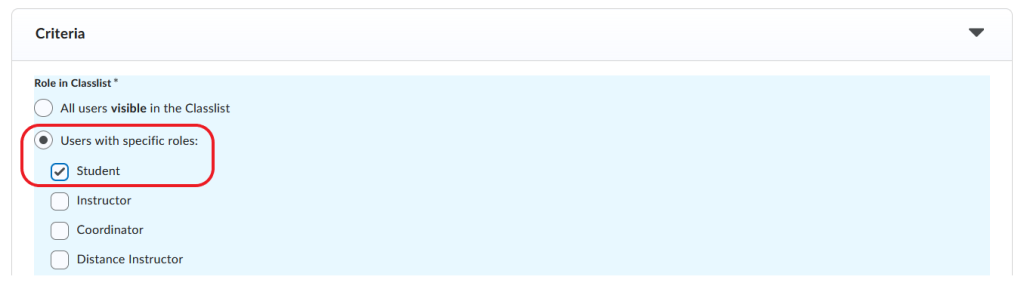
A. Role in Classlist – Decide who will be monitored by the agent.
- Select ‘All users visible in the Classlist‘ if you want the agent to monitor everyone on the classlist, i.e. students, instructors, TAs, student auditors etc. NOTE: This also includes you – the instructor.
- (Recommended) Select ‘Users with specific roles‘ if you want the agent to monitor only a specific group, e.g. students. A menu with various roles will open; check off the role you want the agent to monitor.
B. Take Action on Activity – Specify the activity the agent should monitor. There are 3 options available here: Login Activity, Course Access, and Release Conditions
- Login Activity – This option relates to students (not) logging in to the Brightspace system in general, not specifically to your course. Sample use: Select if you want the agent to identify students who have not logged in to Brightspace for a period of time; enter the number of days with no login activity.

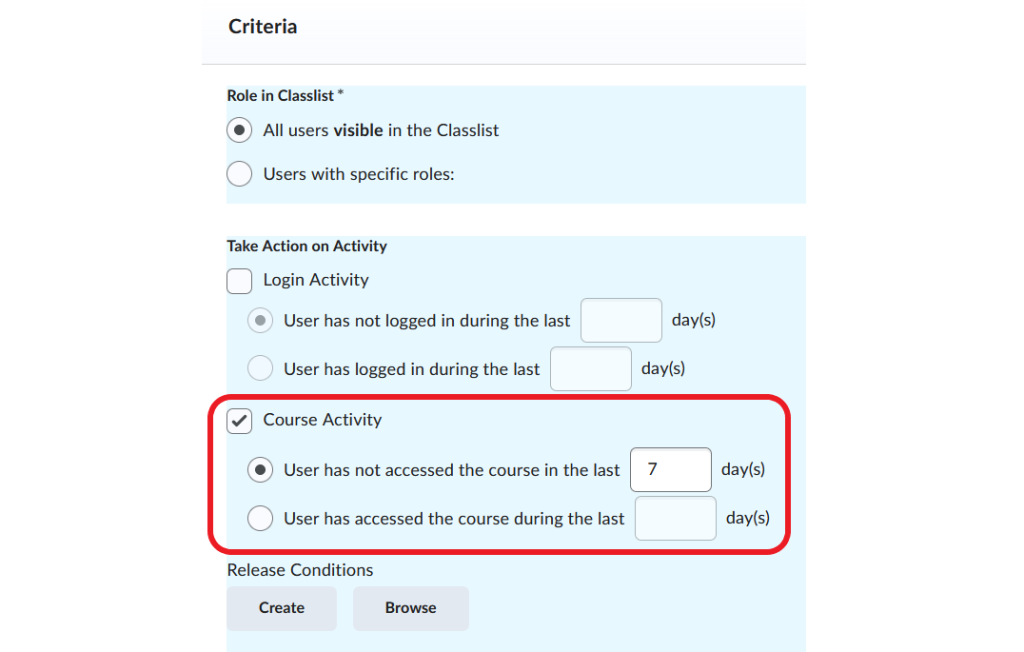
- Course Access – This option relates to students accessing your specific course in Brightspace. Sample use: Select if you want the agent to identify students who have not accessed your course site for a period of time; enter the number of days with no course access.

- Release Conditions – This option relates to specific activity in your course site. Select if you want the agent to monitor for a specific task, such as students receiving a particular grade on a quiz, visiting/completing a content topic, getting enrolled in a group etc.
- If you have previously created release conditions for your course, click Browse and locate the condition you want to use.
- If you have not yet created release conditions, click Create.

Note
For more information on using release conditions, please refer to this Brightspace resource.
EXAMPLE:
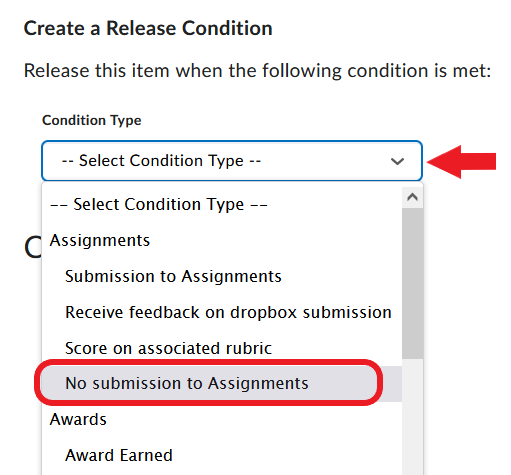
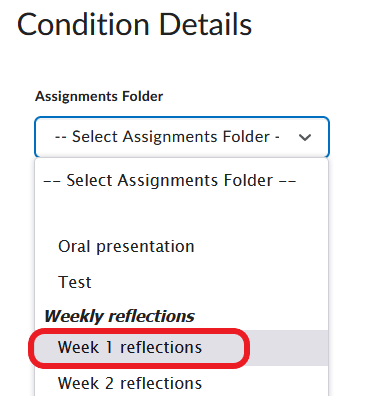
The steps below illustrate how to create a release condition where the intelligent agent will identify students who did not submit an assignment titled ‘Week 1 Reflections’ to the appropriate assignment folder.
Step 1: Under Release Conditions click ‘Create’

Step 2: Open the menu under Condition Type, and select ‘No submission to Assignment’
Step 3: An additional option will appear. Open the menu under Assignments Folders, and select an assignment called ‘Week 1 Reflections’
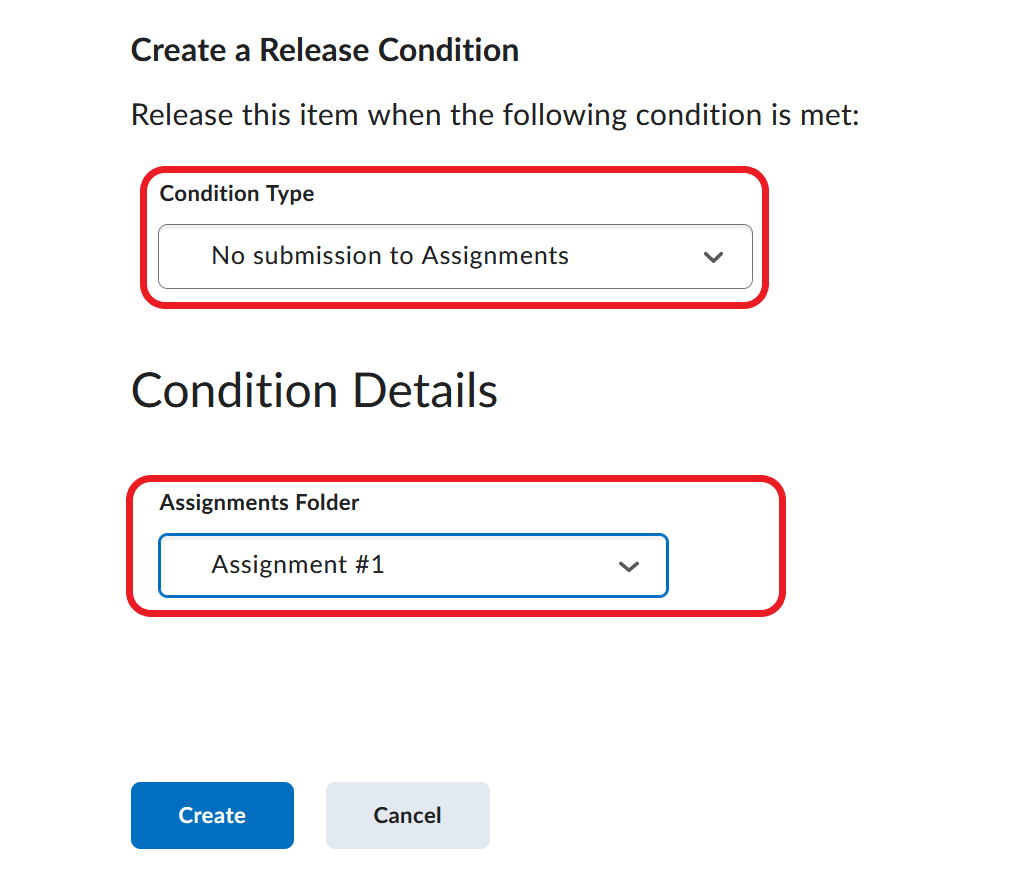
Click Create.
Sample Agent Scenarios
Below are some examples of how you can use Intelligent Agents. Click on each box below to view the steps.
#1: You are teaching an online course. By week 2, you want to check if all students have accessed the course site. How can you identify students who have not logged in to the course yet?
Start creating your agent by following the steps above.
Create a simple Course Activity agent to identify students who have not accessed the course in the last 7 days.
Set the agent to send emails to those students reminding them to log in to the course. You can also provide links to any supports that may help students get on track (academic advising, technical support, your office hours etc.)
Video Instructions
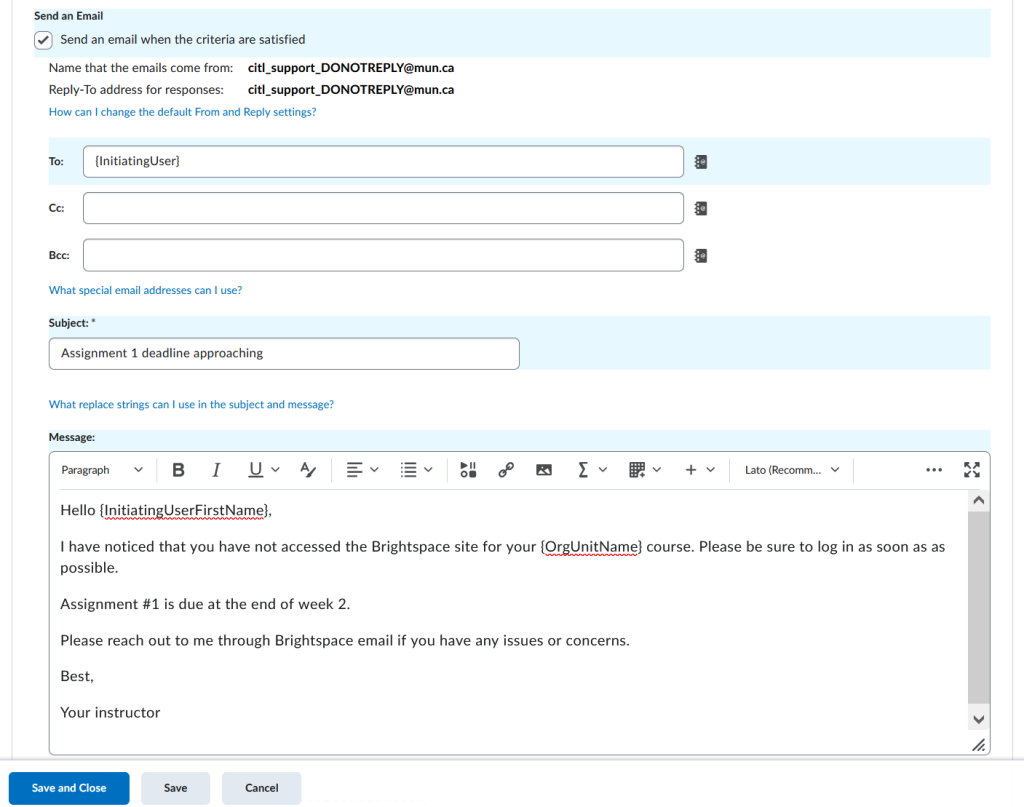
#2: The first assignment in your course is due in week 2 of the semester. In the past, many students have missed this particular assignment. How can you prevent this from happening this semester?
Start creating your agent by following the steps above.
Create a Release Conditions agent to identify students with no submissions to ‘Assignment #1’ assignment folder.
Run this agent a few days before the deadline for Assignment #1.
Set the agent to send students an email reminder about the upcoming deadline.
Video Instructions
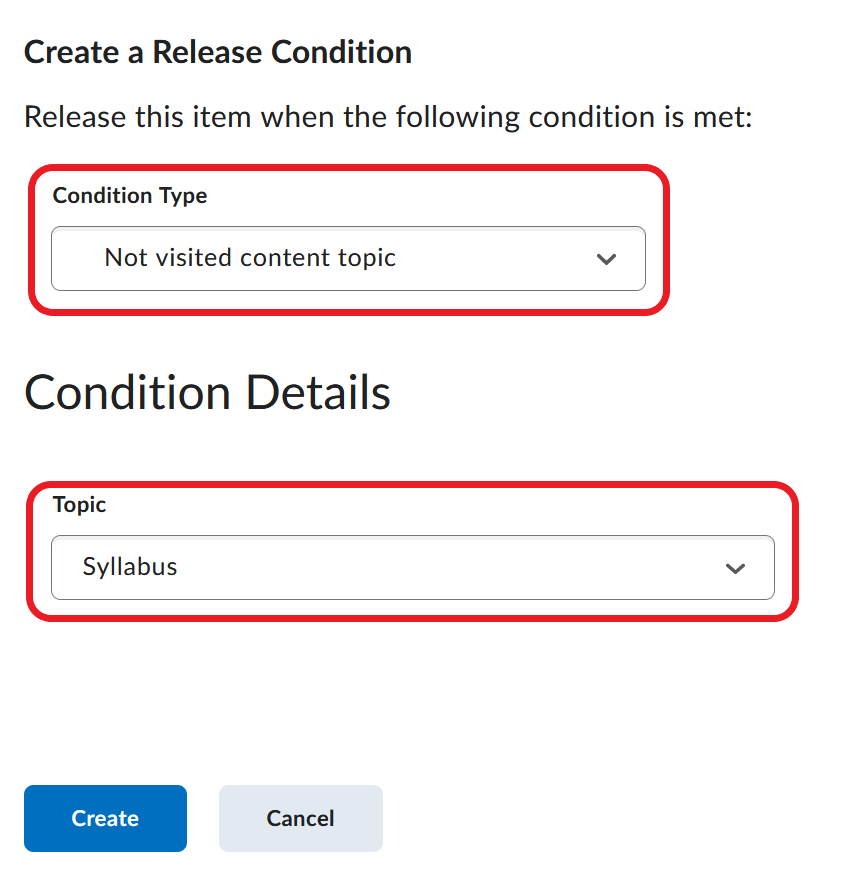
#3: You are teaching an asynchronous online course. You expect that by the end of week 1 all students will have read the course syllabus. How can you identify students who have not read the syllabus and prompt them to do so?
Start creating your agent by following the steps above.
Create a Release Condition agent, and select Not visited content topic as the ‘Condition Type’. Then select Syllabus from the list of content topics (if your syllabus is divided into several content topics, select them all).
Set the agent to send an email to students who have not visited the topic.
Video Instructions
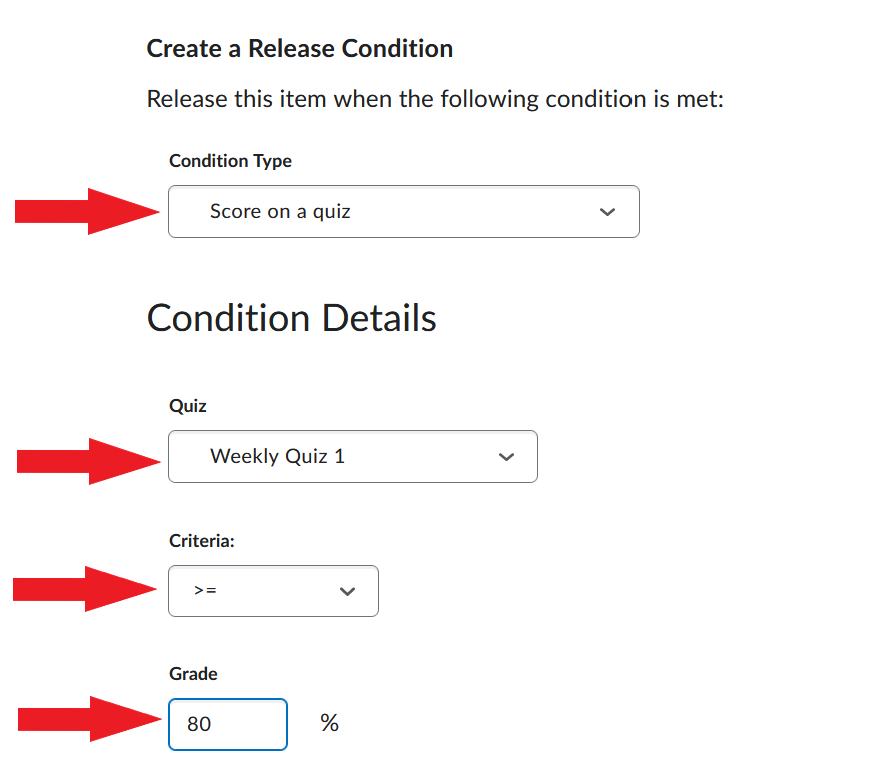
#4: You want to boost students’ motivation by congratulating them on a high grade on a quiz.
Start creating your agent by following the steps above.
Create a Release Condition agent for receiving 80% or higher on the quiz.
Set the agent to send a personalized email to students.
Video Instructions
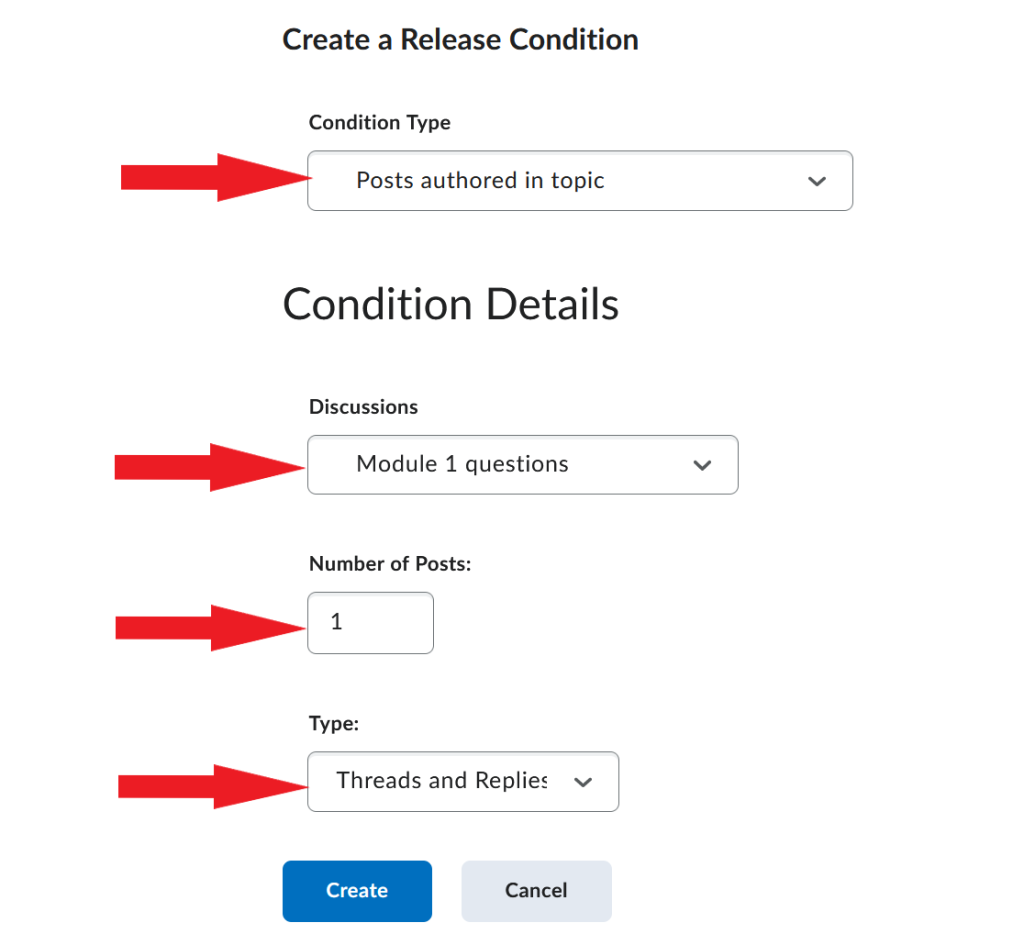
#5: A student has participated in a discussion forum that was not graded. You want to thank them for their contribution to the discussion.
Start creating your agent by following the steps above.
Create a Release Condition agent for posting in a specific discussion topic.
Set the agent to send an email thanking the student for their contributions.
Video Instructions
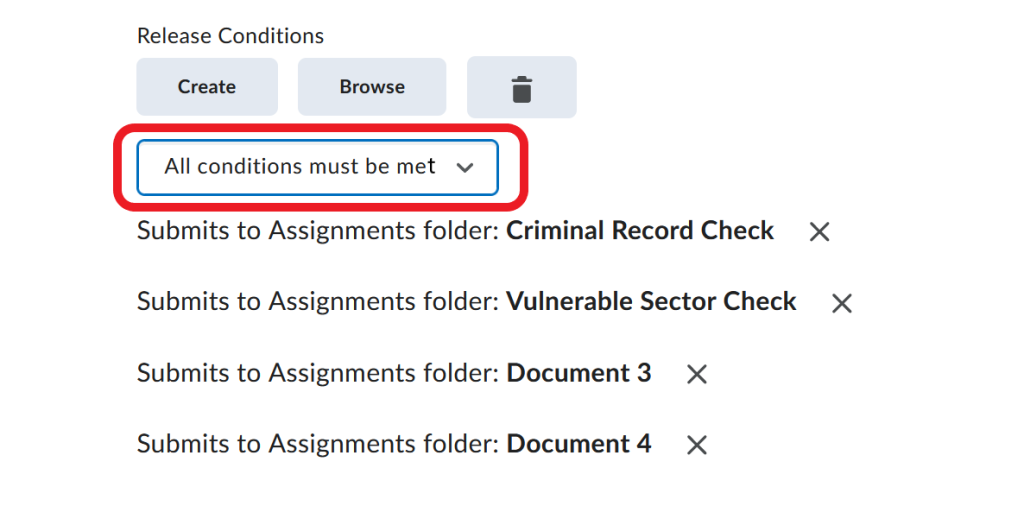
#6: Students required to complete a practicum course need to submit several documents before they can begin their practicum. Once a student submits all documents, they can be issued a letter confirming that they are eligible to start their practicum. How can you identify students who have submitted all documents so that you can issue them such letter?
Start creating your agent by following the steps above.
Create a Release Condition agent and attach multiple conditions to it (one for each document to be submitted). NOTE: Make sure that All conditions must be met is selected.
Run the agent to identify students who have met all the conditions (i.e. submitted all documents) and issue them a letter.
Video Instructions
Personalizing Agent Emails
If you choose to have an intelligent agent send emails to students identified by the agent, you have two options:
- Compose a generic email and have the same version sent to each student.
- Personalize each email with the student’s name, last login date etc., which can be done automatically by using so-called ‘replace strings’.
Replace strings are special codes that can be used in automated emails in places where receiver-specific information would normally be found. When creating intelligent agents, replace strings can be used in:
1. Email recipient field (To, CC, and Bcc)
If you want the Brightspace system to autofill the address of the student identified by the intelligent agent, use the {InitiatingUser} replace string in the recipient field. (For more information on creating intelligent agent emails, view the ‘Actions’ section on the ‘Creating Intelligent Agents’ page.)
2. Body of the email
An example of a replace string that can be used in the email body is {InitiatingUserFirstName}. If an email containing this code is sent out by an intelligent agent, the system removes the replace string and inserts the student’s first name in its place. Thus, an email like this:
Hello {InitiatingUserFirstName},
I would like to congratulate you on the high grade you received on Quiz 4 in your {OrgUnitName} course. Well done and keep up the good work!
Cheers,
Dr. Smith
…would be delivered to a student named Rebecca with her own name in place of the replace string:
Hello Rebecca,
I would like to congratulate you on the high grade you received on Quiz 4 in your Economics 101 course. Well done and keep up the good work!
Cheers,
Dr. Smith
Commonly Used Replace Strings
The chart below lists the most common replace strings available to use in the subject line and message of emails sent out by intelligent agents, along with the type of information they generate.
| Replace String | Information Brightspace will autofill |
| {InitiatingUser} | The name of the user who performs the action that meets the agent’s criteria, e.g. the student’s name |
| {InitiatingUserFirstName} | The first name of the initiating user |
| {InitiatingUserLastName} | The last name of the initiating user |
| {LastLoginDate} | The date the initiating user last logged in to Brightspace |
| {LastCourseAccessDate} | The date the initiating user last accessed the course |
| {OrgName} | The name of the organization |
| {OrgUnitName} | The name of the Org Unit (i.e. course name) |
For a complete list of replace strings that can be used with intelligent agents, please visit this Brightspace resource.
Intelligent Agent Email Settings
By default, intelligent agents send email to and from Brightspace mail system only. If, however, you would like intelligent agents to send reports or emails to your personal email address rather than your Brightspace mail, you can change the default settings.
- Log in to your course in Brightspace.
- In the navbar, click Course Admin.

- Select Intelligent Agents from the list.
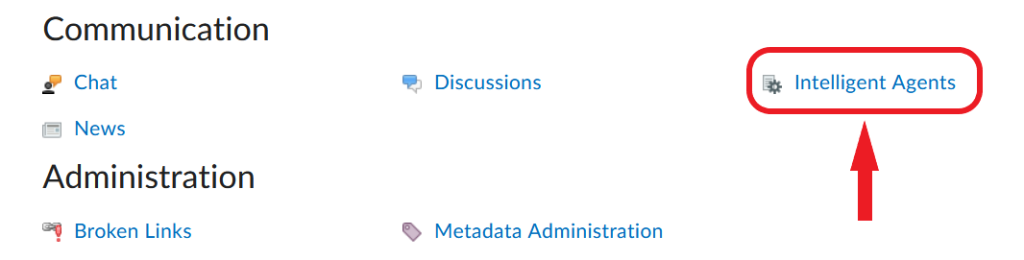
- Click Settings on the right side of the page.

- Select Set custom values for this course. Enter the name that will be associated with emails sent by the agent (your own name) and the email address where you want to receive replies from students, if any (please use your MUN email).
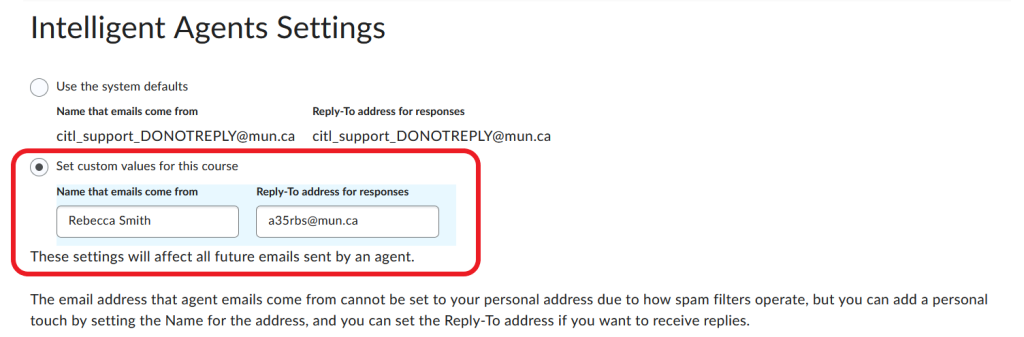
- Click Save.
Running Intelligent Agents
Before running your newly created intelligent agent and sending automated emails to students, you can conduct a practice run. A practice run allows you to check if your agent settings are correct without sending emails to students.
- Log in to your course in Brightspace.
- In the navbar, click Course Admin.

- Select Intelligent Agents from the list of available tools.
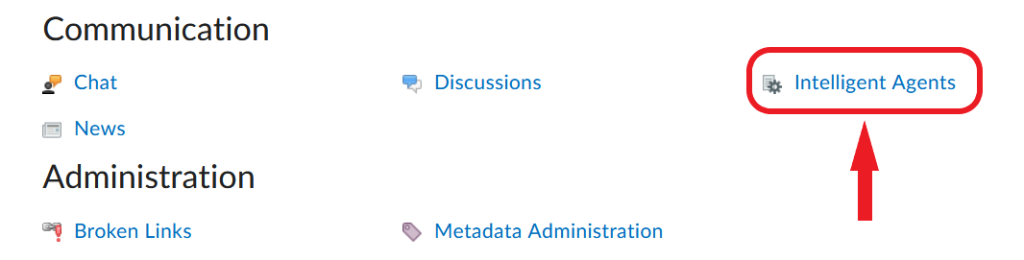
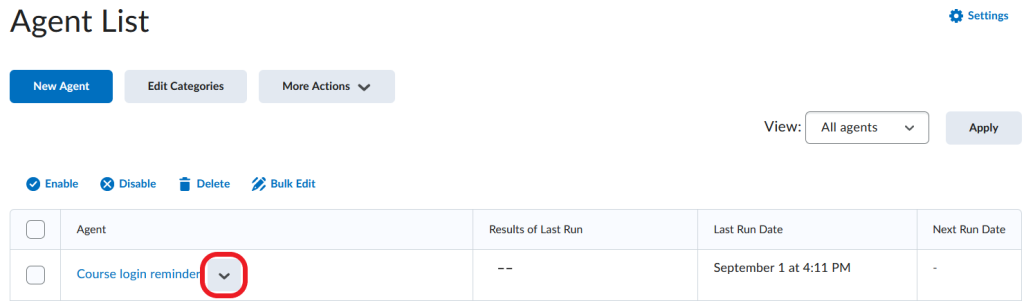
- On the Agent List page, locate the agent you want to practice-run and click the downward arrow next to it.
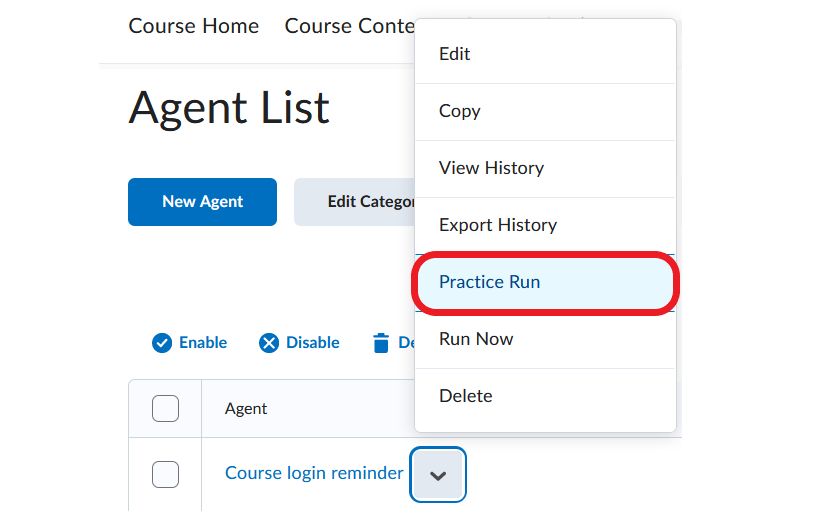
- Select Practice Run from the menu.
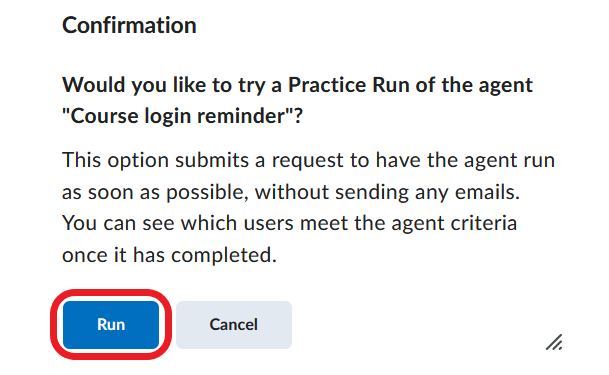
- A window will pop up asking you to confirm that you want to conduct a practice run. Click Run.
- You will see a page with a confirmation that your request has been submitted.
- When the practice run is complete, after a minute or two, you will receive an email (in Brightspace mail or another email if you have changed email settings for the agent).
- Go back to the Agent List page and locate the agent you have just run on the list.
- In the ‘Results of Last Run’ box, click on the users identified by the agent to see the complete list.
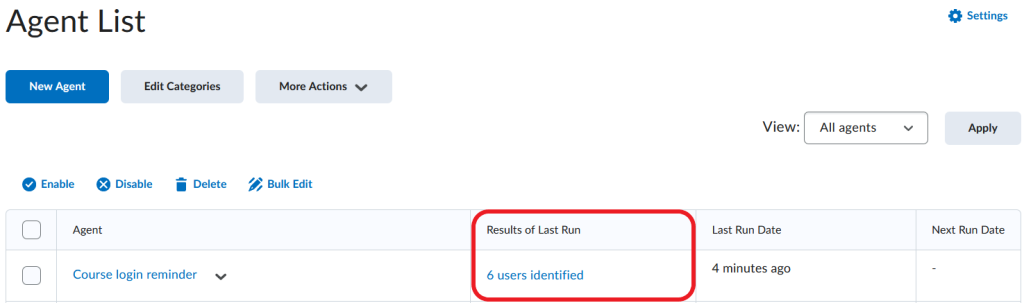
- You can now conduct a proper run of the intelligent agent.
Video Instructions
Intelligent Agents – Practice Run