Online Rooms
Online Rooms (offered by Bongo) is a synchronous online meeting tool integrated with Brightspace. Online Rooms allows for sessions with up to 150 participants and up to 10 webcams turned on simultaneously.
Online Rooms offers many ways to communicate and collaborate with your class and/or outside guests in real-time. It can be used for:
- Lectures / class meetings
- Online office hours
- Guest speakers
- Student presentations
- Webinars
- Language labs
- Simulations
- Group projects
You can also choose to record your sessions and post them within your course(s) as a resource. For information on recording with Online Rooms, please visit our resource under Creating Content.
Note
If you choose to use Online Rooms, CITL has Student Resources available. Feel free to share this link with your students so they are prepared to participate in your Online Rooms session.
1. Main Features
- Maximum number of participants per session is 150
- Maximum number of webcams shared simultaneously is 10
- Session recordings can be embedded directly into your course
- Includes Breakout Rooms, Chat (public and private), and Polling tools
- Contains a whiteboard with annotation and drawing tools
- File types that can be uploaded to and displayed on the whiteboard are PDF, Word and Powerpoint
- Application and desktop sharing is available (NOTE: Desktop sharing is only available with Chrome, Edge, and Firefox. For specifics on browser support, please click here.)
- Instructor can give participants presenter status so they can upload files/share content
- Participants can upload files or share links in the chat
- Participants can use emoticons for status updates during session
- If you choose to record your sessions, availability of recordings is unlimited
2. Accessing Online Rooms
Online Rooms is integrated into Brightspace (D2L), so all instructors have access to it in their active courses. To access Online Rooms in your course:
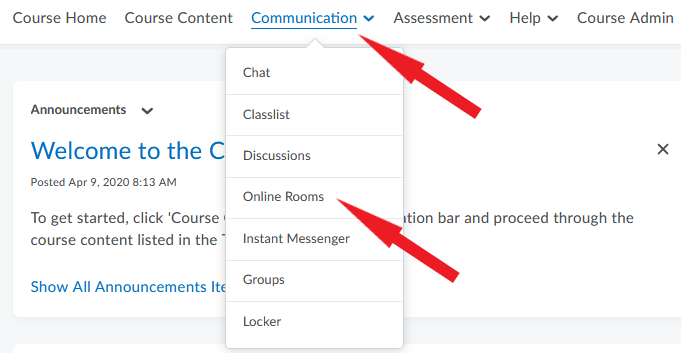
- Go to the Communication tab in your course navigation bar,
- Select Online Rooms from the drop-down menu. This will take you to the Meetings page.
3. Scheduling Class Sessions
You can use Online Rooms to schedule synchronous meetings with individual students, select groups of students, or all students in your course. You can also use Online Rooms to record lectures with no students present in the session and later post the recordings to your course site.
To schedule a class or a series of classes using Online Rooms, follow the steps below.
- On your course homepage, click Communication in the navigation bar.
- Select Online Rooms from the drop-down menu.
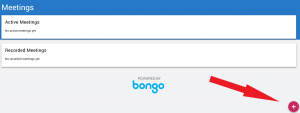
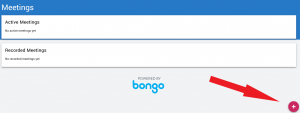
- On the Meetings page that opens, click on the pink circle in the bottom right corner of the screen.
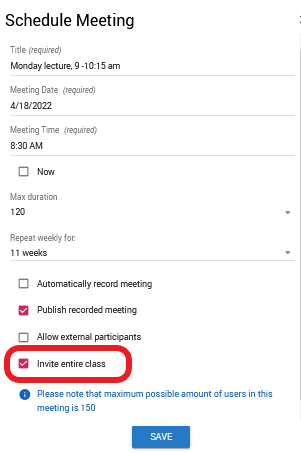
- In the Schedule Meeting window that opens, enter the following information:
- Name of the meeting.
- Date and time of the meeting.
- The maximum duration of the meeting (NOTE: When the time set here runs out, your session will close automatically with no option to extend it.)
- How many weekly meetings will take place, if applicable.
- Whether or not the meeting will be recorded (NOTE: Alternatively, you can click the Record button in the session after launching it).
- Whether you wish to invite external participants to the meeting (e.g., a guest speaker).
- Leave Invite entire class selected, and the information about the session can be transferred to the course calendar.
- Click Save.
Note
The Publish recorded meeting setting is selected by default, and we do not recommend changing it. If you unselect this option but choose to record the session, the recording file that generates will not be usable.
Video Instructions
4. Scheduling Individual or Small-Group Meetings
If you want to use Online Rooms to hold office hours or consultations for individual or select groups of students, follow the steps below.
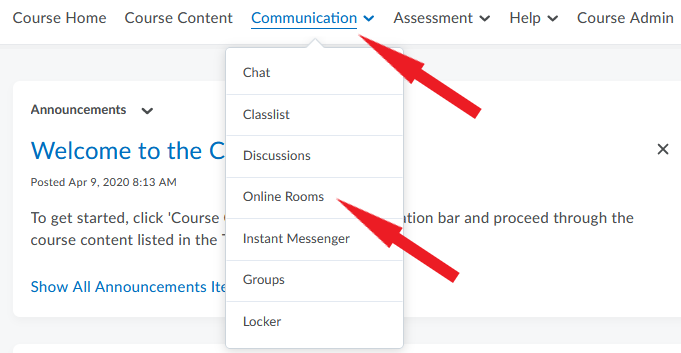
- On your course homepage, click Communication in the navigation bar.
- Select Online Rooms from the drop-down menu.
- On the Meetings page that opens, click the pink circle in the bottom right corner of the screen.
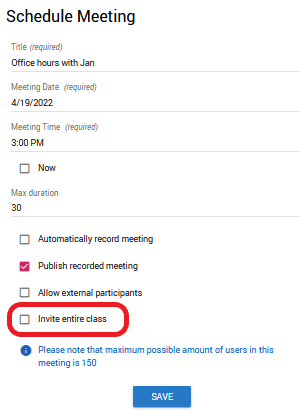
- In the Schedule Meeting window that opens, enter the following information.
- Name of the meeting.
- Date and time of the meeting. Alternatively, you can choose ‘Now as the start time if you are ready to launch the meeting right away.
Note
Settings for future meetings can be edited at a later time, but ‘Now’ meetings cannot be edited.
- Maximum duration of the meeting (NOTE: When the time is up, the session will close automatically with no option to extend it.)
- How frequently you want the meeting to repeat, if applicable.
- Whether or not the meeting will be recorded (NOTE: Alternatively, you can click the Record button in the session after launching it).
- Whether you want to invite external participants to the meeting (e.g., a guest speaker).
- Unselect Invite entire class (otherwise, the whole class will have access to the meeting link through the course calendar).
- Click Save.
- You now need to invite participants to the meeting.
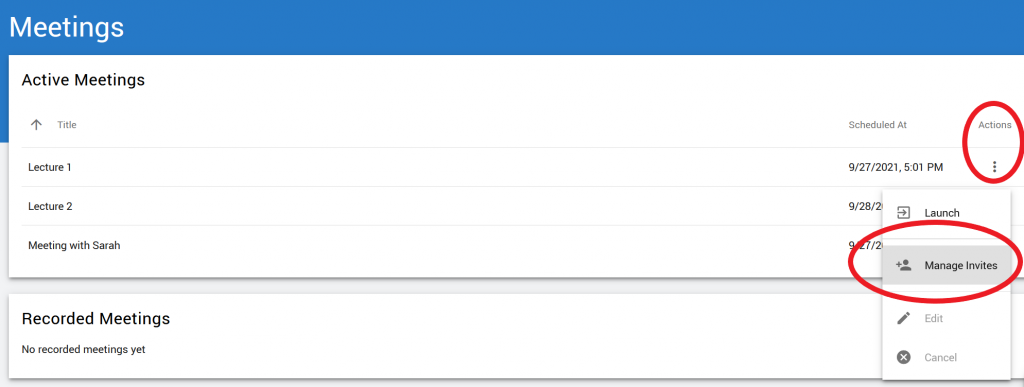
- Go to your list of Active Meetings and locate the session you have previously scheduled.
- Click on the 3-dot icon to the right of the session title (under Actions).
- Your classlist will open. Select the student(s) you want to invite to the meeting and they will receive a meeting link through their Brightspace email.
5. Inviting Guest Speakers
When scheduling an Online Rooms session, you – the instructor – can create an invitation link to share with people outside your Brightspace course. The link can be sent to anyone you want to invite to your session, such as a guest speaker or students from another section of the same course. Follow the steps below to create and share an invitation link.
Step 1: Enable ‘Allow external participants’
In your course navbar, go to Communications and select Online Rooms from the drop-down menu.
- You will be taken to the Meetings page.
- If you are scheduling a new session, click the pink circle in the bottom right corner of the screen to open the Schedule Meeting window.
- If you want to modify a previously scheduled session, locate it on the page and click the 3-dot icon to the right of the meeting name (under Actions). Select Edit from the drop-down menu.
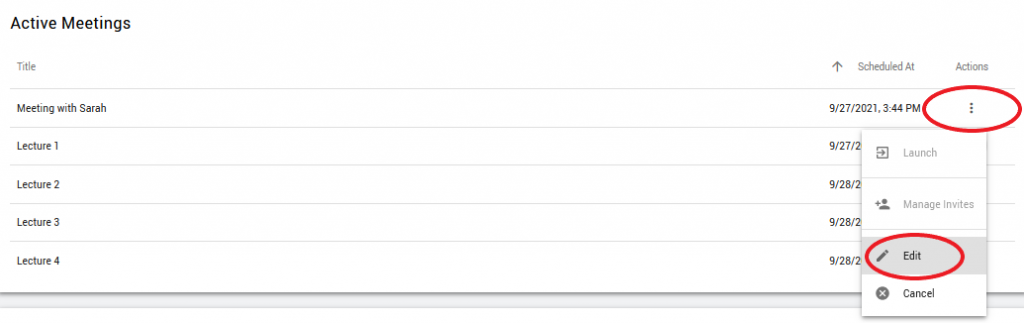
- A Schedule Meeting window will open. Scroll down and select Allow external participants.
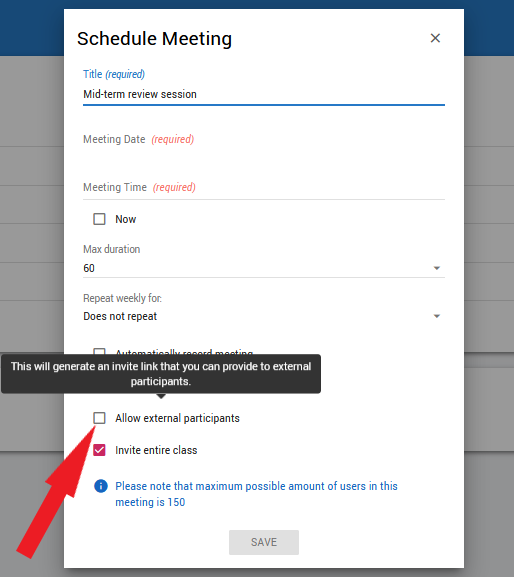
Click Save.
Step 2: Retrieve the External Link
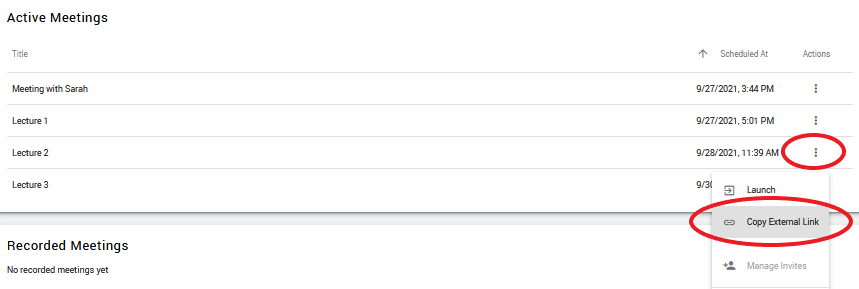
On the Active Meetings page, select the 3 dots to the right of the room you just created and select Copy External Link. This will copy the link to your clipboard.
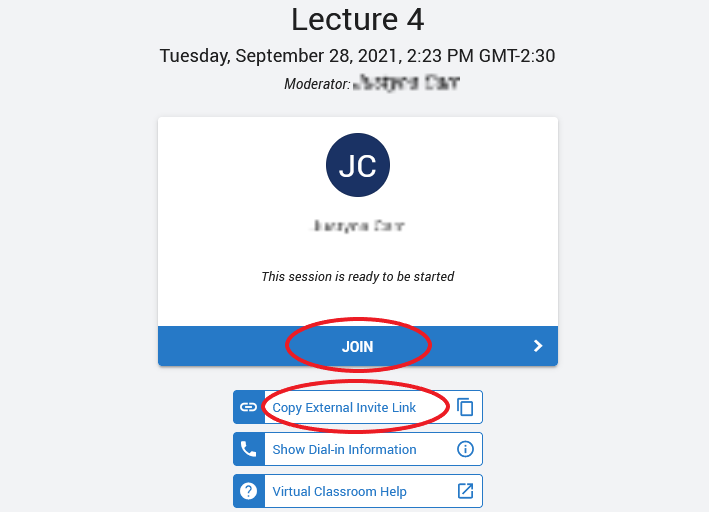
The other place where you can find the invite link is the Meeting Lobby page. To access it, launch your session. The Meeting Lobby page will open. Click Copy External Invite Link. This will copy the link to your clipboard.
Step 3: Share the Link
Paste the link you have just copied and email it to the individuals whom you want to invite to your session. When the invitees click on the link, they will go to the Meeting Lobby page. After they click Join, they will be asked to enter their first and last name, and they will join the Online Rooms session.
6. Scheduling Tips
There are a few things to keep in mind when scheduling Online Rooms sessions:
- Pay close attention to time zones. Since Online Rooms is an add-on to Brightspace, time settings may not always be synced between the two systems. If you are in a different time zone than your students, double-check if the time of the Online Rooms sessions you have scheduled is correct. Issues with the system autocorrecting the time to match the instructor’s time zone have been reported.
- Give students sufficient notice. To ensure students can attend, you should schedule your sessions with as much advance notice as possible (at least 24 hours).
- Students cannot join a session before the scheduled start time. As an instructor, you can enter your Online Rooms sessions 10 minutes before the scheduled start time. Students, however, cannot enter until the exact start time. If you would like to allows students to join early (e.g., to troubleshoot for potential technical issues), select an earlier start time when scheduling your Online Rooms sessions. For example, for a 9:00 am class, select 8:30 am as the session start time.
- The session closes at the scheduled end time. The duration you set for your Online Rooms session is the maximum amount of time you will have in that session. When the time runs out, the session will close automatically. Thus, it is recommended that you schedule Online Rooms sessions to be longer than the actual allocated class time.
7. Launching a Session
Note
As the facilitator, you can launch your meeting 10 minutes before the scheduled start time. Students, however, cannot join the session until the scheduled start time.
To start a previously scheduled Online Rooms session, follow the steps below.
- In your course navbar, click Communication and select Online Rooms from the drop-down menu.
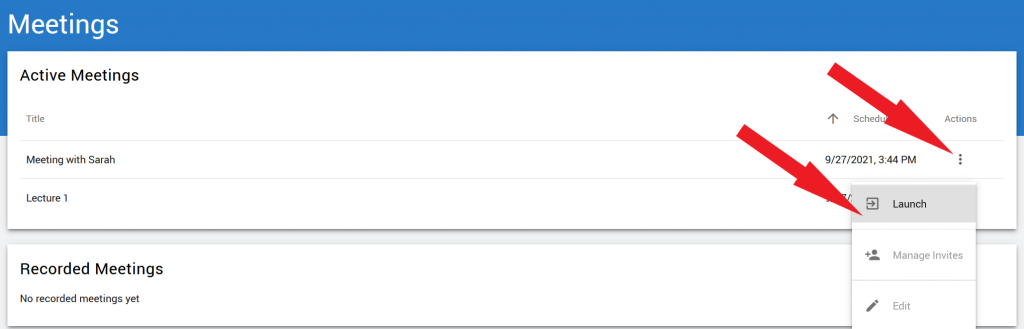
- On the Meetings page, find the session you want to begin. You will see 3 dots to the right of the meeting title (under Actions). Click the dots and a menu will open.
- Click Launch.
- You are now on the Meeting Lobby page. If you selectedInvite external participants when scheduling the session, this page will contain an “Invite Link”. You can copy this link and send it to outside participants via email, if you have not invited them before (See information about Inviting Guest Speakers above).
- To start the session, click Join.
- A new browser tab will open.
- You will be asked to choose between joining the session with full audio capabilities (including a microphone) or to listen only using your speakers/headset. Select Microphone.
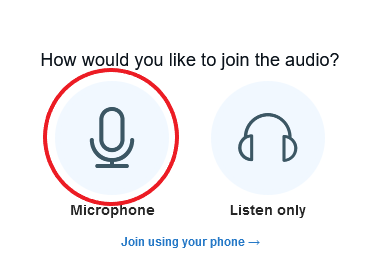
- You may be prompted to complete a quick audio system check.
Note
“My mic is not working” is the most commonly reported problem with the Online Rooms. Be sure to select the correct microphone at this stage.
Welcome to the Online Rooms session!
8. Online Rooms’ Layout
Online Rooms has a user-friendly interface that makes navigation relatively easy. The image below shows the main screen of Online Rooms and the main features are marked with numbers. The list below explains what each number represents.
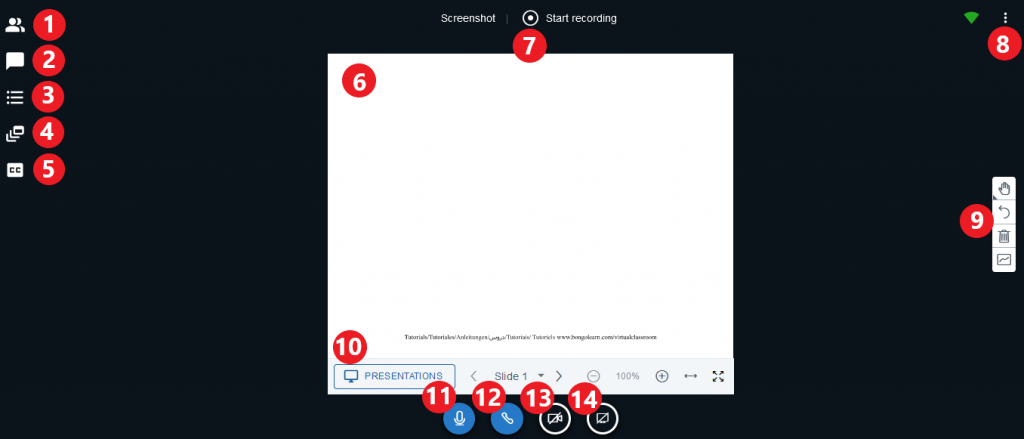
- Share your screen (works only with Chrome, Firefox, and Edge browsers)
- Participant list
- Public chat (Private chat available upon clicking on an individual participant’s name)
- Polling tool
- Breakout rooms
- Closed captioning (note that transcription can only be done manually)
- Whiteboard/ Presentation space
- Start recording button (use this button to start/stop recording)
- Actions (click for additional settings and to leave/end session)
- Annotation tools
- Document uploading tool (supported file types are PDF, Word, and PowerPoint)
- Mute/Unmute
- Leave/Join audio
- Share webcam
Navigating Online Rooms Sessions
The following are some of the most common tasks performed in an Online Rooms session.
Uploading a Presentation
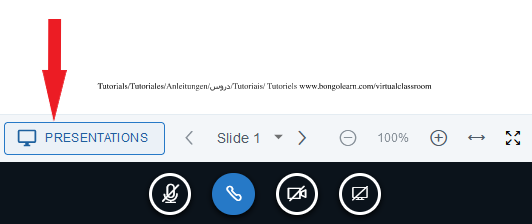
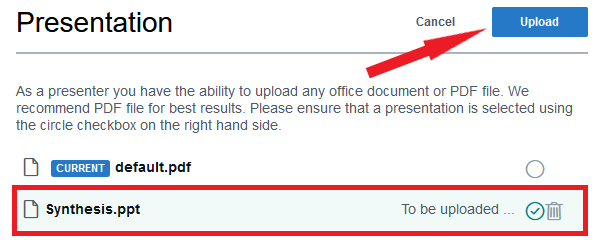
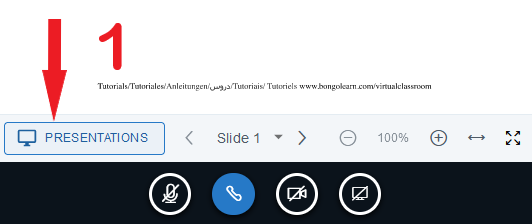
Click Presentations in the bottom left corner of the whiteboard area.
Locate the file you want to upload (PDF, Word, or PowerPoint).
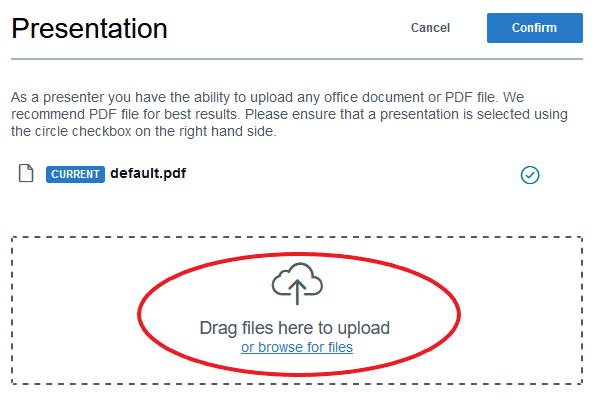
Make sure that the correct file is selected and click Upload. You will now be taken back to your session and your file will be displayed in the whiteboard area of your screen.
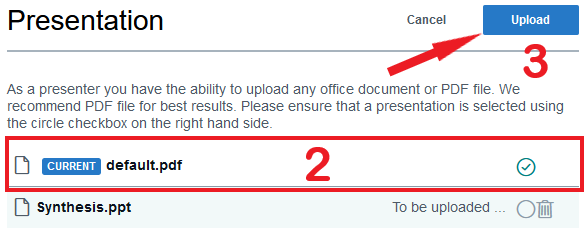
To end a presentation and switch back to the whiteboard, follow the same route:
- Click Presentations in the bottom left corner of the whiteboard.
- Select CURRENT default pdf.
- Click Upload.
Annotating
Online Rooms offer annotation tools, which are located on the right side of the screen. Annotations can be made on the blank whiteboard slides or on content uploaded to the whiteboard. When you launch a session, you will see the following options (their meaning is explained below):
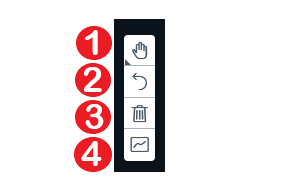
- Pan tool – use it to drag an uploaded zoomed-in document to view a different section
- Undo annotation – use to undo the most recent annotation (Note: it does not undo Clear all annotations)
- Clear all annotations
- Turn multi-user whiteboard on/off – click to allow participants to annotate content displayed on the whiteboard and click again to end the access
To enable annotation tools, click the Pan tool (the hand icon). A selection of writing and drawing tools will open.
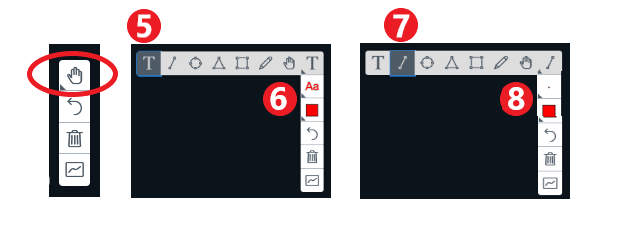
- Text – click the T to activate textbox creation. Drag your mouse over the whiteboard area where you want to create a textbox and start typing.
- Font size & color adjustment for text – these should be adjusted before you start typing
- Drawing tools (includes line, ellipse, triangle, rectangle, and pencil for free-drawing)
- Thickness & color adjustments for drawing tools – these should be adjusted before you start drawing
For more information on the annotation tools, please click here.
Polling
- Open the Polling tool by clicking the middle icon in the top left corner of your screen.
- Choose the type of poll you want to create or select Custom Poll.
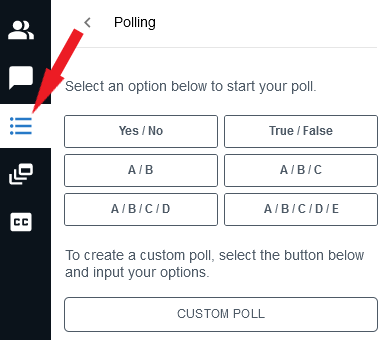
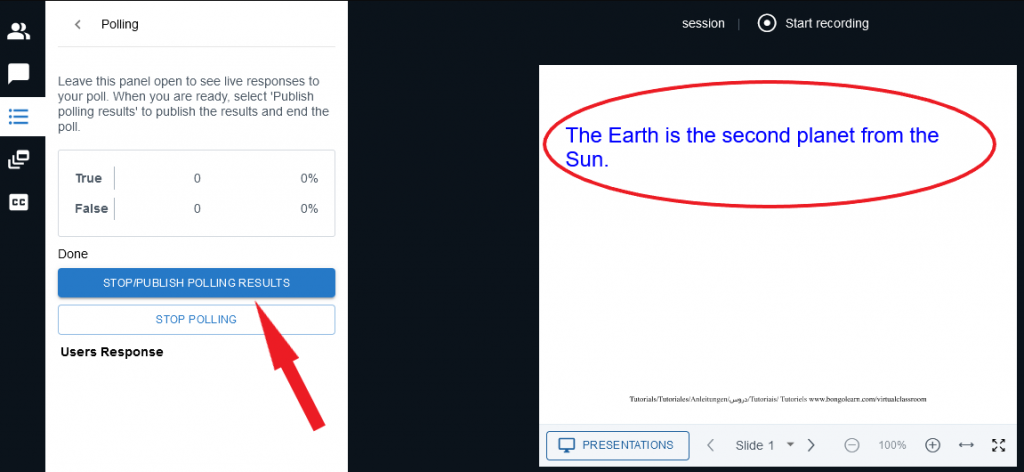
- You can ask poll questions in several ways:
- ask your question orally in the session
- type the question on the whiteboard using the annotation tools (illustrated in the image below)
- upload a document (pdf, doc, ppt) with your question to the whiteboard
- Wait for participants to answer.
- Publish the poll for participants to see the results.
Monitoring Participant Status
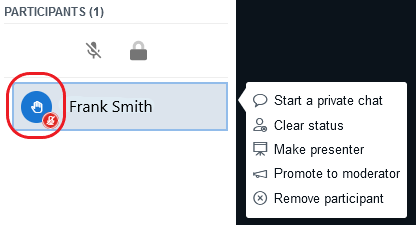
During an Online Rooms session, participants can ‘raise their hands’ or ‘share status’ related to their understanding of the presentation. To do so, they need to open the Participants list and click on their own name. A menu will open and they can select the status they wish to share.
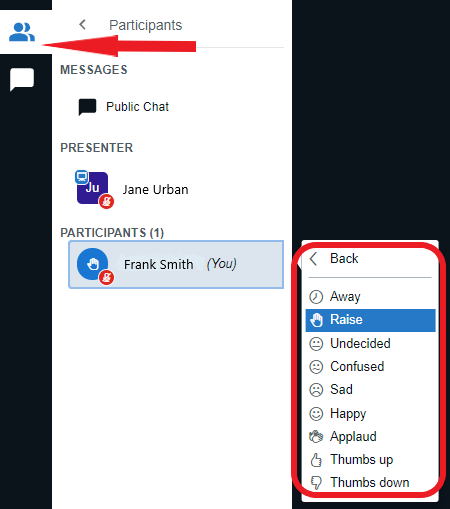
As an instructor, you will see the status displayed in the Participants list, in the circle to the left of the user’s name. You can clear a participant’s status by clicking their name and selecting Clear status from the menu. Other options available in the menu are:
- open a private chat
- clear the participant’s status
- make the participant the presenter or session moderator, and
- remove the participant from the session.
Sharing Screen
Note
If you plan to use the Share your screen feature of Online Rooms, you must use a Chrome, Edge, or Firefox browser.
One of the features of Online Rooms is the ability to share your screen with participants. This option allows you to display any application that is open on your computer.
- In the Online Room, ensure you have the Presenter status.
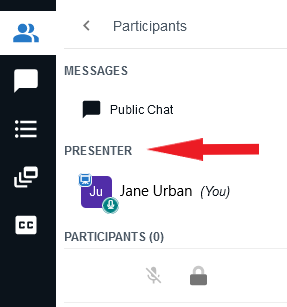
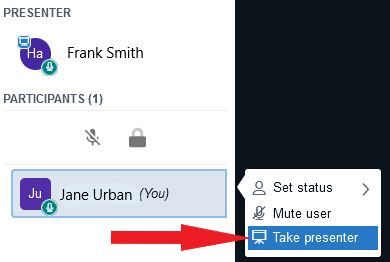
- If you do not have the presenter status, click on your name and select Take presenter from the menu (only the session moderator has the ability to change roles this way).
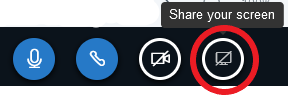
- Once you are the presenter, you will see the Share your screen button at the bottom of the screen. Click on it.
You will be prompted to select which window open on your computer or which screen you want to share. Make your selection and screen sharing will begin.
Note
If you choose to share your desktop, you may be alarmed by the infinity of screens that you will see in the whiteboard area (see image below). This is normal and indicates that screen sharing has started. Simply navigate away from the Online Rooms window, and open the application you want share with participants. If uncertain, you can ask participants to confirm that they are indeed seeing the application you intended to share.
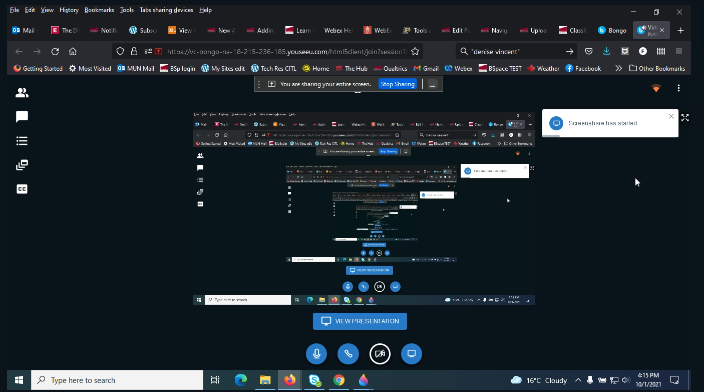
For more information on the Share your screen function, please visit this resource by Bongo.
Using Breakout Rooms
In your Online Room session, select the Create breakout rooms option in the top left corner of the screen.
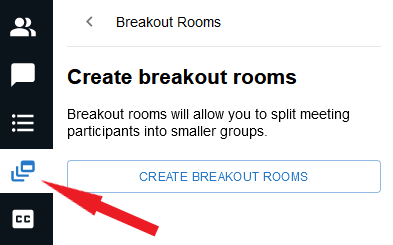
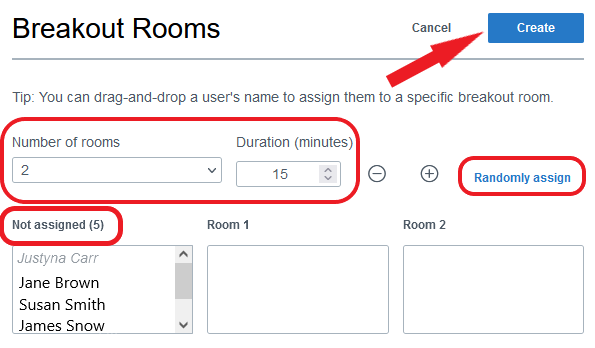
- Select the number of breakout rooms you wish to create.
- Set the time limit.
- Either randomly assign students to groups OR manually drag names from the Not assigned box and drop them into specific rooms.
- Click the Create button when the Breakout Rooms are ready to be launched.
- After the Breakout Rooms are launched, participants will receive an invitation to join their assigned room and will be disconnected from the audio in the main session.
Monitoring and Joining Breakout Rooms
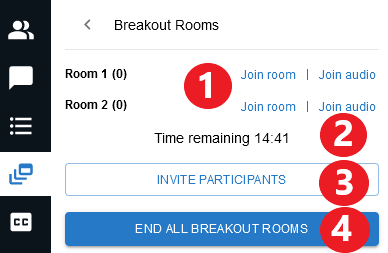
As an instructor, you can monitor activity in the breakout rooms after you launch them. You can do the following:
1. ‘Visit’ each breakout room to monitor or to participate in the discussion taking place in the room
- Click the Breakout Rooms icon in the top left corner of the screen.
- Select which room you want to join.
- Choose whether you want to actively participate (Join room) or whether you want to listen only (Join audio). NOTE: In either case students in the breakout room will be able to see that you have joined their room.
2. Monitor the time students have left in the breakout rooms
3. Put participants in breakout rooms if they happen to join the Online Room after the breakout rooms session has already been launched by clicking Invite Participants
4. End the breakout rooms session at any time by clicking End All Breakout Rooms.
Ending a Session
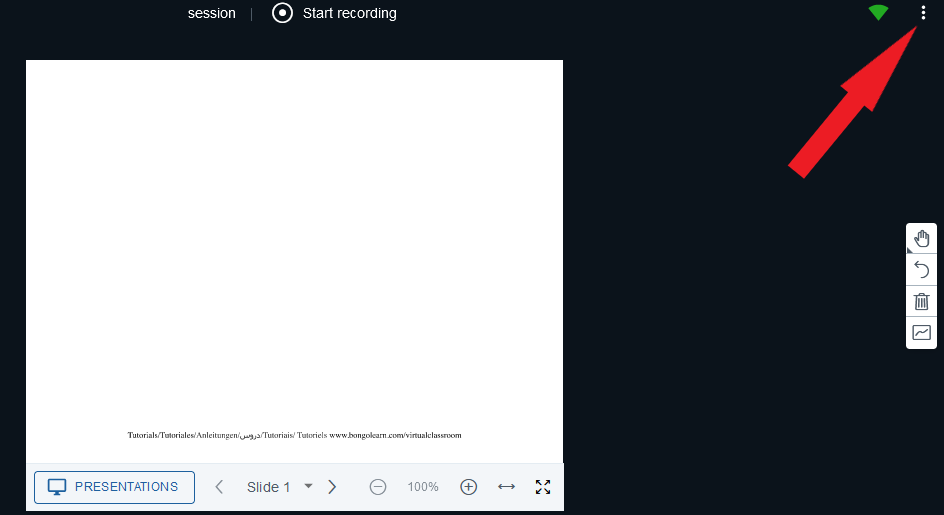
To end a session, click on the 3 dots in the top right corner of the screen. A menu will open.
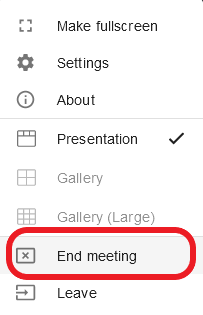
Select End Session from the menu. (NOTE: If you want to leave the session but allow participants to continue working, select Leave Session instead. The Online Room will remain open until the time you scheduled the session for runs out).
Video Instructions
Watch this video on how to navigate an Online Rooms session.
Additional Technical Details
Note
A wired connection is preferred when using Online Rooms. While the tool will work on a wireless network, when you use more advanced features, the connection may be slow and/or not work properly.
- Each Online Rooms session lasts only as long as you schedule it for, e.g. if you create a 60-minute session, it will automatically close at the end of the 60 minutes.
- Default number of slides on the whiteboard is 10 blank slides, which you can annotate.
- You can set a session to be recorded at the time of scheduling, or you can manually hit Record after you launch a session.
- You can start, stop, and restart the recording, but all parts are combined into a single session recording.
- Recordings are available 30-90 mins after the end of session.
- Each recording has a url generated for it, and you can copy and embed it directly into your course.
- To invite external participants (i.e. people not enrolled in the course), be sure to select Allow external participants when scheduling a session. A link will then be generated, which you can email to your invitees.
- Chrome, Edge, or Firefox are required to share your screen.
- Webcam and/or microphone is recommended.
- Desktop or laptop is recommended.