Creating Submission Folders
In order to access the Assignment tool and create digital ‘folders’ where students can submit their work, follow the steps below.
- Log in to your course in Brightspace.
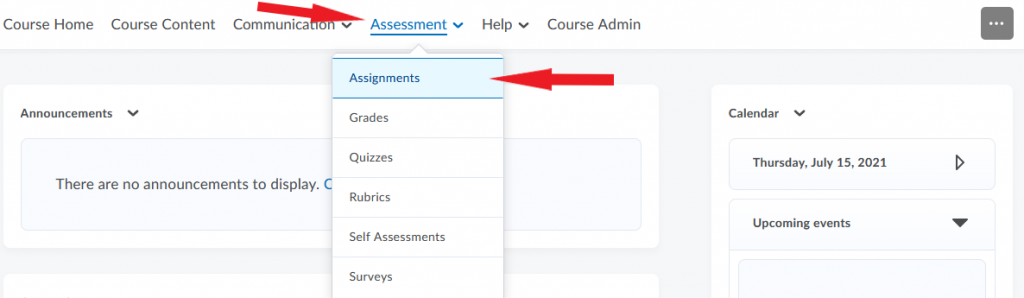
- On your course homepage, go to the navbar and click Assessment.
- In the dropdown menu, select Assignments.
- At this point you have two options:
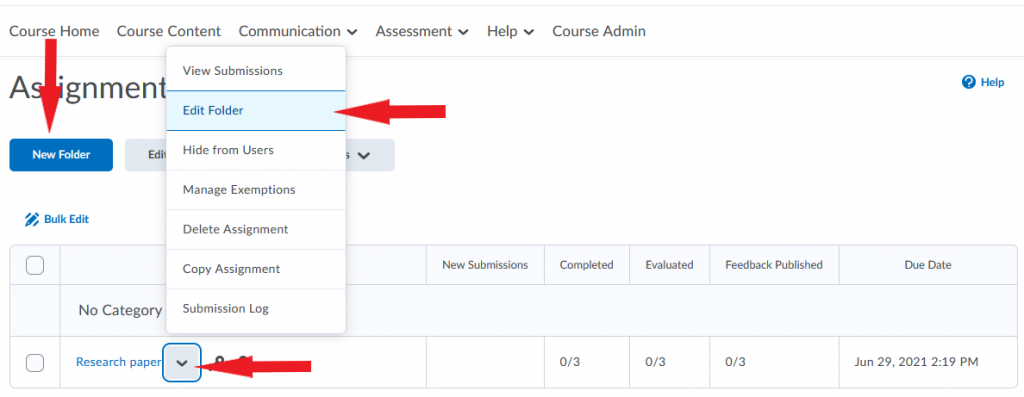
- To create a new assignment, click New Folder.
- To edit an existing assignment, locate the folder for the assignment on the page. Click the down arrow next to it and select Edit Folder (alternatively, you can click the folder’s name, and then click Edit Folder on the new page).
Assignment Settings: The Layout
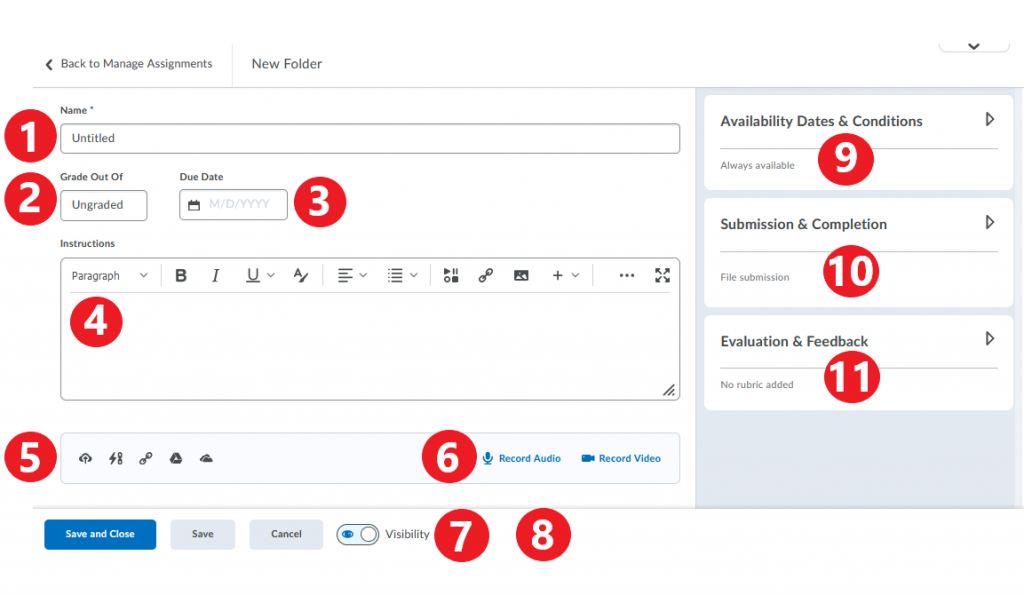
The assignment interface has 3 areas (scroll down the page for details). The main area has space for:
- The assignment name
- Grading options
- Due date
- Instructions for the assignment
- Attachment options, and
- Buttons to add or record audio or video.
At the bottom you can find:
- Save & Close, Save, and Cancel buttons
- A toggle to control the visibility of the assignment (note that the default setting is ‘Visible’).
To the right, there are 3 expandable menu boxes (widgets) for:
- Availability dates & conditions
- Submission & completion
- Evaluation & feedback
Assignment Options: Details
Click on each of the options below for more details.
> Grading options
These options can be accessed in area “2” identified in the Layout image above. The default grading option for assignments is ‘Ungraded’. You can choose to leave it ungraded, or you can assign a grade to it.
In order to assign a grade to an assignment, start by entering the point value for the assignment in the Grade Out Of box (notice that doing so brings up more grading options to the right).
When choosing your options, we suggest that you look at the 4 scenarios below regarding your Grades tool (also known as the grade book) and identify the one that applies to you.
- Your grade book is not yet set up. You want to create an assignment and a grade item for it in the grade book, and link the two:
- Enter the point value for the assignment in the Grade Out Of box.
- Do not change the default grade setting – In Gradebook. This setting indicates that your assignment will be added to the grade book once you click Save.
- Click Save. You have just created an assignment, a grade item with the same name (you can change the name of the grade item in the grade book if you wish), and a link between the two.
- Your grade book is not yet set up. You want to create an assignment, but you do NOT want to create a grade item for it in the grade book.
- Enter the point value for the assignment in the Grade Out Of box.
- Click In Gradebook to open a dropdown menu and select Not in Gradebook.
- Click Save. You have just created an assignment but no new grade item in the grade book.
- Your grade book is already set up. You want to create an assignment and link it to an existing grade bookitem.
- Enter the point value for the assignment in the Grade Out Of box.
- Click In Gradebook to open a dropdown menu, and select Edit or Link to Existing.
- In the pop-up window, select Link to an existing grade item radio button. Choose the item to which you want to link the assignment and click OK.
- On the assignment page, click Save. You have just created an assignment, and linked it to an existing item in the grade book.
- Your grade book is already set up. You want to create an assignment but you do NOT want to link it to an existing item in the grade book.
- Enter the point value for the assignment in the Grade Out Of box.
- Click In Gradebook to open a dropdown menu, and select Not In Gradebook.
- Click Save. You have created an assignment, but did not link it to the grade book.
NOTE: If you remove a link between an assignment and a grade item and then link them again, the original link will not be restored. Instead, a brand new grade item will be created in the grade book and the assignment will be linked to that new item. In this situation, you should check your grade book to be sure it correctly reflects your grading scheme.
> Due date
Select Due Date for the assignment so that students can see it in the Brightspace Calendar.
NOTE: If you set a Due Date, students will continue to be able to submit their assignments after that date, but those assignments will be flagged as late. If you want to prevent student from submitting after the duedate, you must set an End Date under Availability Dates on the right of the assignment page.

> Attachment Options
You can supplement written instructions for an assignment with one or more attachments. Hover your cursor over the attachment options to see what each one attaches. The options include:
- files from your computer
- links to existing activities in the course
- links to external websites
- files from a Google Drive
- files from OneDrive

> Recording Options
You can supplement written instructions for an assignment with an audio or video recording. Options include:
- Recording up to 1.5 minutes of audio within Brightspace OR uploading an audio clip from your computer.
- Record up to 30 minutes of video in Brightspace OR uploading a clip from your computer.
> Availability Dates and Conditions
In this widget you can set:
- Start date – the day and time the assignment folder becomes available for students to begin submitting their work.
- End date – the day and time the assignment folder becomes unavailable and students can no longer make submissions. Note: The End Date will be visible in the Brightspace calendar but not the Start Date.
- Release Conditions (click here for more information).
- Special Access– if one or more students in your course requires an alternate submission date for the assignment.
> Submission & Completion
In this widget you can:
- set the assignment to be individual or group-based
- add the assignment to a category if applicable
- choose submission type (File, Text, On Paper, or Observed in Person)
- decide on the number of files allowed per submission (1 or more)
- determine the file types/extensions you want students to upload
- decide whether to keep all or only one submission in the folder
- add an email address if you want to be notified when a new submission is made.
> Evaluation & Feedback
In this widget you can:
- Create a rubric or attach an existing one (visit this resource for information on Brightspace rubrics)
- Align your assignment with learning objectives
- Toggle ON and OFF the Brightspace annotation tool (this tool allows you to digitally mark students’ submissions)
- Choose to make marking anonymous if you wish.
NOTE: Selecting anonymous marking cannot be undone once you click Save. if you create an assignment with anonymous marking enabled but later change your mind, you will need to create a new assignment with this option disabled.