Widgets
When you navigate to a specific course in Brightspace, the first page you see is the course homepage. All Brightspace course sites at Memorial have the same standard design. However, instructors have the option to customize the course homepage to meet their instructional needs. Instructors can make the following changes:
- Add a banner image at the top of the page.
- Change links in the course navbar.
- Modify the layout and types of widgets on the page.
Scroll down this page for more information.
Default Course Homepage
Below you can find a general overview of a standard course homepage.
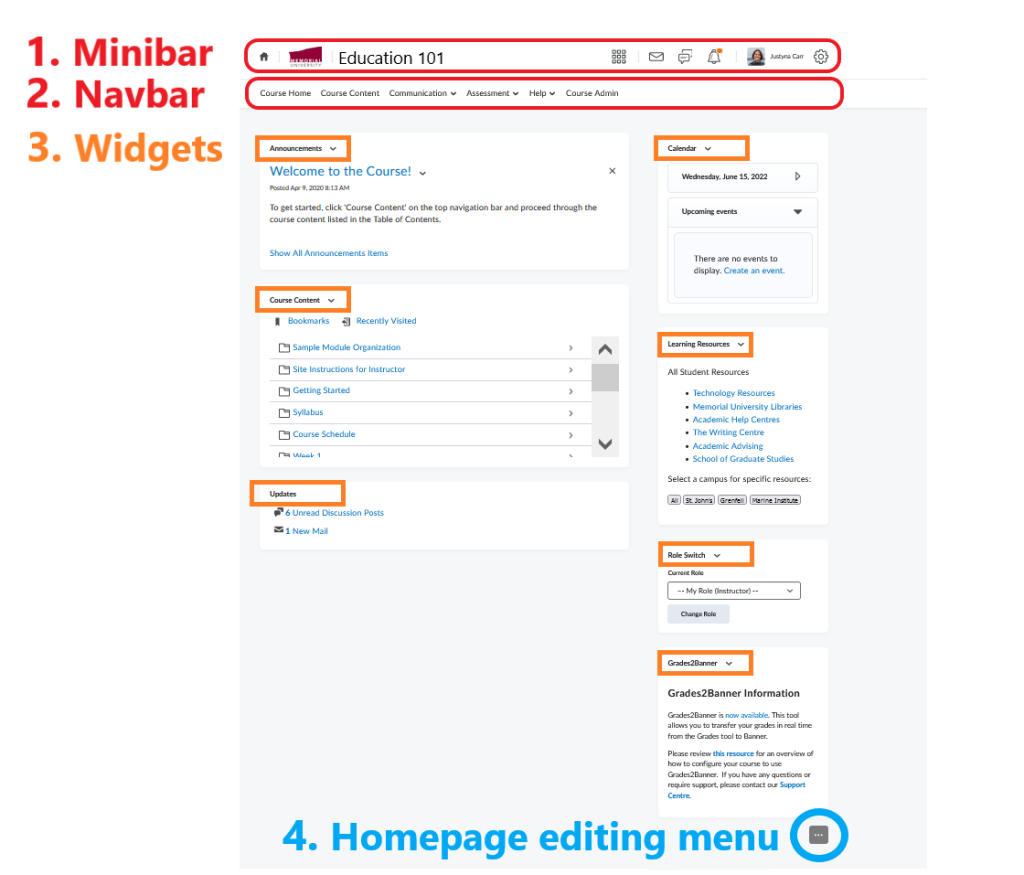
- Minibar – Menu visible at the top of every page in Brightspace
- Navigation bar (navbar) with links to course tools
- Widgets with the following tools and resources:
- Announcements – Area where instructors share important messages with students.
- Course Content – Location of all course materials.
- Updates – Notifications about unread course mail, discussion posts, quiz attempts awaiting evaluation etc.
- Calendar – A list of important dates for your course, e. g., end dates, due dates, scheduled meetings etc.
- Learning Resources – Links to various supports available to students at Memorial.
- Role Switch – A tool that allows instructors to view the course site as students see it.
- Grades2Banner – A tool that allows instructors to transfer final grades from Brightspace to Banner at the end of the semester.
- A menu with homepage editing options
Customizing Course Homepage
Although every course homepage has the same layout by default, instructors can modify their homepage. One way to customize it is to change the widgets (content blocks on the page).
The purpose of widgets is to provide links to frequently used tools directly on the course homepage, so that students can access them easily without having to navigate through the course site. A standard homepage contains a standard set of widgets:
- Announcements, Course Content, Updates on the left side of the screen,
- Calendar, Learning Resources, Role Switch, and Grades2Banner on the right.
However, instructors can customize the homepage by adding, removing, and modifying widgets.
Benefits of Using Widgets
Effective use of widgets in Brightspace benefits both students and instructors in the following ways:
- Instructors have more control over where students look for information.
- External tools can be incorporated directly into the course site
- The homepage can become a single platform for course content and additional course resources.
- The homepage can be made more interactive.
Sample Widgets
The chart below lists some of the widgets available on a Brightspace course site and their purpose. The middle column indicates the visibility of the widget—while most widgets are visible to both students and instructors (“S/I”), some are visible to the instructor only (“I”).
| Widget Type | Visibility | Function of Widget |
|---|---|---|
| Bookmarks | S/I | Provides direct access to previously bookmarked parts of course content. |
| Calendar | S/I | Contains two elements: a mini-calendar and a list of upcoming events added by instructors (meetings, quizzes, deadlines etc.). Clicking on a particular day in the mini-calendar limits the upcoming events to that day only. Clicking on any upcoming event on the list takes users to that event in the Calendar tool. |
| Course Reserves | S/I | Provides a direct link to the library course reserves. For information on Course Reserves, visit this library page. |
| Getting Started | I | Contains a link to the ‘Course Design Accelerator’—a tool that instructors can use as a guide when creating their course site. Once the ‘Course Design Accelerator’ is launched from the Getting Started widget, it takes instructors through the process of designing a Brightspace course site and provides direct links to the various tools within it. |
| Google Search | S/I | Provides a direct link to the Google search engine. Search results open in a new window in a web browser. |
| Grades2Banner | I | Provides instructors with a direct link to the ‘Instructor Tools’ page where final course grades can be transferred to Banner directly from the Brightspace grade book. |
| Learning Resources | S/I | Provides links to other units at Memorial University that provide support to students (e.g., Writing Services, Academic Advising). |
| Role Switch | I | Allows instructors to temporarily view the course as it would appear to students. The student preview applies only to general areas of the course (Announcements, Course Content, Discussions etc.), but not to student-specific areas such as Grades. Note: you cannot view the course as a specific student. |
| Tasks | S/I | Enables users to create a personalized list of tasks to complete in a course, along with the due date and additional notes. The system then sorts the tasks into the categories of Today, Upcoming, or Someday (no due date). Once a task is completed, you can check it off and it will disappear from the list. However, you can always view your completed tasks by clicking the ‘View Completed Tasks’ link. |
| Updates | S/I | Displays any new activity in the course. It informs about: |
| – Unread submission files | ||
| – Assignment submissions awaiting evaluation | ||
| – Unread discussions posts | ||
| – New Brightspace email | ||
| – Ungraded quizzes, etc. | ||
| User Links | S/I | Allows users to create a personal list of links to external websites. |
Before Adding Widgets
Before you can modify a course homepage, you need start by creating your own homepage. This can done in one of two ways.
Method A: Copy the Default Course Homepage
1. Create a copy of the ‘Default Course Homepage’
- In the course navbar, go to Course Admin.
- In the Site Setup section, click Homepages.
- Locate the Default Course Homepage on the list and click the down arrow next to it. In the menu that opens, select Copy. (You can copy any of the pages listed here, but we recommend using the Default Course Homepage as the template.)
- You have just created a copy of the Default Course Homepage (it should be listed just below the original version). Blue front indicates that the page is editable (pages listed in black font are non-editable).
2. Activate your new homepage
- On the Homepages page, locate the Active Homepage box and click the down arrow inside it.
- From the drop-down menu that opens, select Default Course Homepage – Copy.
- Click Apply. Your new homepage is now activated and ready to be modified.
Now that you have created and activated your new homepage, you are ready to customize it according to your needs.
3. Customize your new homepage
- On the Homepages page, locate the Default Course Homepage – Copy that you just created and click on it.
- A page titled Edit homepage will open. On this page, you can change the name of your new homepage and make other available modifications.
- Scroll down to the Widgets section.
- You may now begin to customize the widgets on your homepage. Your options are to:
- Delete a widget by clicking the X symbol in the widget’s top right corner
- Change a widget’s location by clicking and dragging it to a different location within a panel
- Modify a widget by clicking it and choosing whether to: hide its title, restrict the ability to minimize it, or change the widget’s display name
- Add a new widget
Video Instructions
Method B: Create a new homepage from scratch
1. Create your new homepage
- In the course navbar, go to Course Admin.
- In the Site Setup section, click Homepages.
- On the page that opens, click Create Homepage.
- On the new page that opens, give your new page a name and make other available selections (note that the Description will not be available to the students).
- Scroll down to the Widgets section where you can begin adding widgets of your choice.
Step 2: Activate the new homepage
- In the course navbar, go to Course Admin.
- In the Site Setup section, click Homepages.
- On the page that opens, locate the Active Homepage box and click the down arrow inside the box.
- From the drop-down menu that opens, select the homepage that you created and named in Step 1 above.
- Click Apply. Your new homepage is now activated.
Video Instructions
Adding and Customizing Widgets
Widgets can be added to a course homepage in three different ways.
1. Add a widget from an existing list
The default layout of your course homepage includes two panels in which the widgets can be placed – a wide panel on the left and a narrow panel on the right. Each panel has a dashed outline around it. The two-panel layout can be changed by clicking the Change Layout button right above the Widgets section on your ‘Edit homepage’ or ‘Create homepage’ page. However, the width of the panels cannot be changed.
- On your course homepage, decide if you want to add a new widget to the left or the right panel.
- Click the Add Widgets button at the bottom of the panel you have selected.
- In the new window that opens, you can select widgets from either System Widgets or Custom Widgets. For more information on some Brightspace system widgets, click here.
Note
If you wish to preview the available widgets, open a new browser window or tab, open your Brightspace course site and go to Course Admin –> Widgets. You can preview the available widgets by clicking the Preview icon on the right side of the screen.
- Once you make your selection, click Add, then Save.
Note
You can change the name of the widget you have just added by clicking anywhere on the widget. In the window that opens, select Custom under Widget name and type a new name.
Video Instructions
2. Copy an existing widget and customize it
- In the course navbar, go to Course Admin.
- In the Site Setup section, click Widgets. You will find two lists of widgets here: System widgets (cannot be copied or modified) and Custom widgets (can be copied and modified to create custom versions).
- Find the widget you would like to copy. Select the Copy icon to the right of the widget’s name (under Actions).
- A copy of the widget will now appear right under its original version.
- To the right of your newly copied widget, locate the Edit icon and click on it.
- In the new window that opens, in the Properties tab, rename your widget. You can add a description, but it will only be visible to instructors, not students.
- You can optionally attach release conditions to your new widget by clicking the Release Conditions tab.
- Click on the Content tab to add content to and customize your new widget.
- Click Save.
- Now that you have created a new (version of a) widget, follow the steps listed in #1 above (‘Add a widget from an existing list’).
3. Create a new widget
- In the course navbar, go to Course Admin.
- In the Site Setup section, click Widgets.
- Click the Create Widget button.
- In the new window that opens, in the Properties tab, name your new widget. You can add a description, but it will only be visible to instructors, not students.
- You can optionally attach release conditions to your new widget by clicking the Release Conditions tab.
- Click on the Content tab to add content to and customize your new widget.
- Click Save.
- Now that you have created a new a widget, follow the steps listed in #1 above (‘Add a widget from an existing list’).
Video Instructions