ScreenPal
ScreenPal is an easy-to-use and intuitive screen-recording software that allows you to record content from your computer screen along with audio and optionally video. The software then creates a video file (available formats are MP4, AVI, FLV, or GIF), which can be uploaded to a video streaming service and then embedded into your Brightspace course site. ScreenPal also includes easy-to-use annotation and editing tools. Some benefits of ScreenPal include:
- Easy, intuitive interface.
- Mistakes can be edited out — no need to re-record.
- Video segments can be easily cut out.
- Free for students.
ScreenPal is a free software, but a paid version offering advanced tools is also available.
Memorial has purchased an educational ScreenPal license, and instructors can can gain access to it by request. The resources in this category will introduce you to the features of ScreenPal available under Memorial’s license.
Instructional Use of ScreenPal
ScreenPal videos can be used in teaching for a wide variety of purposes. Below are some possible uses.
To Present New Content
- Record and post online lectures – open the technology of your choice (PPTs, webpages, spread sheets, images, videos etc.) on your computer screen and record it while you narrate, annotate, highlight, or draw.
- Create ‘how-to’ videos of either on-screen or real-life procedures (e.g., solving equations, explaining navigation of a website, drawing chemical bonds, showing how to use an application or software, conducting a lab procedure).
- Customize content to include the exact information you want.
- Create captions for hearing-impaired students.
To Preview or Review Material
- Create a short introductory overview of a unit, module, lesson.
- Record recap of main points before homework and tests.
To Create Remedial Tutorials
- If you identify a problem several students have (e.g., use of citations), create a remedial video for the whole class.
- FAQ videos – collect questions from students and create a video with all the answers.
To Supplement Feedback
- Provide individualized video feedback on assignments – display students’ work on the screen and annotate, highlight, correct while you discuss it.
- After a test/exam, record an overview of correct answers.
To Assess Learning
Have students use ScreenPal to record:
- presentations
- speeches
- reflections
- answers to discussion questions (alternative to the discussion forum)
- oral output in foreign language classes
- digital stories
Using ScreenPal
ScreenPal is a free software available to instructors as well as students. The free version, however, provides access to only some of the powerful tools the product offers.
Memorial has purchased a limited number of educational ScreenPal licenses for use by instructors, and CITL will be administering these licenses on behalf of Memorial.
Obtaining a Licensed Version of ScreenPal
1. Request an account
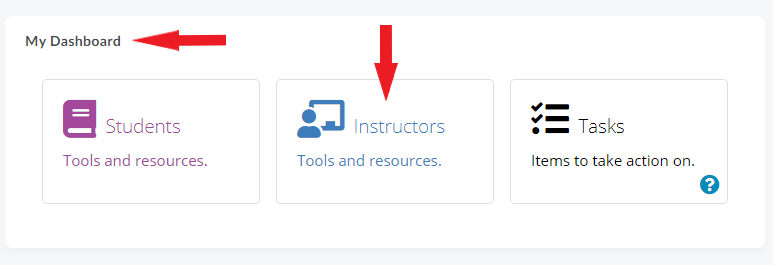
- Log in to Brightspace. In My Dashboard widget, select Instructors.
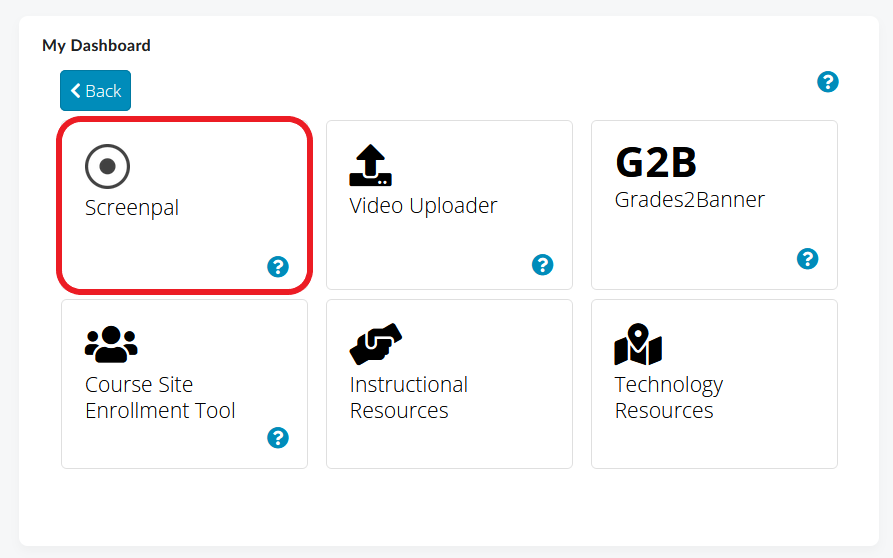
- On the next page, select ScreenPal.
- In the window that opens, click the ScreenPal Terms and Conditions of Use.
- Once you review the conditions, select Request Account.
- You will receive an email to your @mun email address confirming that your account request has been submitted.
- Within about 24 hours, you will receive a second email with information that your account has been created.
2. Activate your account & download the software
Once your account have been created, you will need activate it in order to access Memorial’s version of ScreenPal.
- Log in to Brightspace. In My Dashboard widget, select Instructors.
- On the next page, select ScreenPal.
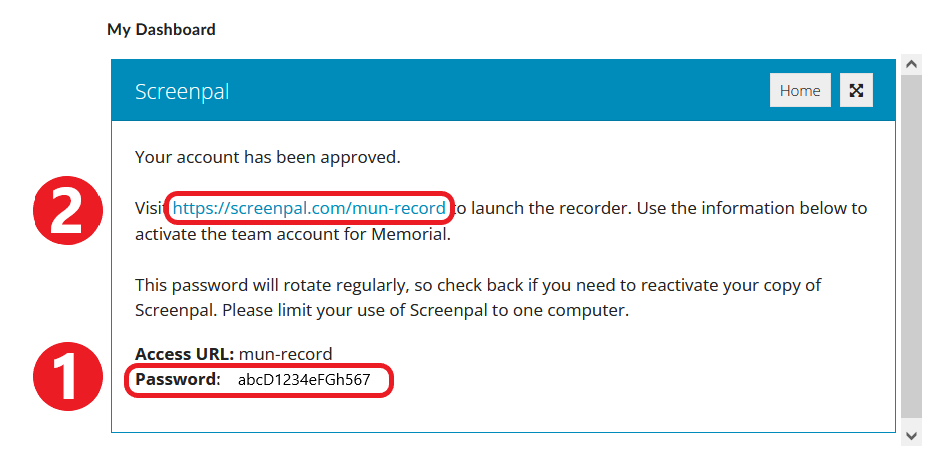
- On the ScreenPal window that opens, first copy the password that has been generated for you (#1 below), and then click the link provided in the message (#2 below).
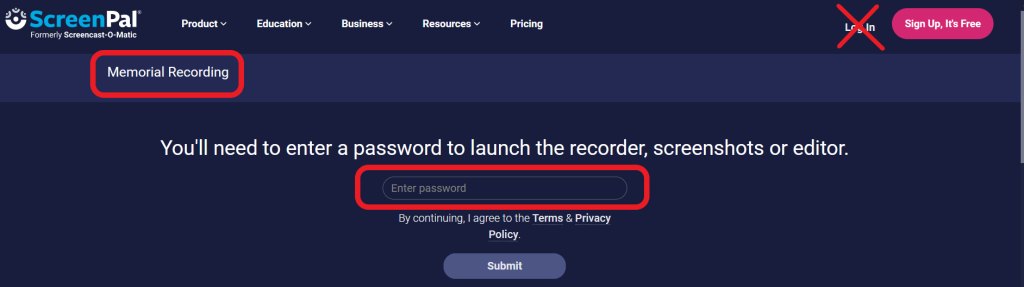
- You will now be taken to the ScreenPal website. When prompted, enter the password you copied in the previous step.
Note
Do not use the ‘Log In’ function at the top of the page. If you do, you will be redirected to the free version of ScreenPal instead of Memorial’s licensed version.
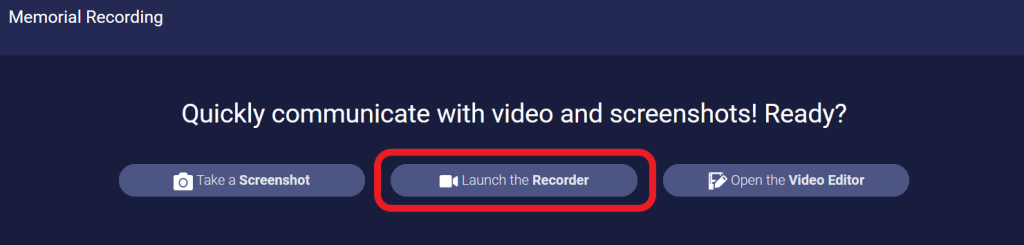
- Once you log in, select Launch the Recorder.
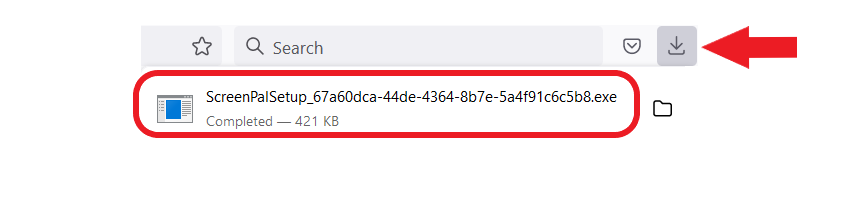
- An executable file will download to your computer. When the process is complete, go to your downloads and install ScreenPal on your computer.
- You may be prompted to enter your ScreenPal password again.
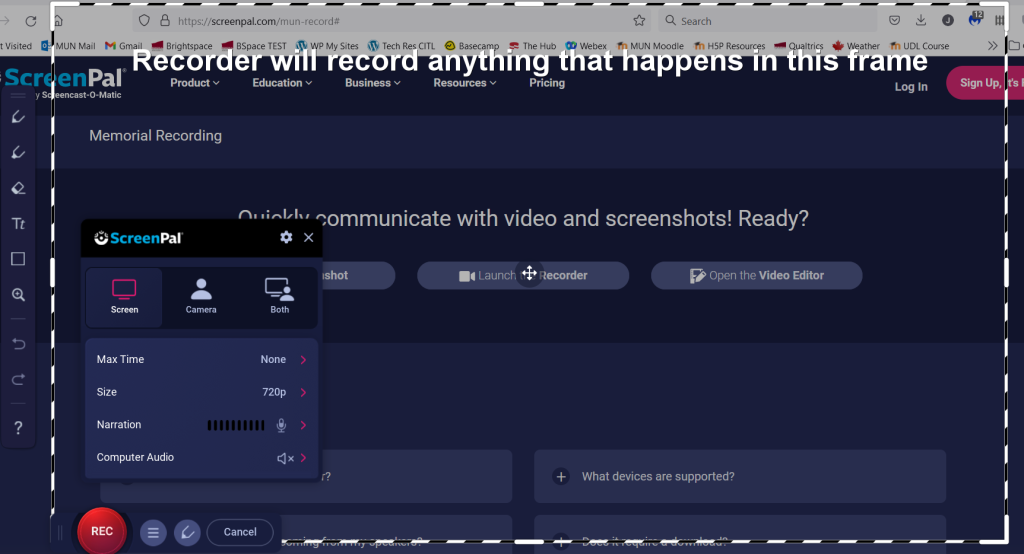
- The ScreenPal recorder window will now open, and you can start recording.
Note
The ScreenPal password changes periodically, so you may need to return to My Dashboard > Instructors > ScreenPal in Brightspace to retrieve your new password.
Recording with ScreenPal
Once you have downloaded Memorial’s licensed version of ScreenPal onto your computer, you can use it to create recordings on your device.
ScreenPal includes annotation tools, a video editor, and special effects that can be used to make your videos more dynamic. ScreenPal can also generate transcripts of your video using Google’s speech-to-text engine, and you have the ability to edit the transcripts for accuracy. You can publish these as open or closed captions for your video file.
Once a video is created, it can be uploaded to Memorial’s server through the CITL Video Uploader tool, and then easily embedded into your Brightspace course sites.
Pros:
- Can generate a transcript automatically
- Can share screen, audio, and webcam easily
- Built-in video editor for basic editing
Cons:
- Generating a transcript can be time consuming
- Additional work required to export closed captioning files for external players
If you ever experience issues locating the software on your device, simply log in to Brightspace, select Instructors in My Dashboard widget, select ScreenPal and follow the directions you initially used to install the software.
1. Take a screenshot
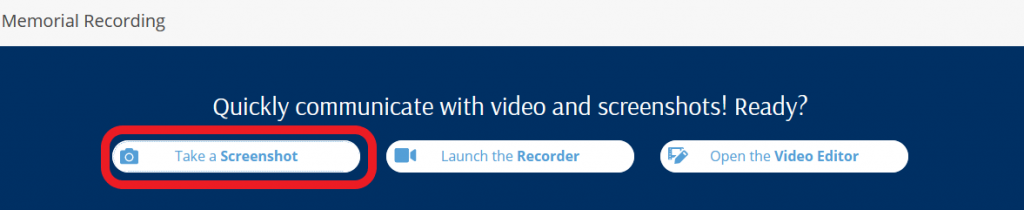
On the ScreenPal page, select Take a Screenshot. This will open the ScreenPal web launcher.
- At the top of the screen, a window will appear asking: Ready to take a screenshot? Go to the computer window or application you want to capture and click Ready.

- Follow the instructions on the screen to take your screenshot.
- After you take a screenshot, a confirmation message will appear. You can now:
- paste the image into a document by pressing Ctrl+V
- edit the image using ScreenPal’s editing tools
- download the image to your computer.

2. Use the screen recorder
On the ScreenPal page, select Launch the Recorder.

- The ScreenPal screen recorder will launch. It contains:
- a resizable recording frame (you can record the entire screen or only a portion of it)
- recording controls (input type, length, size etc.)
- various annotation tools you can use for your recording
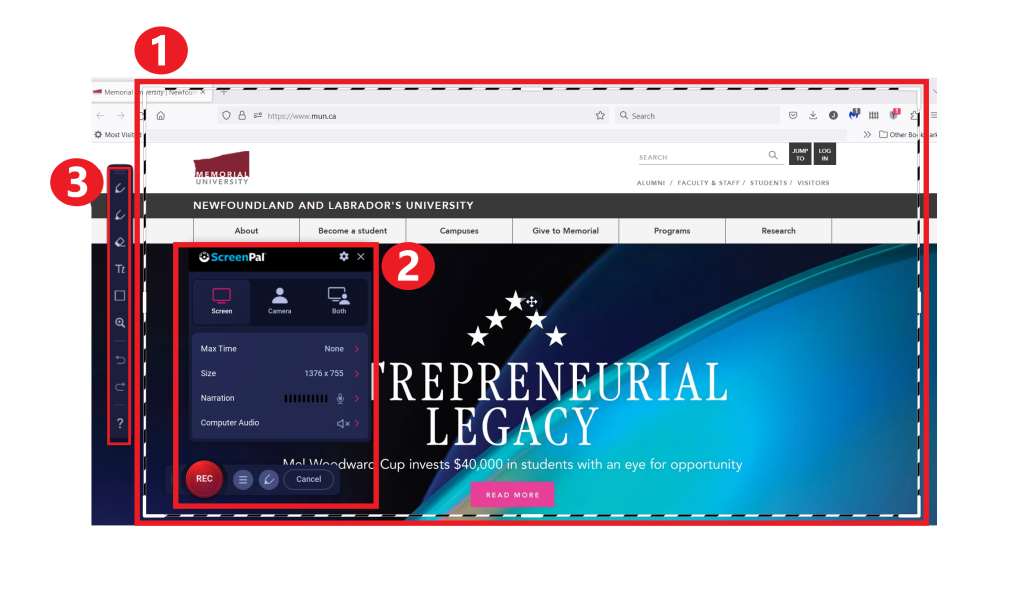
- Once your preferred options are set, click the red Rec button. A 3-2-1 countdown will begin. When recording starts, the black-and-white dotted frame around your recording area will change to red-and-white to indicate that recording is in progress.
- You can pause the recording at any time by clicking the Pause button
 . When you pause, a bar will display with options to resume recording (click Rec), play what has been recorded so far, end the recording (click Done), or delete it.

- When you have finished recording, click Done.
- You will now have two options: to Save/Upload or Edit Video.
- If you select Save/Upload, your recording will be saved to the ScreenPal folder and you will be able to view it. After viewing the video, you can decide what to do next:
- save the recording on your computer (available formats are MP4, AVI, FLV, and GIF)
- edit the recording in the ScreenPal editor, or
- delete the recording and start over.
If you select Edit Video, your recording will be saved in the ScreenPal folder and you will be taken to the editing window. For information on editing using the ScreenPal Video Editor, please refer to the section below.
3. Edit an existing recording
On the ScreenPal, select Open the Video Editor. This will open the video manager.

- Select the video you want to edit. You can:
- import a video from your computer
- choose a video you recorded using ScreenPal
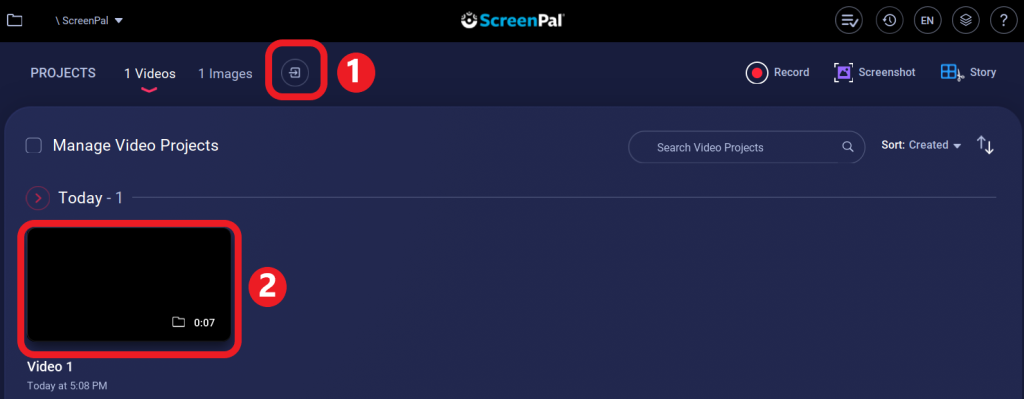
- On the next page, select Edit Video.

- You will now be able to edit your recording using numerous editing tool available in the ScreenPal video editor. Some of the tools are:
- Adding captions (speech-to-text, typed by you, or from a file)
- Adding music (from the available selection or imported)
- Deleting segments of the recording
- and many, many more (for a complete list of editing tools, visit the ScreenPal site).
- After every edit you make, you will be asked if you want Modify Main Video. Click OK if appropriate.
When finished, you can save the video file to your computer in one of the available formats: MP4, Avi or FLV.
Hosting ScreenPal Videos
Your finished video file can be hosted on a number of video streaming services and then inserted into Brightspace. A list of video hosting services is available in our Learning Technology Index.
We recommend using the CITL Video Uploader tool, which allows you to host your created videos on Memorial servers. Once you create a video, simply follow the steps outlined in the CITL Video Uploader resource to upload your file and then embed it into Brights
Video Overview
The short video below provides a great overview of ScreenPal. NOTE: The limitations described in this video do not apply to Memorial’s licensed version of the software.
For more information on the software, please refer to ScreenPal tutorials.
The following video illustrates the process of recording using ScreenPal. Note: The video references Screencast-O-Matic, the name of which has been changed to ScreenPal.
Recording with ScreenPal