Creating Content Pages
Creating content (HTML) pages in Brightspace allows instructors to present course content in a way that is more accessible, flexible, and student-friendly than uploaded documents. Unlike PDFs or Word files, HTML pages are designed for the web, making them easier to read on any device, quicker to update, and more compatible with assistive technologies such as screen readers. Content pages also enable creating cohesive content with a combination of text, images, embedded media, as well as links to multiple files and file types on a single page.
You can create content pages in Brightspace in several ways:
- Brightspace Editor: Build content directly in the editor. Use the toolbar to format text, add images or tables, and create links. See below for details.
- Course Setup Kit: Use CITL’s course design template with ready-made modules and pages you can copy and customize while keeping consistent HTML styling. For more information, please refer to the resource on this topic.
- HTML Source Editor: If you are comfortable with HTML or CSS (cascading style sheets), use the source editor to create or edit content, or paste in code from other applications.
Brightspace Editor
Content (web) pages in Brightspace can be easily created using the Brightspace Editor, which requires no knowledge of HTML. This built-in text and content editor is available wherever you can create content in Brightspace, including Content, Discussions, Assignments, and Announcements.
Instructors can create and format content pages using the tools in the Brightspace Editor’s menu the following ways:
- Format text with bold, italics, lists, headings, and alignment options
- Insert media such as images, videos, audio, and links
- Embed HTML to add custom code for advanced customization
- Check accessibility using the built-in accessibility checker
- Add equations with MathML, LaTeX, or graphical equation tools
- Insert objects like course files, external links, or interactive elements
To create a content page:
- Go to your Course Content
- Create or select a content module
- In the module you selected, click Upload/Create and select Create a File from the dropdown menu.
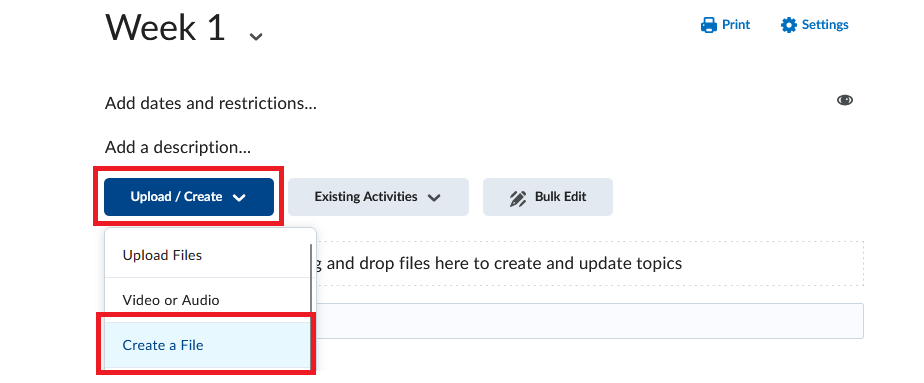
The Brightspace Editor will open. The menu with editing tools is located at the top of the editing window and contains all the common elements needed to create and edit content pages.
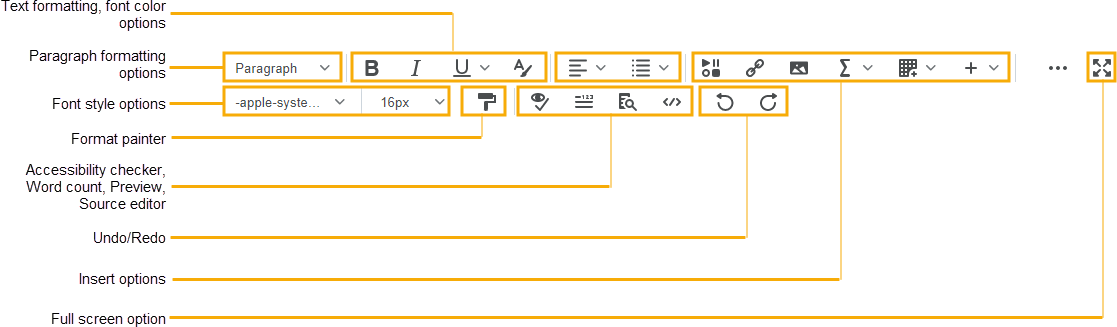
Below you can find instructions for adding different elements to a content page.
Creating Headings
Headings are an important element of any page. Not only do they help organize content in a visual way, but they are also used by screen readers and thus are essential to providing accessible content.
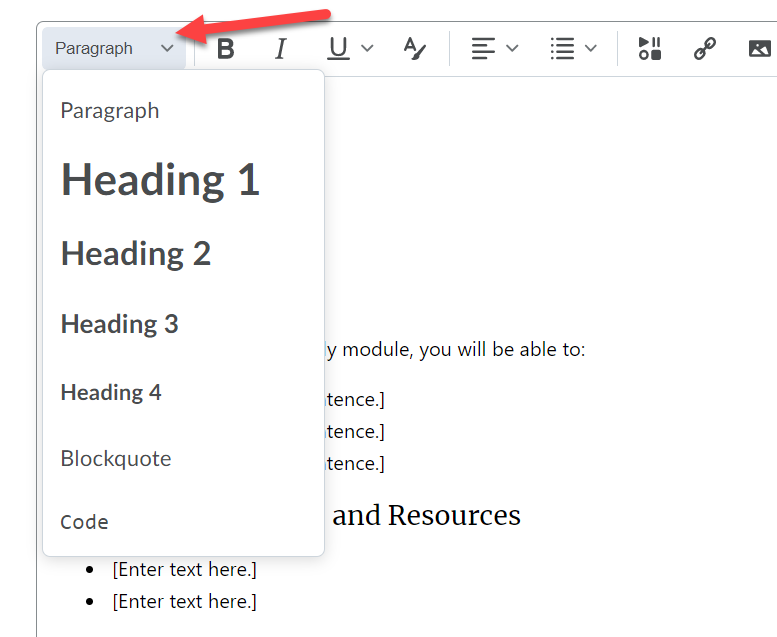
To add headings to a page, click on the Format drop down in the editor. Select the Heading you would like to use. Keep in mind that headings should follow in a ranking order. Typically the first heading on a page is Heading 1, then followed by Heading 2, then Heading 3 and so on. Try not to skip levels within a page.
Adding Images
- While editing an HTML page, place your cursor in the area of the page where you would like to insert the image. Using the Brightspace editor, click on Insert Image.

- From the Add a File window, click My Computer to access an image that is stored on your computer (Alternatively, you can click Course Offering Files to access a file that is already stored in the course offering files area.)
- Click Upload. Locate and select the image you wish to upload. Click Open. Clicking Choose Destination will enable you to change the folder where the file will be stored in your course offering files. Click Add.
- You will be prompted to provide alternative text for the image. Alternative text is important for students who may be accessing the course through the use of assistive technologies, such as screen readers. Please try to be as descriptive as possible. When done, click OK.
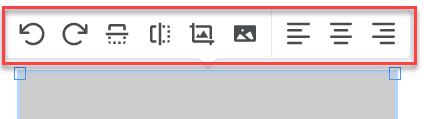
- Once the image is inserted in the page, clicking on the image will display a pop up menu that will enable you to make minor modifications, such as resize or crop.
Be sure to save your changes when finished by clicking Save or Save and Close at the bottom of the HTML editing window.
Embedding Videos
- While editing an HTML page, place your cursor on the area of the page where you would like to embed the video. Click Insert Stuff.

- From the Insert Stuff menu, click Enter Embed code.
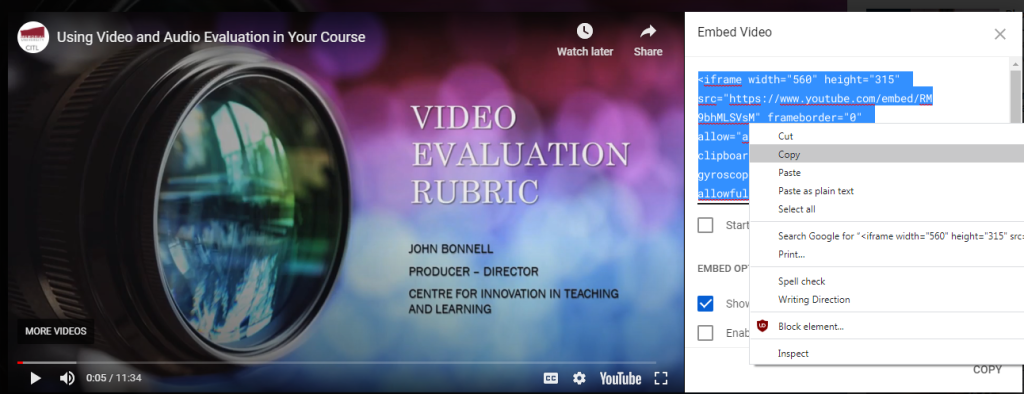
- You can access the embed code for a YouTube video, for example, by clicking Share at the bottom of a video, then Embed.
- Copy the embed code from YouTube. (You can do this by right clicking on the code, then selecting copy, or by using Ctrl/Cmd + C on a keyboard.)
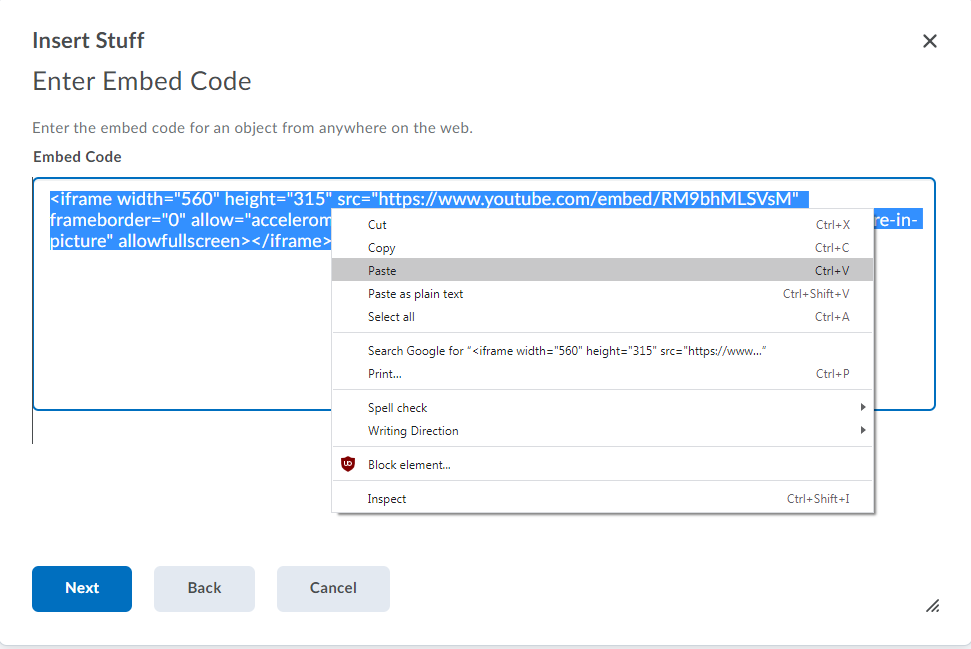
- Paste the code into the Embed code box in Brightspace. (You can do this by right clicking on the code, then selecting paste, or by using Ctrl/Cmd + P on a keyboard.)
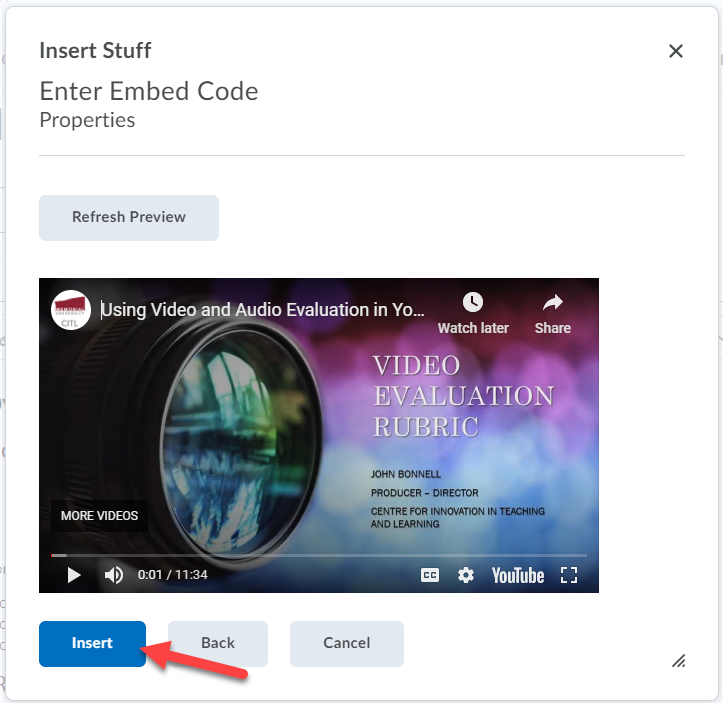
- Click Next to see a preview of the video. Then click Insert.
Be sure to save your changes when finished by clicking Save or Save and Close at the bottom of the HTML editing window.
Creating Tables
While editing an HTML page, place your cursor on the area of the page where you would like to insert the table. Using the Brightspace editor, click on the Table button, then on Insert Table. (You may need to click Other Insert Options to see the table option)

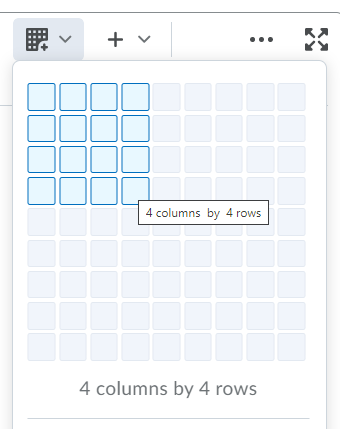
A grid will appear. Click and drag on the grid to select the number of cells (columns and rows) you need. (Note that you can increase/decrease the rows and columns later.) Once you stop dragging and release the mouse click, an empty table will appear. You can populate the table by placing text in each cell of the table.
There are a number of common table editing options available for tables such as merge, split, insert/remove rows and columns, etc. To access the options, place your cursor in a table cell (or highlight several rows or columns). Click the arrow next to the table icon.
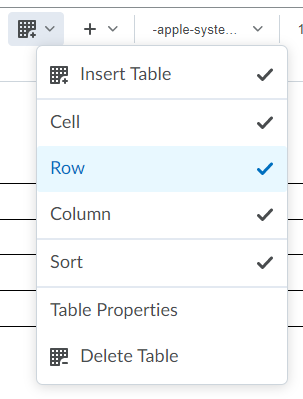
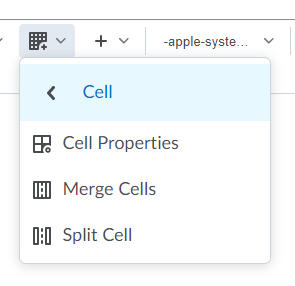
In order to increase the readability of your tables and also to increase accessibility for students, you can indicate which table rows and columns are headings. Place your cursor in a table cell. Click the arrow next to the table icon and then click Cell, then Cell Properties.
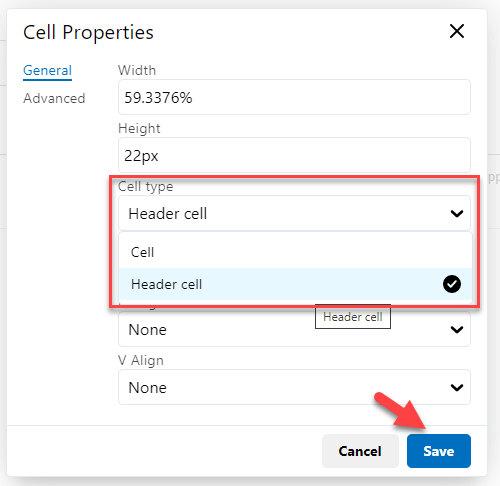
Under Cell Type. Choose Column Header, for example to indicate that the cell is a column header. Click Save.
Be sure to save your changes when finished by clicking Save or Save and Close at the bottom of the HTML editing window.
Creating Hyperlinks
Instructors can add links to files directly on the content pages they create using the Brightspace Editor. This method allows for multiple files and file types (text, images, and media) to be added to a single page, which results in cohesive presentation of content.
- In the course navbar, select Content.
- Select the module where you want to create a page (or edit an existing one).
- To create a new page, click Upload/Create and choose Create a File from the dropdown menu.
- To edit an existing page, find the page in the module, click the downward arrow next to its title, and select Edit HTML from the menu.
- A content page with the Brightspace Editor will open. Explore the menu at the top of the editing window as it contains various options for adding files.
- Enter text into the Brightspace editor and highlight it. You will now create a link from the highlighted link to a file.
- With the text highlighted, select Insert Quicklink.

- From the Insert Quicklink menu, select Course File.
- If you previously uploaded the file to Manage Files in Brightspace, navigate to the file and select it from the list.
- If you have not previously uploaded the file to Brightspace, scroll down to the bottom of the Insert Quicklink menu and click Create New File.
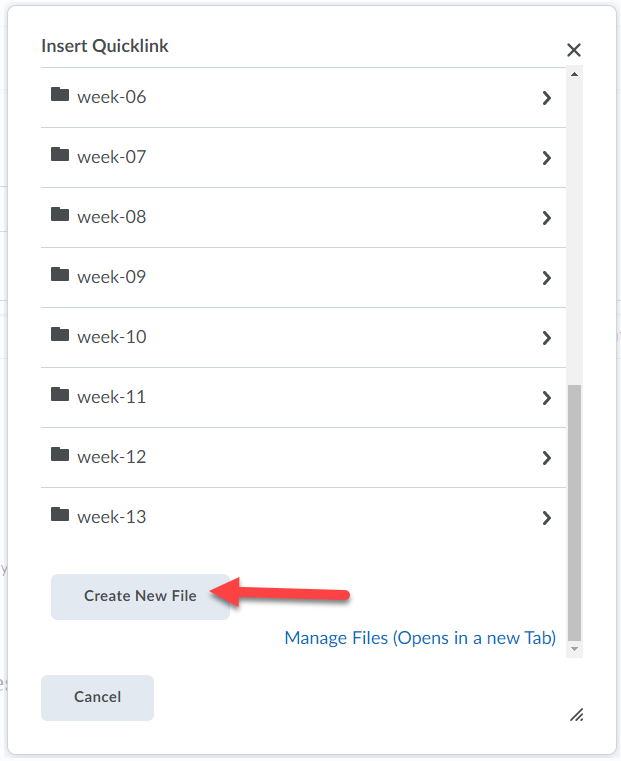
- Click Upload. Locate and select the file you wish to upload. Click Open. (Alternatively, you can drag and drop the course file into the box).
- Click Create and Insert.
Note
Once a link is created, you can modify it by clicking it and selecting the pencil icon.
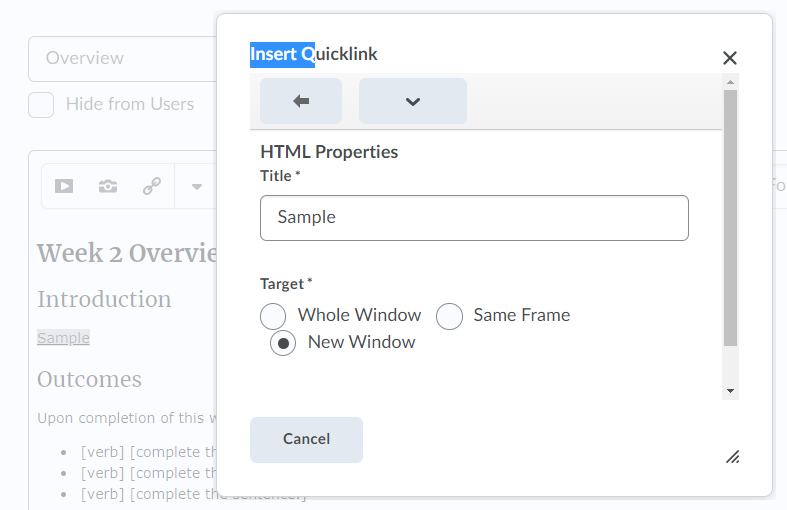
- When finished, click Save or Save and Close at the bottom of the editing window.
- While editing an HTML page, highlight the word that you would like to hyperlink. Click Insert Quicklink.
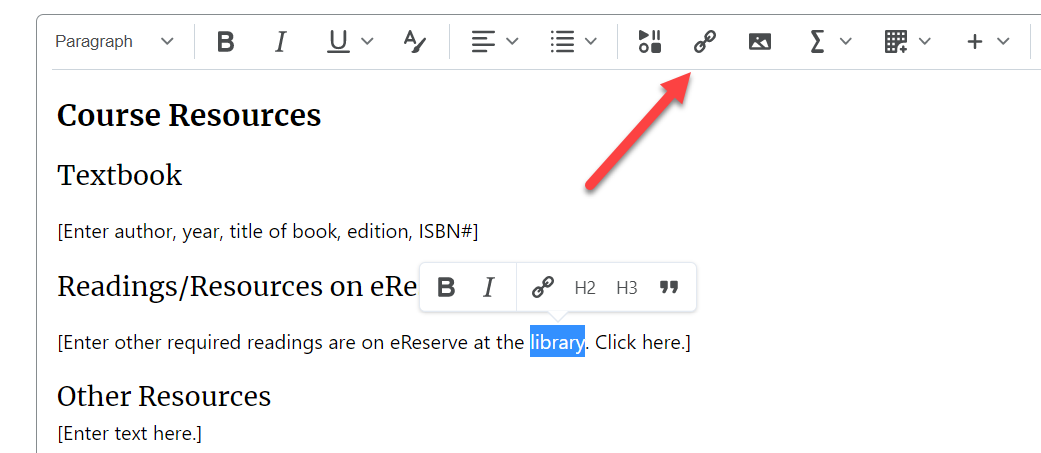
- In the Insert Quicklink window, scroll down and click URL.
- Enter the website URL, title (if different from what is selected), and select the target window. Click Insert when done.
Note: To increase accessibility and minimize the chances of the students becoming “lost” in open browser tabs, it is recommended to only open links in new tabs or windows when necessary. In some cases, for example, students may need to reference an external page to complete a task, therefore opening the link in a new tab would be necessary. It is recommended that notice be given for links that open in new windows.
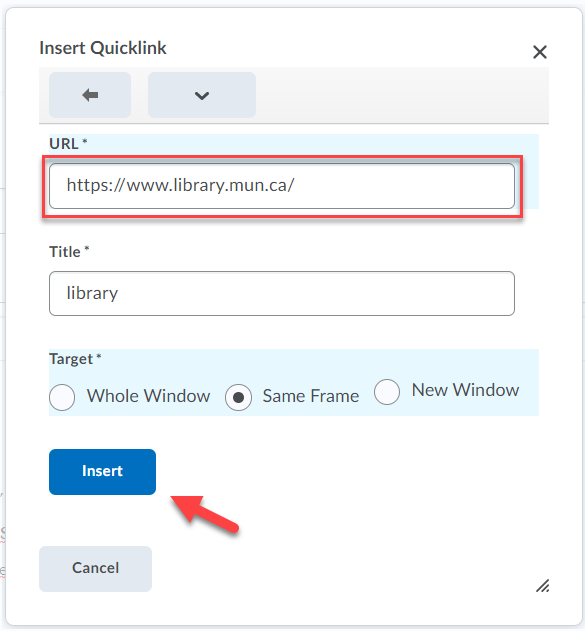
Be sure to save your changes when finished by clicking Save or Save and Close at the bottom of the HTML editing window.
Video Instructions
The following short video presents some basic information on using the Brightspace Editor. More information on the tool is available in the Brightspace Community.
HTML Editor – Introduction