Brightspace Content
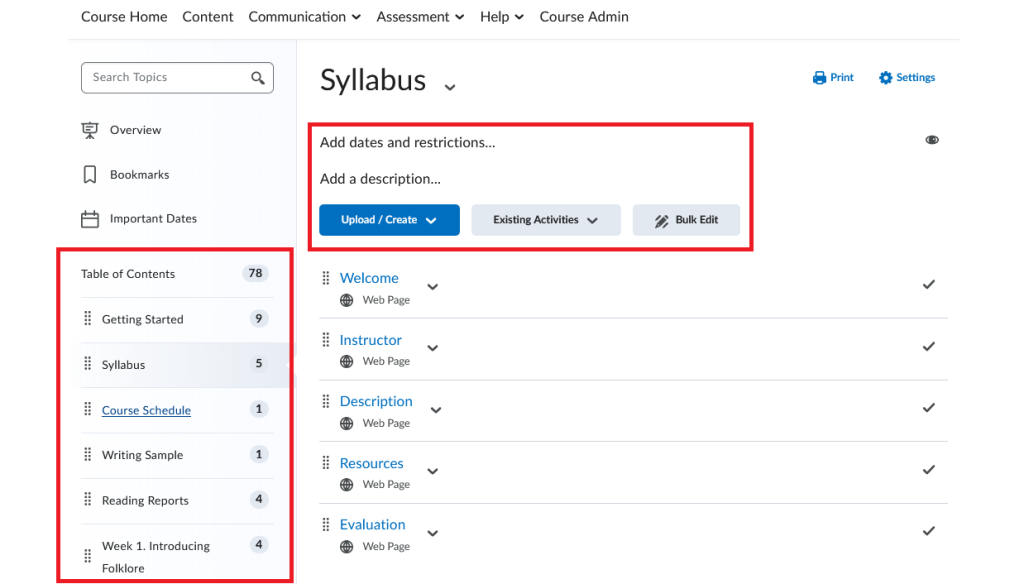
The Content tool is the main area in Brightspace where instructors organize and share course materials with students. It acts as a central hub for everything students need to access throughout the course. The Content tool allows instructors to:
- Organize course materials (e.g. syllabus, lecture notes, multimedia)
- Create modules (e.g., weekly units)
- Add topics (e.g., readings, videos, instructions)
- Build content pages
- Use the HTML editor to add text, links, images, or embedded media
- Upload and manage files
- Add documents, slides, or other resources using Manage Files (course file management system in Brightspace) under Course Admin
- Embed multimedia
- Include videos (e.g., Video Note) or external tools directly in content pages.
- Post links to websites or external resources
- Add course activities directly into content (e.g., assignments, discussions, quizzes)
- Set availability dates, due dates, and release conditions to guide student progress
Instructions
The following videos provide basic instructions on adding and arranging course material using the Content tool in Brightspace. More detailed information is available in the Brightspace Community.
Adding Content Modules
Content – Add a Module – Instructor
Rearranging Topics, Modules and Submodules
Content – Rearrange Topics, Submodules, and Modules – Instructor
Adding Content to Modules
Instructors can add documents, presentations, or media from their personal computer or from cloud storage (e.g. Google Drive) directly to content modules. Files can be added to content in several different ways.
1. Upload Files from a Computer
Documents such as PDFs, presentations, word documents, or images can be uploaded directly to a content module from a personal computer.
- In the course navbar, select Content.
- Select the module (or create one) where you want the file to appear.
- In the module, click Upload/Create.
- Choose Upload Files from the dropdown menu.
- In the pop-up window that appears, select the location where the file is stored. The options are:
- My Computer
- Course Offering Files
- Google Drive (if enabled).
- Click Upload, select your file, then click Add to insert it into the module.
- The uploaded file will now appear in the content module.
Note
Course Offering Files are stored in the Course Admin > Manage Files area of your course. It is an internal file management system in Brightspace where instructors can organize and manage their course materials.
Video instructions
Content – Upload a Topic
2. Link to Google Drive or OneDrive Files
Instructors now have the ability to add files from their Google Drive and OneDrive accounts directly into their Brightspace course. Any changes you make to the document in Google are instantaneously visible in your course.
Note
You must have personal Google and Microsoft accounts to upload files to Brightspace. You cannot use your MUN Microsoft account.
Adding Files from Google Drive
- Go to the module in which you want to add the file in your course.
- Click either Upload/Create > Upload Files or Existing Activities, and then select Google Drive from the dropdown menu. (You may be prompted to log into your Google account.)
- In the pop-up window, select the file you want to insert into your course. Note: If your file is not publicly viewable, a notification that says “This file is private” will appear. Next to this, a checkbox says “Change permissions so that anyone with a link can view.” If you uncheck this box, students will not be able to view the file.
- Click Select
- Your file is now embedded in your course.
Note
If your file is set to “Anyone with the link can view,” your students will just be able to view the document. If it is set to “Anyone with the link can edit,” students will be able to make changes to the document. This would be useful for something like a sign-up sheet.
Adding Files from OneDrive
- Go to the content module in which you want to add the file.
- Click the Existing Activities button, then select OneDrive from the dropdown menu. (You may be prompted to log in to your Microsoft account and allow D2L (Brightspace) access to your account.)
- In the pop-up window, select the file you want to insert into your course.
- Click Select.
- Your file is now linked in your course.
Note
By default, files are set to “Read Only.” If you want students to be able to makes changes to the file, change the permissions on the file.
Privacy and Security
- Students can see files shared by instructors after the course has ended.
- If students make changes to the documents you share, those changes will be anonymous. You will not know who made the changes.
- One Drive allows instructors to specify an end date for the sharing.
- Google Drive must be manually unshared at a date decided upon by the instructor.
3. Create Content Pages
Note
For more information about creating content pages, please visit our Creating Content Pages resource.
Instructors can create HTML pages in the content modules using the Brightspace (HTML) Editor. This method allows to create cohesive content with a combination of text, images, embedded media, as well as links multiple files and file types (text, images, and media) on a single page.
- In the course navbar, select Content.
- Select the module where you want to create a page (or edit an existing one).
- To create a new page, click Upload/Create and choose Create a File from the dropdown menu.
- To edit an existing page, find the page in the module, click the downward arrow next to its title, and select Edit HTML from the menu.
- A content page with the Brightspace Editor will open. For information on how to use the Brightspace Editor, please refer to our resource on this topic.
Video instructions
Content – Create a File and Insert Stuff
4. Add Existing Activities
Click Existing Activities to link to assignments, quizzes, discussions, or other course tools.
Video instructions
Content – Add an Existing Activity
5. Link to External Resources
Select Upload/Create > Create a Link to add URLs to external websites or cloud storage.
Deleting Modules
Content – Delete a Module – Instructor
Brightspace Content FAQs
What is a module?
You must create a module before you can add topics. A module is a title or category that is used to organize your content.
What is a sub-module?
Sub-modules are simply modules nested within other modules. Similar to modules, they hold and organize topics.
What is a topic?
A topic is the actual content item. Topics can be either created using the Brightspace HTML editor, or they can be files (PDF, .doc, .ppt, etc.) that you upload into Brightspace. You can also link to external websites or resources such as journals or videos.
Can I hide modules and topics in Brightspace?
Yes. To hide a module or topic, click on the module you would like to hide. Click the ‘eye’ icon on the upper right corner and you can toggle from ‘visible’ to ‘hidden.’
To hide a topic, click the dropdown arrow beside the heading, and select ‘Hide from Users.’
Can I release content to students on specific dates?
Yes. You have the ability to choose the date and time that a module or topic will be released to your students. Keep in mind that if a topic or module is hidden you must remember to unhide them or students will not be able to see them on the start date.
Can I release content to specific individuals or groups?
Yes, you can use release conditions and the groups tool to allow the content to only be released an individual or group.
What is completion tracking?
Completion tracking enables instructors to set the method of completion for an activity and provides progress indicators for learners as they complete course activities. Completion Tracking is for the benefit of the learners only. There is no way for you to see what participants are doing with completion tracking, or if they are using it at all.