H5P Interactive Learning Objects
H5P is a free and open technology for creating interactive digital content. H5P is widely used in education as it allows instructors to easily create engaging activities without needing advanced programming skills.
Some benefits of H5P are as follows:
- Various activity types can be created using H5P, e.g. quizzes, interactive videos, presentations, timelines, and games.
- H5P objects can be seamlessly integrated with Brightspace.
- H5P content can be easily reused and shared with others.
Examples of H5P Objects
The following are examples that CITL staff created for various online courses. There are many more interactions and interaction types available but this will give you an idea of the instructional need for the interaction and the teaching and learning benefit.
Presentation
Using a slide presentation in a course gives the instructor control over how they present the content and it gives students control over how they interact with the content. Instructors can present the related concepts together and insert headings, links, images, videos, audio to present the content and to engage learners. Quiz type questions can be used for recall practice and self checks.
This is a simple slide presentation with text, images, and questions.
Question Set
With a Question Set, instructors can create a simple quiz that includes various question types such as multiple choice, multiple select, fill-in the blanks, and drag and drop. Question sets can be embedded directly in the content for recall practice and self-check on that topic.
Drag and Drop
A drag and drop activity requires learners to drag text or an image and drop it on an associated area of an image or text. A drag and drop activity can help learners to engage with the content, make associations and connections, check their understanding, and in some cases it may be a safe way to practice a dangerous or difficult task or skill.
Activity Instructions
Use the clues below to fill in the family tree. Drag and drop the names on the left to the appropriate space on the right. Once done, select Comprobar to check your answers.
Isabella es la hermana de Felipe. / Elena es la nuera de Tomás. / Julia es la suegra de Martín. / Mía es la prima de Samuel. / Isabella es la mujer de Martín. / Felipe es el marido de Elena. / Samuel es el sobrino de Isabella. / Elena es la tía de Mía. / Elena es la madre de Sara. / Mario es el hermano de Mía. / Martín es el cuñado de Elena / Tomás es el abuelo de Samuel. / Martín es el yerno de Julia. / Sara es la nieta de Tomás.
Audio Dictation
For this interaction, the instructor observed that many ESL students struggled with numbers that sounded similar, like “fourteen” and “forty”. This dictation interaction allows students to practice listening and identifying numbers that are spoken. Students can practice multiple times. Feedback is provided immediately,
Dialog Cards
Dialog cards are a set of cards with a word, expression, or image on one side of the card and a corresponding word, expression, or image on the opposite side.
This simple activity requires students to interact with a Spanish vocabulary list. Students can practice identifying the English equivalent of the Spanish word, they simply turn the card to see the English equivalent.
Timeline
An timeline is an interactive and visually appealing way to present chronological content with images, text, and links.
Image Hotspots
The image hotspots activity uses an image that has various points of interest on it. Students can view the entire image, see the relationships between various aspects of the image, and click on a point of interest to see in-depth information about it.
This image hot spot interaction uses an image of The Major Pathways for Dopamine. Students can use the interaction to see the content visually and to test their understanding of concepts.
Activity Instructions
Study the three major pathways for dopamine on the image, view their location and how they interact. Hover over the question mark for the name of the pathway, click on it for a description.
H5P at Memorial
CITL has created an H5P Resources Environment where Memorial users can create and store H5P objects for use in their courses and websites. Please note that H5P objects created in the environment are visible to other users at Memorial and available for them to reuse and/or modify. If you do not wish to have your content reused, there are settings you can apply that will limit others’ ability to edit and/or change your item without your permission.
In addition to creating their own content, instructors can browse the H5P Resources Environment to view and potentially reuse H5P objects created by others at Memorial.
NOTE: If you wish to use and/or modify an object created by someone else, we recommend reaching out to the original creator for permission to reuse and/or modify the object. You should also review the copyright information linked to the object and provide appropriate attribution.
There are two ways to access Memorial’s H5P resources environment:
- Visit as a Guest
Visit CITL’s H5P Resources Environment to browse through and view the publicly available resources from Memorial’s learning community. You can use the guest account to do this; you do not need a username and password. The guest account allows you to reuse or embed an object but it does not allow you to create a new object or reuse an existing one.
- Create an Account
If you want to create and reuse resources, you will need an account with a username and password. Please request a resource area through our Support Centre. When your account is active, you can create and edit H5P objects in the “My resources” area.
Using H5P Objects
Reusing Existing H5P Objects
With proper attribution, you can reuse H5P objects created by others. If you wish, you can also modify objects to suit your own instructional needs.
If you choose to reuse a resource created by another author, you need to make a copy of the object and then make changes to it.
There are two scenarios for reusing an H5P object:
- You have rights to edit the resource (this may be the case if you are a co-instructor for a course):
- Open the resource, click “Reuse” on the resource and then click “Copy content” or click edit settings on the resource and in the Editor section click “Copy”.
- Open an area in “My resources”, click “Add an activity or resource” and then click paste. You can edit the resource here, making a new version. Be sure to rename it and use the new embed code in your course.
- You do not have rights to edit another user’s resource:
- Open the resource, click “Reuse” on the resource and then download (export) the h5p file.
- Open an area in “My resources”, click “Add an activity or resource” and then click upload. You can edit the resource here, making a new version.
Reuse H5P Resource by Another Creator
- Go to the H5P Resources Environment hosted by CITL (windmere.citl.mun.ca) and log in with your MUN username and password if prompted.
- Go to Home at the top of the page.
- You will see a page with all H5P resources created by instructors at Memorial. Open the object that you would like to reuse.
- Scroll to the bottom of the page and click Reuse.
- In the pop-up window that appears, click Download as an .h5p file – the file will be downloaded to your computer.
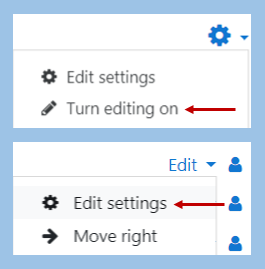
- At the top of the page, click My resources. Turn editing on in the top right corner of the screen.
- Click Add an activity or a resource, then select H5P.
- In the Package file area, upload the H5P file you have just saved on your computer. Save it with a different name.
- Click Use.
- Make the required changes.
- Click Save and return to course.
Note
You can also reuse a resource that exits on h5p.org or another website outside of our H5P Resources Environment that supports H5P resources. Follow the steps above starting with step 2.
Creating H5P Objects
- Go to the H5P Resources Environment hosted by CITL (windmere.citl.mun.ca) and log in with your MUN username and password if prompted.
- In the top left corner of the screen, select My resources.
- In the top right corner of the screen, turn on Edit mode.
- Select Add an activity or resource.
- Select Interactive Content, then click Add.
- Scroll down to the ‘Editor’ section of the page, and select the type of interactive object you want to create (you can click Details next to each object type for information, screen shots, and a content demo).
- Create your object. You may want to view the examples and tutorials provided with each activity type.
- Click Save and return to course.
Video Instructions
View the following video for a detailed step by step tutorial in accessing the H5P resources site and creating a H5P object.
H5P – Create your own interactive learning objects
H5P.org has a variety of tutorials for authors on their website. These tutorials provide an overview of the resource type and the steps to help you create the resource.
Organizing H5P Objects
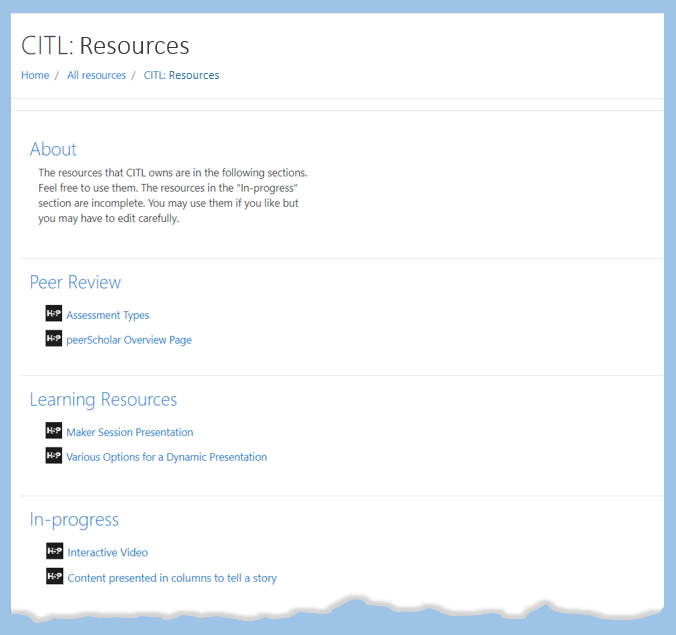
Organizing the resources that you have in the H5P Resources Environment will make them easier to use and manage. You can organize by course, subject area, user (if multiple users have access), etc. An effective way to do this is by using Topics. You can create a topic in one of your resource areas and add H5P resources to that topic.
Create a Topic
Creating topics within your resource area is optional but organizing into groups will be helpful if you have a large number of interactions.
- Ensure that editing is on — click the cog icon in the top right corner and click “Turn Editing on”
- Click “Add topics” at the bottom of the page
- Choose number of sections/topics you want to add and click “Add topics”
- To change the name of the topic, click the pencil icon next to the title, type the new name in its place, and press the “Enter” key.

Best Practice: Create an topic called “In Progress” to indicate to you and others that the resources within are incomplete.
Naming Conventions
Good naming conventions will also help with organization. Below we use the convention of module, activity name and activity type. Consider closely what naming convention you will use for your objects. As the number of objects grow, this convention will help you stay organized and be able to reference your objects quickly for changes and updates. As a rule of thumb, be as descriptive as possible with the names.
| Topic | Name of Resource |
|---|---|
| Spanish 1000 2020 Section 001 | Module 1 Numbers Audio Activity |
| Spanish 1000 2020 Section 001 | Module 1 Grammar FlipCards |
| Spanish 1000 2020 Section 001 | Module 2 Language Activity |
| In Progress | Pronunciation Practice 1 Audio Activity |
| Language Conference 2021 | ESL Tourism Interactive Video |
Example H5P Site
Embedding H5P Objects in Brightspace
Reusing versus Embedding a Resource
Embedding a resource provides a “link” to the original object — which means that any changes the original creator makes to the object will be reflected anywhere the resource is embedded.
Reusing a resource allows you to create a copy of an object and either use as is or, if permissions allow, modify the resource to meet your needs.
Embedding is the best choice if you want to have the regular updates/revisions; however, if you want to tweak or customize the object for your course (with the original creator’s permission), reusing is most suitable.
Embed an H5P Resource in Brightspace
If you choose to embed another user’s resource into your course or website you are simply accessing their resource in your course or website. The following are the steps to embed a resource in Brightspace:
- Select the “<> Embed” link from the bottom of any resource that you want to use.
- Copy the code from the Embed pop-up window.
- Click “Edit HTML” to edit the page on Brightspace.
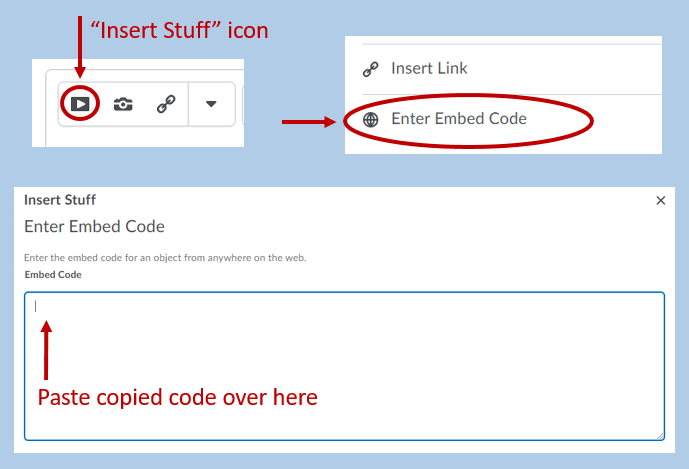
- Then click the “insert stuff” icon.
- Scroll down the drop-down menu and click “Enter Embed Code”.
- Paste copied code into the area. (Note: For object types that require the use of the microphone, also add “allow=”microphone” to the iframe parameters.)
- Click the “Next”.
- Click “Insert”.
Note
You cannot edit an H5P resource directly in Brightspace. When you edit a resource in the H5P Resources Environment, it will automatically update in Brightspace.